
Creating a handmade woven keychain is more than just a craft—it’s a small act of personal expression. Whether you're looking to add a unique touch to your keys, make thoughtful gifts, or simply unwind with a tactile creative project, weaving your own keychain offers both satisfaction and style. The best part? You don’t need advanced skills or expensive tools. With basic supplies and a little patience, you can craft a durable, eye-catching accessory in under an hour. This guide walks you through every stage, from choosing the right cord to finishing with a polished knot.
Why Make Your Own Woven Keychain?
Store-bought keychains are plentiful, but few carry the personality and craftsmanship of a handmade piece. A DIY woven keychain allows full control over color, texture, length, and pattern. It's also an excellent entry point into fiber crafts—low-cost, portable, and forgiving for beginners. Once mastered, the same techniques can be applied to bracelets, lanyards, or even decorative wall hangings.
Beyond aesthetics, handcrafting builds mindfulness. The repetitive motion of weaving promotes focus and relaxation, making this activity ideal for short breaks during the day. Plus, giving a handmade keychain as a gift carries emotional weight—each knot represents time, care, and intention.
Materials and Tools You’ll Need
Before beginning, gather these essential items. Most can be found at craft stores or repurposed from household supplies.
- Paracord or waxed cotton cord (2–3mm thickness) – Durable and easy to work with; available in dozens of colors.
- Keyring or split ring – Metal or plastic; choose based on desired durability.
- Scissors – Sharp enough to cut cord cleanly without fraying.
- Lighter or fray check solution – To seal cut ends and prevent unraveling.
- Tape or clip – For securing your work while weaving.
- Ruler or measuring tape – Ensures consistent length.
Choosing Your Weave Pattern
The visual appeal of your keychain depends largely on the weave pattern. Below are three beginner-friendly styles, each producing a distinct look:
| Pattern | Description | Difficulty | Best For |
|---|---|---|---|
| Square Knot | Alternating left and right knots create a flat, braided effect. | Beginner | Classic, symmetrical design |
| Diagonal Knot (Half-Hitch Spiral) | Knots progress diagonally, forming a spiral appearance. | Beginner+ | Dynamic, modern look |
| Cobra Weave | Dense, interlocking knots form a textured band. | Intermediate | Durability and rugged style |
For first-time weavers, the square knot is highly recommended. It’s intuitive, reversible if mistakes occur, and looks polished even with slight inconsistencies.
“Handweaving teaches rhythm and precision—qualities that translate into confidence with every finished piece.” — Lila Monroe, Textile Artist & Craft Educator
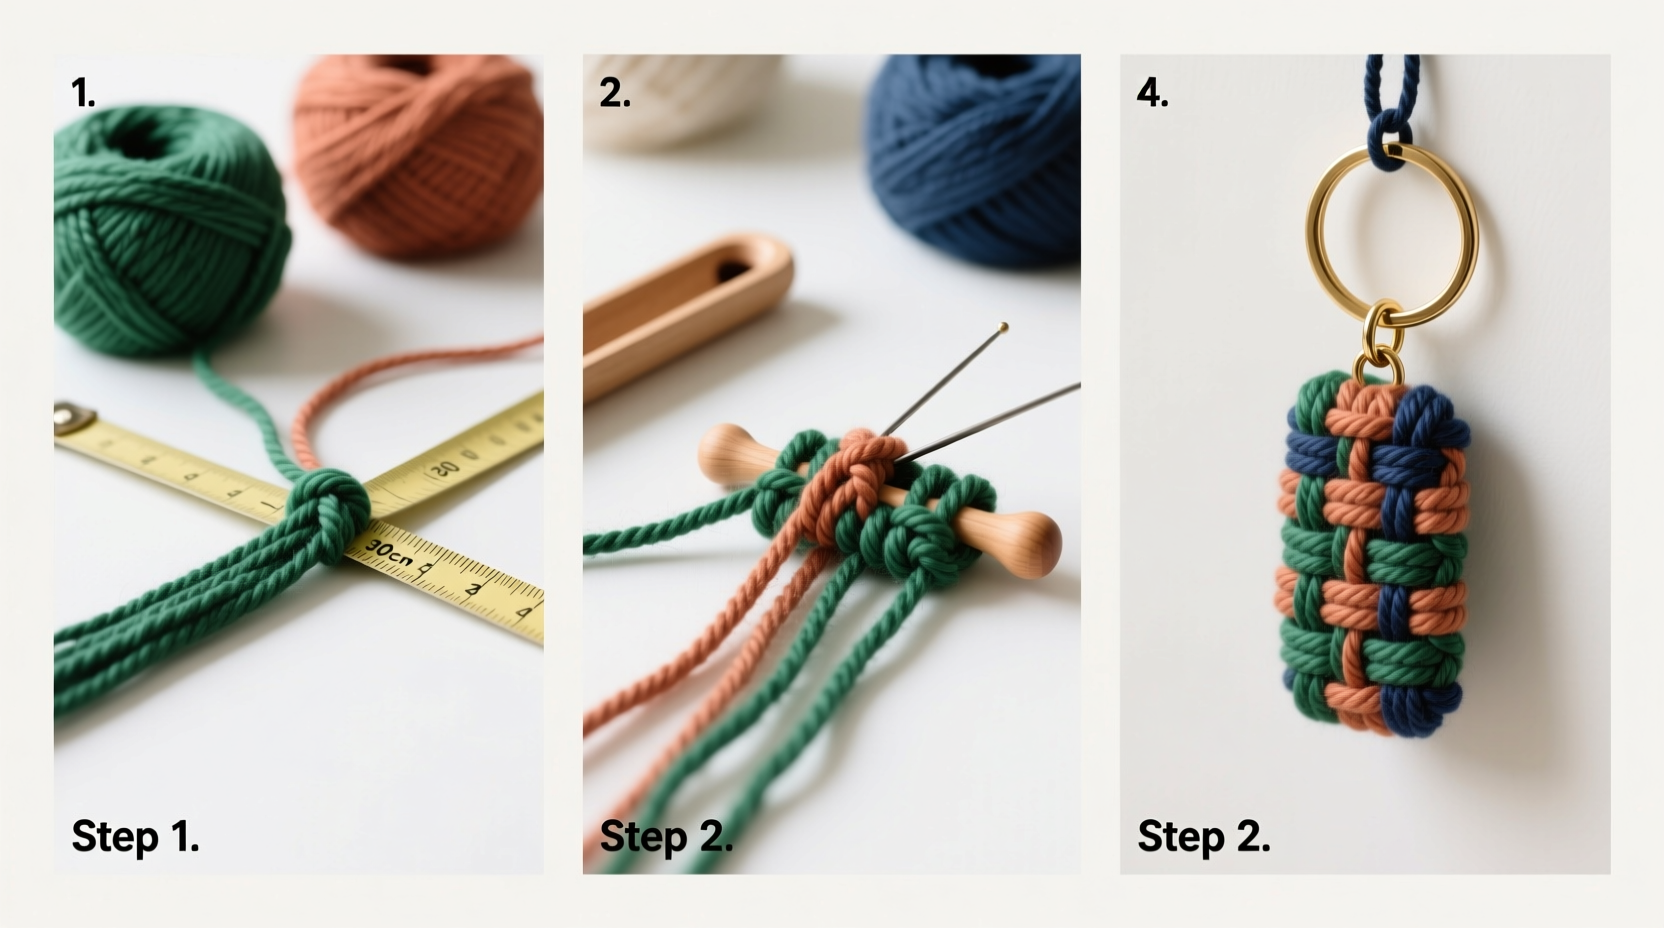
Step-by-Step Guide to Weaving a Square Knot Keychain
Follow this detailed process to create a clean, professional-looking keychain using the square knot pattern.
- Cut two cords: One long cord (working cord) about 90 cm (35 inches), and one shorter cord (filler cord) about 20 cm (8 inches). The longer cord will form the knots; the shorter one runs through the center.
- Attach to keyring: Fold the short filler cord in half and loop it through the keyring. Secure with a simple overhand knot beneath the ring so it hangs evenly down both sides.
- Position working cord: Place the long cord perpendicular across the two hanging strands of the filler. The long cord should cross over the left strand, go under the right, then back over the left—forming a “4” shape.
- Tie the first half of the square knot: Pull the long cord’s tail through the loop formed beneath the two filler strands. Tighten gently. You’ve completed the left-over-right half.
- Complete the square knot: Now reverse: bring the tail over the right filler strand, under the left, and up through the new loop. Pull tight. The knot should lie flat and symmetrical.
- Repeat: Continue tying square knots down the length of the keychain. Aim for 15–20 knots depending on desired thickness and length.
- Finish securely: Once the woven section reaches 3–4 cm (1.5 inches), trim the filler cords close to the last knot. Tuck the ends inside the weave if possible, or seal them flush with a lighter.
- Trim and seal: Cut the working cord to leave a 1 cm tail. Melt the end slightly with a lighter to prevent fraying, then press it against the final knot to embed it.
Real Example: Maya’s First Keychain Project
Maya, a college student with no prior crafting experience, decided to make keychains for her roommates’ birthdays. She chose bright contrasting colors—teal and coral paracord—and followed the square knot method. Her first attempt was uneven, but after adjusting her grip and slowing down, the second row tightened beautifully. By the fifth knot, she found a natural rhythm. In under 40 minutes, she completed four matching keychains. Her friends loved the personal touch, especially noticing the sealed ends and secure rings. Maya now keeps a mini kit in her backpack for downtime between classes.
Common Mistakes and How to Avoid Them
Even simple projects come with learning curves. Here are frequent pitfalls and how to fix them:
- Inconsistent tension: Leads to lopsided weaving. Pause every few knots to check alignment and adjust pressure.
- Frayed ends: Caused by dull scissors or skipping sealing. Always flame-seal synthetic cords like paracord.
- Twisted filler cords: Happens when the base strands rotate. Straighten them periodically by letting the piece dangle.
- Too short working cord: Measure generously—better to have excess than run out mid-weave.
Customization Ideas for Personal Flair
Once comfortable with the basics, experiment with design variations:
- Color blocking: Alternate sections of different colored cords.
- Striped patterns: Use multiple filler cords in contrasting hues.
- Add beads: Slide a small metal or wooden bead onto the filler before starting, then weave around it.
- Layered weaves: Combine square knots with diagonal sections for texture contrast.
- Initial charms: Attach a tiny engraved letter at the base before finishing.
FAQ
Can I wash my woven keychain?
Yes, but gently. Use mild soap and lukewarm water. Avoid soaking for long periods, especially with waxed cotton. Air dry completely before use.
How long should my keychain be?
A functional length is typically 3–5 cm (1.2–2 inches) of woven section. This provides enough grip without bulk. Total drop (including ring) should not exceed 7 cm for everyday usability.
Is paracord safe to use indoors?
Absolutely. Paracord is non-toxic and widely used in indoor crafts. Just ensure ends are properly sealed to prevent shedding.
Final Checklist Before You Begin
- ✅ Choose your cord type and color(s)
- Select based on durability and aesthetic preference.
- ✅ Cut cords to correct length
- 90 cm working cord, 20 cm filler (adjustable for longer designs).
- ✅ Prepare keyring and secure base knot
- Ensure the filler cord is centered and stable.
- ✅ Test knot tension on scrap piece
- Practice one or two square knots to calibrate pressure.
- ✅ Keep workspace well-lit and clutter-free
- Reduces errors and improves focus.
Conclusion
Crafting a woven keychain is a small investment of time that yields lasting rewards. Beyond the tangible product, the process nurtures patience, attention to detail, and creative confidence. Whether you stick to classic patterns or evolve into complex designs, each keychain becomes a marker of progress. These handmade pieces serve as daily reminders of what you’re capable of creating with your own hands.


 浙公网安备
33010002000092号
浙公网安备
33010002000092号 浙B2-20120091-4
Comments
No comments yet. Why don't you start the discussion?