
Creating a new user account on your computer is one of the most practical ways to maintain privacy, improve security, and allow multiple people to use the same device without interfering with each other’s files and settings. Whether you're setting up a laptop for a family member, configuring a shared workstation, or simply want to separate work from personal use, a dedicated user profile ensures a clean, personalized experience. This guide walks you through the process across major operating systems—Windows, macOS, and Linux—with clear steps, essential tips, and real-world considerations.
Why Create Separate User Accounts?
A single-user system may seem convenient, but it quickly becomes problematic in households or small offices. When everyone uses the same login, personal files get mixed, browser histories overlap, and accidental changes to system settings can disrupt workflows. A separate account for each person enhances both usability and security.
User accounts isolate preferences, documents, desktop layouts, and application settings. They also allow administrators to enforce access controls—for example, restricting children from installing software or limiting guest users to basic browsing.
“User segregation is a foundational principle of digital hygiene. It minimizes risk and simplifies troubleshooting.” — Dr. Alan Torres, Cybersecurity Consultant at NetShield Labs
Step-by-Step Guide: Creating a New User Account
The exact method varies depending on your operating system. Below are detailed instructions for the three most common platforms.
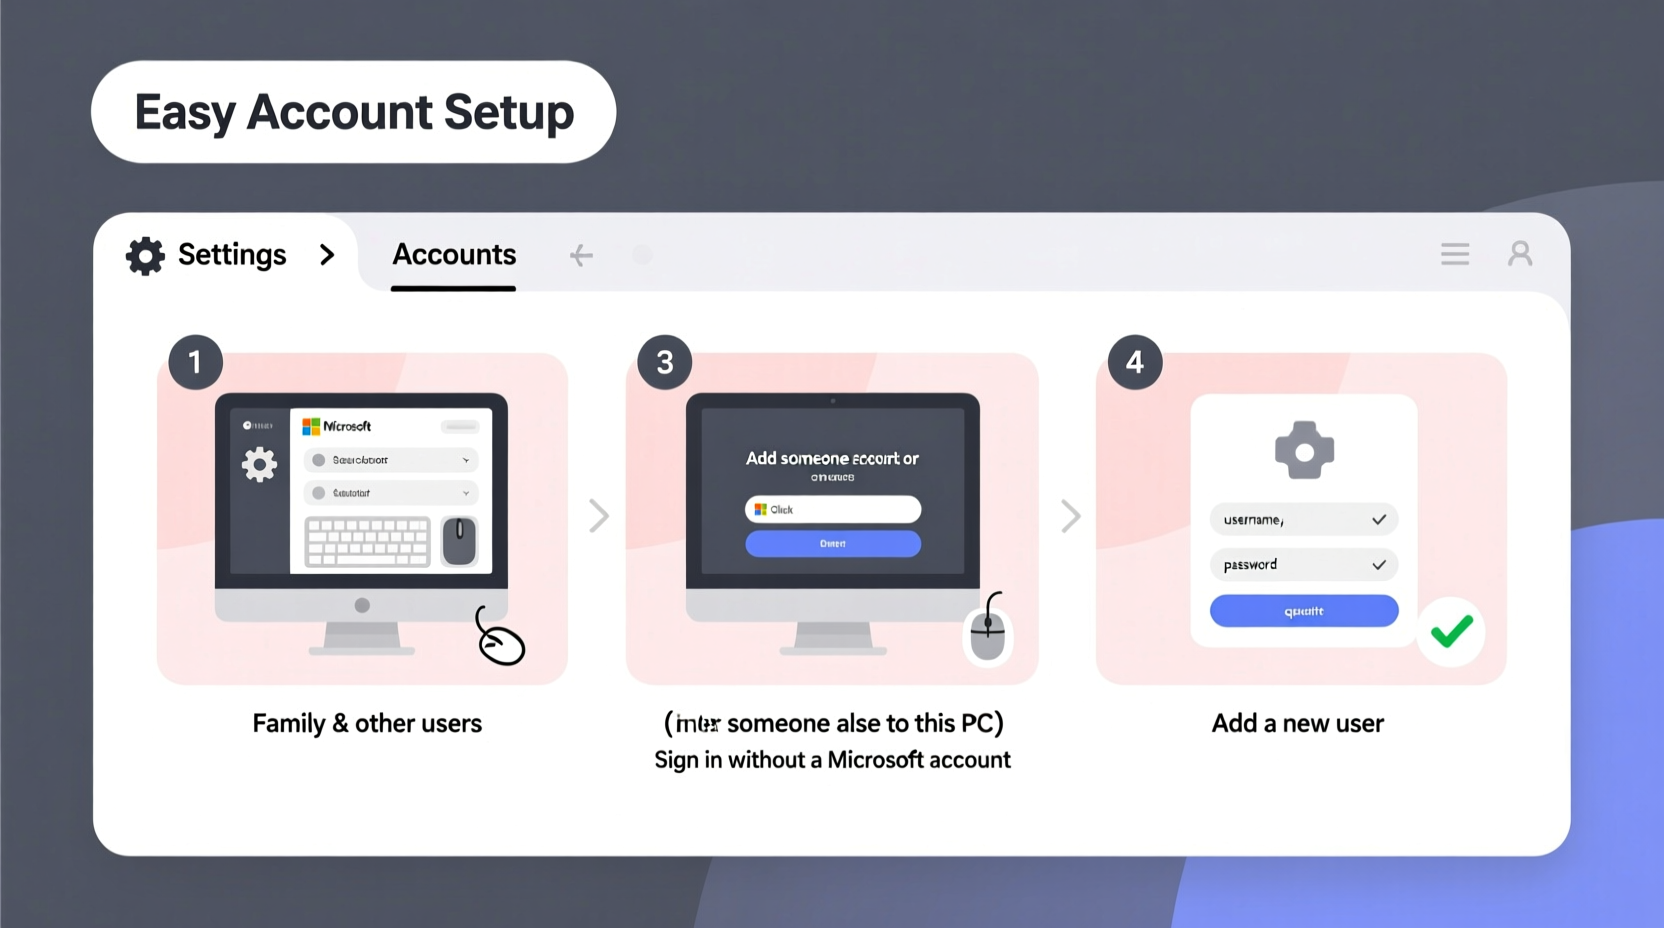
On Windows 10 and 11
- Click the Start menu, then select Settings (gear icon).
- Navigate to Accounts > Family & other users.
- Under “Other users,” click Add account.
- Choose I don’t have this person’s sign-in information if they don’t have a Microsoft account.
- Select Add a user without a Microsoft account.
- Enter a username, password (optional), and security questions.
- Click Next. The account will appear under “Other users.”
- To assign administrator rights, click the account, select Change account type, and choose Administrator.
On macOS (Ventura and Later)
- Open System Settings from the Apple menu.
- Click Users & Groups in the sidebar.
- Unlock the settings by clicking the lock icon and entering your admin password.
- Click the + button below the list of users.
- Select the account type: Administrator, Standard, or Managed with Parental Controls.
- Enter the full name, account name (used internally), password, and hint.
- Click Create User.
- The new user will appear in the login screen after restart.
On Ubuntu Linux (GNOME Desktop)
- Open Settings from the Activities overview.
- Go to Users.
- Click the Unlock button and authenticate with your password.
- Click Add User….
- Enter the full name, username, and password.
- Choose account type: Standard or Administrator.
- Click Add.
- The new user can now log in from the display manager (e.g., GDM) at startup.
Best Practices for Secure and Efficient Account Management
Setting up an account is just the beginning. Proper configuration ensures long-term usability and protection against misuse.
Checklist: Setting Up a New User Account Safely
- ✅ Assign the correct account type (admin vs. standard)
- ✅ Set a strong, unique password
- ✅ Enable disk encryption if not already active
- ✅ Configure automatic updates
- ✅ Review privacy settings (location, camera, microphone access)
- ✅ Install necessary software before handing over the device
- ✅ Educate the user on logging out properly
Do’s and Don’ts When Managing Multiple Users
| Do’s | Don’ts |
|---|---|
| Create individual accounts for each regular user | Share admin passwords among non-technical users |
| Use standard accounts for everyday tasks | Store sensitive data on public or guest profiles |
| Regularly review inactive accounts | Allow autologin on shared computers |
| Enable full-disk encryption | Disable firewall or antivirus for convenience |
Real Example: A Family Laptop Setup
The Patel family recently bought a new laptop for their two children and themselves. Initially, they all used the same admin account. Within weeks, the younger son accidentally deleted critical drivers while trying to uninstall a game. The older daughter’s school documents were moved into random folders by her brother. Frustrated, Mr. Patel followed this guide to restructure the system.
He created four accounts: one admin (his own), one standard for his wife, and two standard accounts with parental controls for the kids. He disabled auto-login, enabled BitLocker encryption on Windows, and scheduled weekly backups. Each child now has a personalized desktop, safe browsing limits, and no access to system settings. Since the change, file conflicts dropped to zero, and the system runs more smoothly.
Frequently Asked Questions
Can I delete a user account without losing their files?
Yes, but only if you manually back them up first. When deleting a user in Windows or macOS, there is usually an option to keep the home folder. Make sure to copy those files to another location or external drive before confirming deletion.
What’s the difference between a local and Microsoft/Apple ID account?
A local account stores credentials directly on the device and doesn’t sync with the cloud. A Microsoft or Apple ID enables cloud syncing of settings, app purchases, and services like OneDrive or iCloud. However, local accounts offer more privacy and work offline by default.
Is it safe to let someone use an administrator account?
Only if they understand system risks. Admins can install software, modify security settings, and access other users’ files (if permissions allow). For most users, a standard account is safer. Grant temporary admin rights only when necessary, such as during software installation.
Conclusion
Creating a new user account is a simple yet powerful way to enhance your computer’s usability, organization, and security. Whether you're managing a household device, supporting remote learning, or optimizing a shared workspace, taking a few minutes to set up proper user profiles pays off in reduced conflicts, better privacy, and smoother performance.


 浙公网安备
33010002000092号
浙公网安备
33010002000092号 浙B2-20120091-4
Comments
No comments yet. Why don't you start the discussion?