
In communities across the country, feral and stray cats rely on kind individuals to provide safe, dry, and insulated shelter from freezing winters and sweltering summers. A well-built wooden cat house can make the difference between survival and suffering. While many DIY options exist, using professionally designed, downloadable PDF plans ensures accuracy, durability, and proper insulation tailored to outdoor conditions. This guide walks through every phase of acquiring and using these plans to construct a long-lasting, protective shelter.
Why Use Downloadable PDF Plans?
Building a cat shelter without a plan often leads to structural flaws, poor insulation, or water intrusion. High-quality PDF plans eliminate guesswork. They include precise measurements, material lists, cut diagrams, and assembly instructions—often developed by experienced wildlife advocates or carpenters familiar with outdoor animal housing.
These digital blueprints are typically created with real-world testing in mind. Many include features like elevated floors, dual-entry tunnels, sloped roofs for runoff, and removable panels for cleaning—all critical for maintaining hygiene and safety.
“Using tested plans drastically increases the effectiveness of a cat shelter. I’ve seen poorly built boxes fail within weeks due to moisture damage. Good design prevents that.” — Dr. Linda Harper, Urban Wildlife Veterinarian
How to Find Reliable PDF Plans Online
Not all free plans are equal. Some lack detail or use inappropriate materials. To find trustworthy resources:
- Search for plans from animal welfare organizations such as Alley Cat Allies, Best Friends Animal Society, or local humane societies.
- Look for user reviews or testimonials if downloading from independent creators (e.g., Etsy, Patreon, or woodworking blogs).
- Ensure the plan includes full dimensions, recommended lumber sizes, and weatherproofing guidance.
- Verify whether the design accounts for insulation (e.g., foam board or straw-filled walls) and drainage.
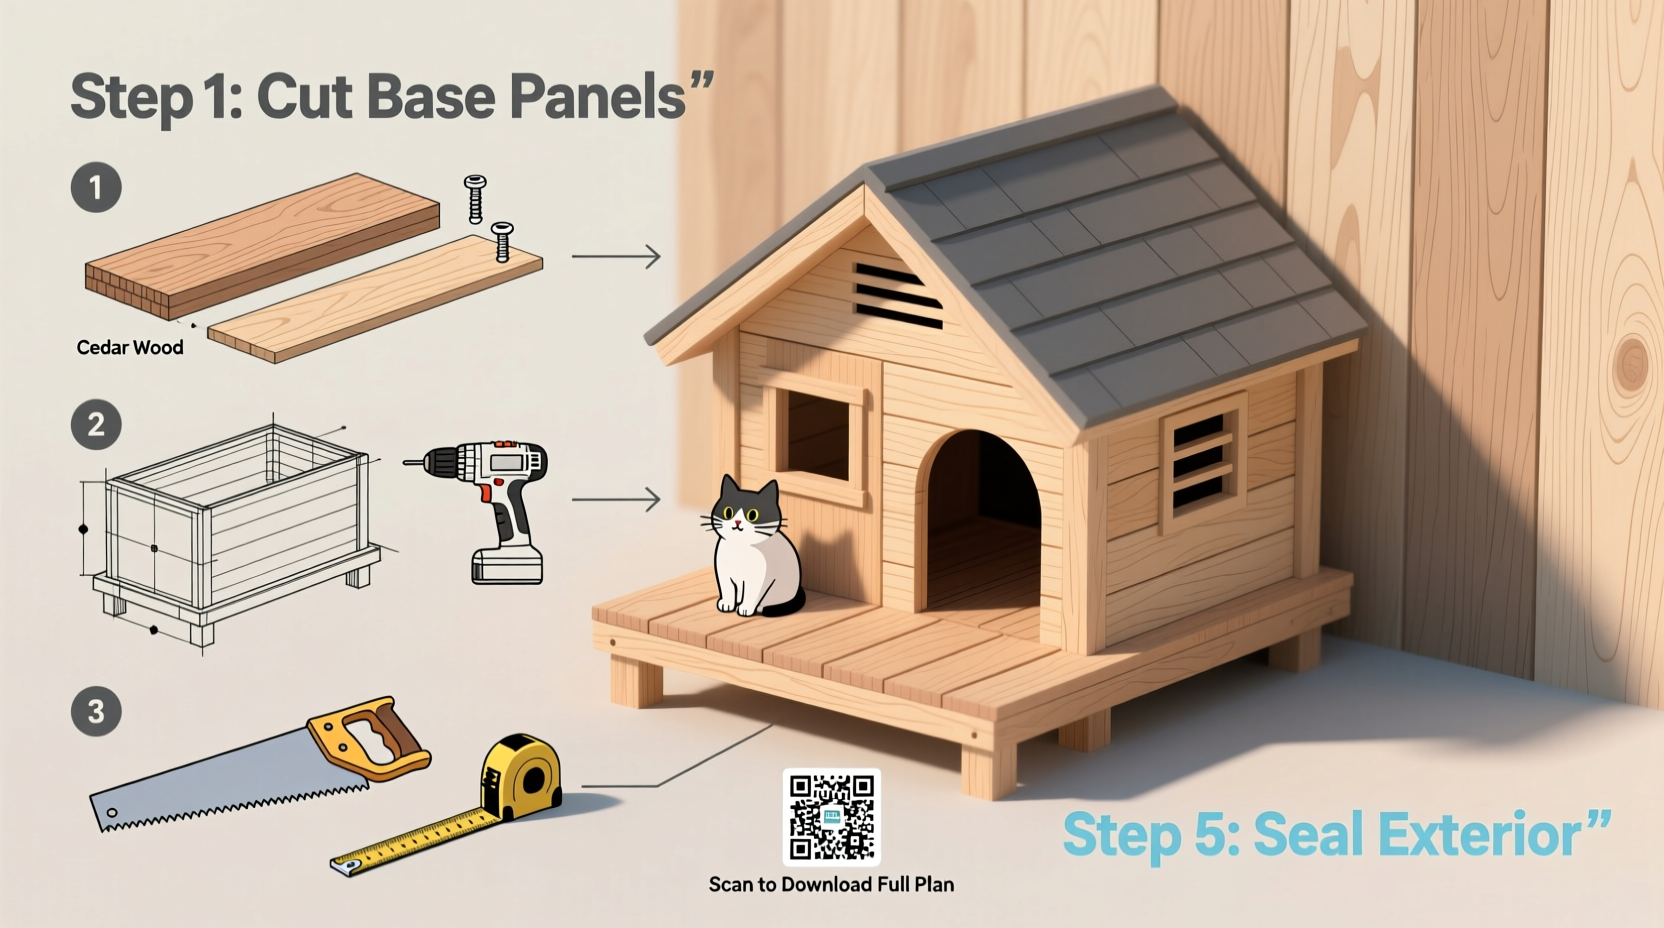
Step-by-Step Construction Using PDF Plans
Once you've downloaded a reputable plan, follow this sequence to build a functional, durable shelter:
- Review the Entire Plan First: Print it out or keep it open on a tablet. Study each page, noting required tools, cuts, and fasteners.
- Gather Materials and Tools: Common items include:
- Exterior-grade plywood (½” or ¾”)
- Wood screws (stainless or coated for rust resistance)
- Waterproof wood glue
- Latex or silicone caulk
- Insulating foam board or rigid insulation
- Saw, drill, measuring tape, clamps
- Cut All Pieces Accurately: Follow the cutting diagram. Double-check measurements before sawing. Label each piece (e.g., “Front,” “Roof”) to avoid confusion during assembly.
- Assemble the Base Frame: Build a raised floor at least 2–3 inches off the ground to prevent water absorption. Attach legs or a skid base using corner brackets.
- Attach Walls and Roof: Join sides with screws and glue. Ensure joints are tight. Install a sloped roof that overhangs slightly to shield entrances from rain.
- Install Insulation: Line interior walls with rigid foam insulation (avoid fiberglass, which can irritate skin and is unsafe for animals). Seal edges with caulk.
- Add Entry Tunnels: Use PVC pipes or wooden funnels angled downward to block wind and rain. Position entries away from prevailing winds.
- Seal All Seams: Apply waterproof caulk around joints, screw holes, and edges. Paint exterior surfaces with non-toxic, exterior-grade sealant.
- Finish and Test: Let dry completely. Place a small bale of straw inside (not blankets—straw sheds moisture and provides warmth). Elevate the house on bricks or pallets in its final location.
Essential Features of a Durable Feral Cat House
A truly effective shelter must withstand seasonal extremes. The following table compares basic versus advanced builds:
| Feature | Basic DIY Box | PDF-Planned Shelter |
|---|---|---|
| Floor Elevation | Flat or ground-level | Raised 2–4 inches on legs |
| Insulation | None or makeshift | Full-wall foam board |
| Weatherproofing | Paint only | Sealed seams + overhanging roof |
| Entry Design | Open doorway | Offset tunnel to block wind |
| Maintenance Access | Difficult to clean | Removable roof or side panel |
Real-World Example: Community Shelter Initiative
In Ithaca, New York, a volunteer group used standardized PDF plans from Alley Cat Allies to build 15 shelters for a managed colony near a university campus. Each unit was constructed from recycled exterior plywood and lined with repurposed insulation from construction sites. After one winter, all shelters remained dry and intact, even during heavy snowfall. Colony caretakers reported no cold-related injuries—a marked improvement over previous years when homemade boxes collapsed or flooded.
The success was attributed directly to consistent design and detailed instructions. Volunteers shared the same PDF file, ensuring uniformity and ease of repair. One organizer noted, “We didn’t waste time fixing mistakes. We spent time placing shelters where they were needed most.”
Checklist: Building Your Cat Shelter from PDF Plans
- ☐ Download a trusted, tested PDF plan from a reputable source
- ☐ Gather all materials and tools before starting
- ☐ Cut pieces precisely using labeled diagrams
- ☐ Raise the base at least 2 inches off the ground
- ☐ Install rigid insulation on all interior walls
- ☰ Use waterproof glue and rust-resistant screws
- ☐ Seal all seams and joints with exterior caulk
- ☐ Paint or seal exterior with non-toxic, weather-resistant finish
- ☐ Add entry tunnels facing away from wind
- ☐ Place on bricks or pallets in a quiet, covered area
- ☐ Fill interior with straw (never cotton or fabric)
Frequently Asked Questions
Can I modify the PDF plan to make a larger shelter?
Yes, but maintain key features like insulation, elevation, and ventilation. For multiple cats, consider building separate small units instead of one large one—smaller spaces retain heat better.
Where should I place the cat house?
Choose a quiet, elevated spot protected from wind and flooding—under a porch, behind shrubbery, or beside a garage. Face the entrance away from prevailing winds and ensure easy access for caretakers.
How do I maintain the shelter after installation?
Inspect monthly. Replace wet or matted straw. Clean interior surfaces with mild vinegar solution if needed. Reapply sealant annually, especially on roof edges and joints.
Final Thoughts and Call to Action
Providing safe shelter for feral cats isn’t just an act of kindness—it’s a practical step toward humane community animal management. With downloadable PDF plans, anyone with basic tools and willingness can build a structure that lasts for years, protecting vulnerable animals from harsh elements.
Start today: search for a vetted plan, gather your supplies, and build something that matters. Share your completed project online to inspire others. Together, we can create safer winters—one sturdy cat house at a time.


 浙公网安备
33010002000092号
浙公网安备
33010002000092号 浙B2-20120091-4
Comments
No comments yet. Why don't you start the discussion?