
Drawing a monkey doesn’t require years of artistic training or advanced tools. With a few basic shapes and structured steps, anyone—from beginners to intermediate artists—can create a realistic and expressive monkey sketch. Monkeys are fascinating subjects due to their dynamic postures and emotive faces, making them ideal for practicing observational drawing and proportion. This guide breaks down the process into manageable stages, using accessible techniques that emphasize simplicity and accuracy.
Understanding Monkey Anatomy: A Foundation for Realism
Before putting pencil to paper, it helps to understand the underlying structure of a monkey’s body. While species vary, most monkeys share common physical traits: long limbs, flexible tails (in many species), rounded heads, and expressive facial features. Focus on general proportions rather than exact biological detail unless you're aiming for scientific illustration.
The key areas to observe include:
- Head-to-body ratio: Typically around 1:3—meaning the head is about one-third the height of the torso.
- Limb length: Arms are often longer than legs, especially in arboreal species like spider monkeys.
- Tail usage: In some monkeys, the tail acts as a fifth limb, so consider its curvature and attachment point near the lower back.
- Facial structure: Flatter faces with prominent eyes, small ears, and defined nasal areas.
“Simplifying complex forms into geometric shapes is the artist’s greatest tool for accuracy.” — Daniel Reyes, Illustration Instructor at the National Art Academy
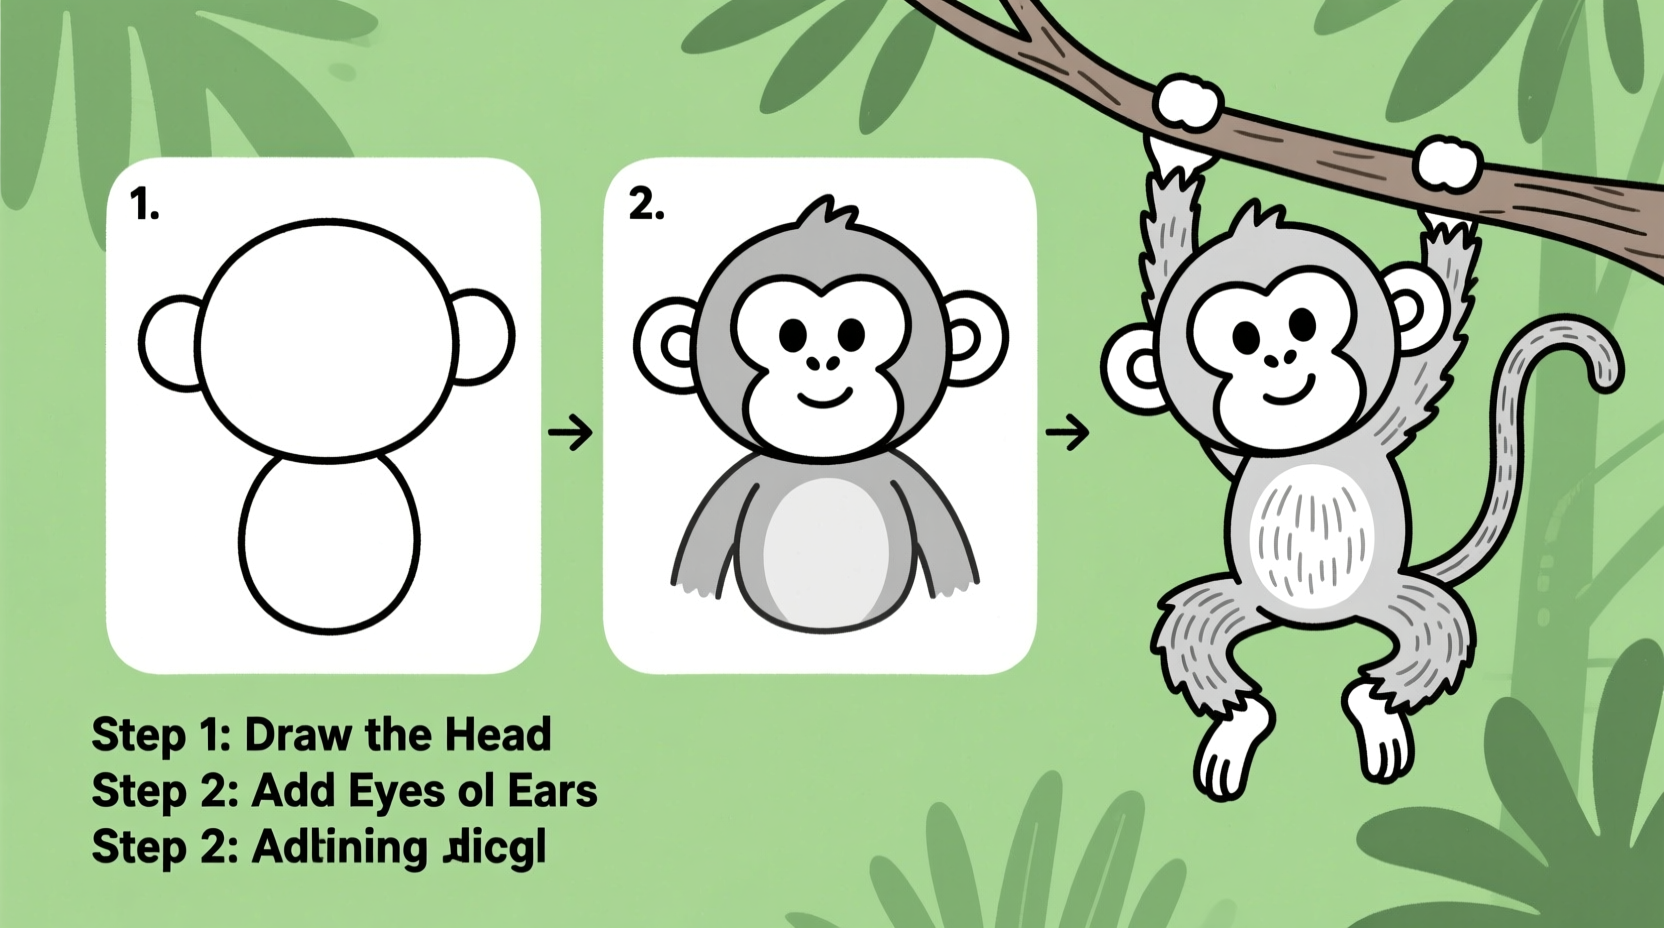
Step-by-Step Guide to Drawing a Sitting Monkey
This sequence walks through creating a naturalistic sitting monkey using only basic shapes and gradual refinement. Use a soft pencil (2B or 4B) for sketching and a harder pencil (HB) for final lines.
- Draw the Head Circle: Begin with a medium-sized circle for the head. Place it slightly above center on your page to allow space for the body below.
- Add the Jawline: Sketch a larger oval beneath the circle, tilted slightly forward, to form the lower face and jaw. Connect it smoothly to the head circle.
- Suggest the Torso: Draw an elongated egg shape vertically beneath the jaw. This will represent the chest and upper abdomen.
- Position the Limbs: Lightly sketch two curved lines extending downward for the arms. For the legs, draw two bent ovals beneath the torso, angled outward to suggest a seated posture.
- Outline the Tail: From the base of the torso, draw a long, gently coiling line upward and backward. Let it curve loosely like a question mark.
- Refine Facial Features: Inside the head, draw two almond-shaped eyes near the top. Add a small inverted triangle for the nose bridge and a short curved line for the mouth. Position small rounded shapes on either side for ears.
- Define Hands and Feet: At the end of each limb, add simplified mitt-like shapes with three to four short lines indicating fingers or toes.
- Connect and Smooth Shapes: Trace over your construction lines with confident strokes, blending circles and ovals into organic monkey contours. Erase unnecessary guidelines.
- Add Fur Texture: Use short, flicking pencil strokes around the head, shoulders, and back to simulate fluffy fur. Keep strokes directional—following the flow of hair growth.
- Shade for Depth: Apply gentle shading under the chin, inside the ears, beneath the arms, and along the inner legs. Use a blending stump or tissue to soften gradients.
Timeline for Completion
| Stage | Time Estimate | Description |
|---|---|---|
| Construction Sketch | 5–7 minutes | Basic shapes and placement |
| Detail Refinement | 10–12 minutes | Eyes, hands, tail, and facial features |
| Outlining & Cleanup | 5 minutes | Finalizing clean lines |
| Texturing & Shading | 10–15 minutes | Fur, depth, and contrast |
| Total | ~30–40 minutes | Ideal for a focused session |
Adapting Techniques for Different Skill Levels
Whether you’re new to drawing or building on existing skills, this method scales effectively.
For Beginners: Simplify Further
Focus on capturing the essence rather than precision. Replace detailed limbs with stick-like arms and simplified foot ovals. Use a single continuous line to outline the head and body together. Prioritize symmetry and balance over realism.
For Intermediate Artists: Add Expression and Movement
Introduce subtle gestures—tilt the head, angle the eyes toward an imaginary object, or lift one hand as if reaching. Experiment with foreshortening by drawing one arm closer to the viewer. Incorporate cross-contour lines to suggest muscle and volume beneath the fur.
For Advanced Practitioners: Explore Realism and Mediums
Use charcoal or graphite powder to build rich tonal ranges. Layer textures with different pencil grades (2H to 6B). Consider adding a background element like tree bark or foliage to contextualize the animal within its habitat.
Dos and Don’ts When Drawing Monkeys
| Do’s | Don’ts |
|---|---|
| Use light initial sketches to avoid deep indentations | Press too hard early in the process |
| Check proportions frequently using comparative measurement (e.g., eye width = distance between eyes) | Ignore negative space around the figure |
| Keep erasers handy for correcting outlines | Rush into detailing before establishing correct shape |
| Study real monkey behavior for natural poses | Copied cartoonish styles without understanding anatomy first |
Mini Case Study: From Frustration to Confidence
Sarah, a hobbyist drawer with no formal training, struggled to make her animal sketches look lifelike. Her early attempts at drawing monkeys resulted in stiff, disproportionate figures that lacked character. After following a structured approach similar to this guide—starting with circles and ovals, then gradually refining details—she noticed immediate improvement. By focusing on one step at a time and allowing herself to make mistakes during the sketch phase, her third attempt captured a playful capuchin monkey mid-gesture, complete with textured fur and alert eyes. Within two weeks, she completed a small series of primate drawings and shared them in a local art group, receiving positive feedback for her attention to proportion and expression.
Essential Drawing Checklist
Follow this checklist to ensure consistent results every time:
- ☐ Gather materials: Pencil (HB, 2B, 4B), eraser, sharpener, paper
- ☐ Choose a clear reference image (preferably high-resolution and well-lit)
- ☐ Lightly sketch primary shapes: head, torso, limbs
- ☐ Confirm proportions using comparative measuring
- ☐ Define facial features with attention to eye alignment
- ☐ Clean up construction lines after finalizing outlines
- ☐ Add texture with directional strokes mimicking fur patterns
- ☐ Apply shading to enhance dimension and mood
- ☐ Step back periodically to assess overall balance
- ☐ Sign your artwork upon completion!
Frequently Asked Questions
Can I draw a monkey without any prior experience?
Absolutely. The step-by-step method outlined here uses foundational shapes anyone can draw. With patience and practice, even first-time artists produce recognizable and satisfying results.
What kind of pencil should I use?
Start with a 2B pencil for sketching—it’s soft enough to create visible lines but not so dark that errors become difficult to erase. Use an HB for final outlines and a 4B or 6B for deeper shading.
How do I make my monkey look more expressive?
Facial expression hinges on eye shape and eyebrow positioning. Slightly narrowing the eyes or angling them downward conveys curiosity or mischief. Pair this with a tilted head or open mouth for added personality.
Final Thoughts and Next Steps
Drawing a monkey is more than just replicating a likeness—it’s an exercise in observation, patience, and creative problem-solving. By breaking down a complex subject into simple components, you build confidence and sharpen essential drawing skills applicable to all kinds of animals and figures. Mastery comes not from perfection, but from repetition and mindful practice.


 浙公网安备
33010002000092号
浙公网安备
33010002000092号 浙B2-20120091-4
Comments
No comments yet. Why don't you start the discussion?