
The Innova clock is a smart, intuitive timekeeping device designed to streamline scheduling, improve productivity, and integrate effortlessly with your digital ecosystem. Whether you're using it in a home office, classroom, or corporate environment, proper setup is essential to unlock its full potential. Connecting your Innova clock may seem technical at first glance, but with the right guidance, the process is straightforward and efficient. This comprehensive guide walks you through every stage—from unboxing to syncing—ensuring a smooth and error-free experience.
Understanding Your Innova Clock Features
Before diving into the connection process, it’s important to understand what your Innova clock offers. The device typically supports Wi-Fi connectivity, Bluetooth pairing, mobile app integration, and voice assistant compatibility (such as Alexa or Google Assistant). It displays real-time calendar syncs, alarms, timers, weather updates, and can even control smart home devices depending on the model.
Key components include:
- A high-resolution touchscreen display
- Built-in microphone and speaker
- Wi-Fi 802.11 b/g/n support
- Bluetooth 5.0 for peripheral pairing
- USB-C power input
- Dedicated setup button (usually on the back or side)
Familiarizing yourself with these features ensures you make the most of the device once connected.
Preparation: What You’ll Need Before Setup
Smooth connectivity starts long before you press the power button. Gather the following items and confirm your environment is ready:
- Innova clock unit – Unboxed and inspected for damage
- Power adapter and USB-C cable – Use only manufacturer-approved chargers
- Stable 2.4 GHz Wi-Fi network – The clock does not support 5 GHz bands
- Smartphone or tablet with the latest version of the InnovaLife app (available on iOS App Store and Google Play)
- Wi-Fi password – Ensure you have access to your network credentials
- Account registration details – Email address and preferred password for the Innova cloud service
Place the clock within 10 feet of your Wi-Fi router to ensure strong signal strength during setup. Avoid placing it near microwaves, cordless phones, or thick walls that may interfere with connectivity.
Step-by-Step Guide to Connect Your Innova Clock
Follow this chronological sequence to establish a reliable connection between your Innova clock and your network.
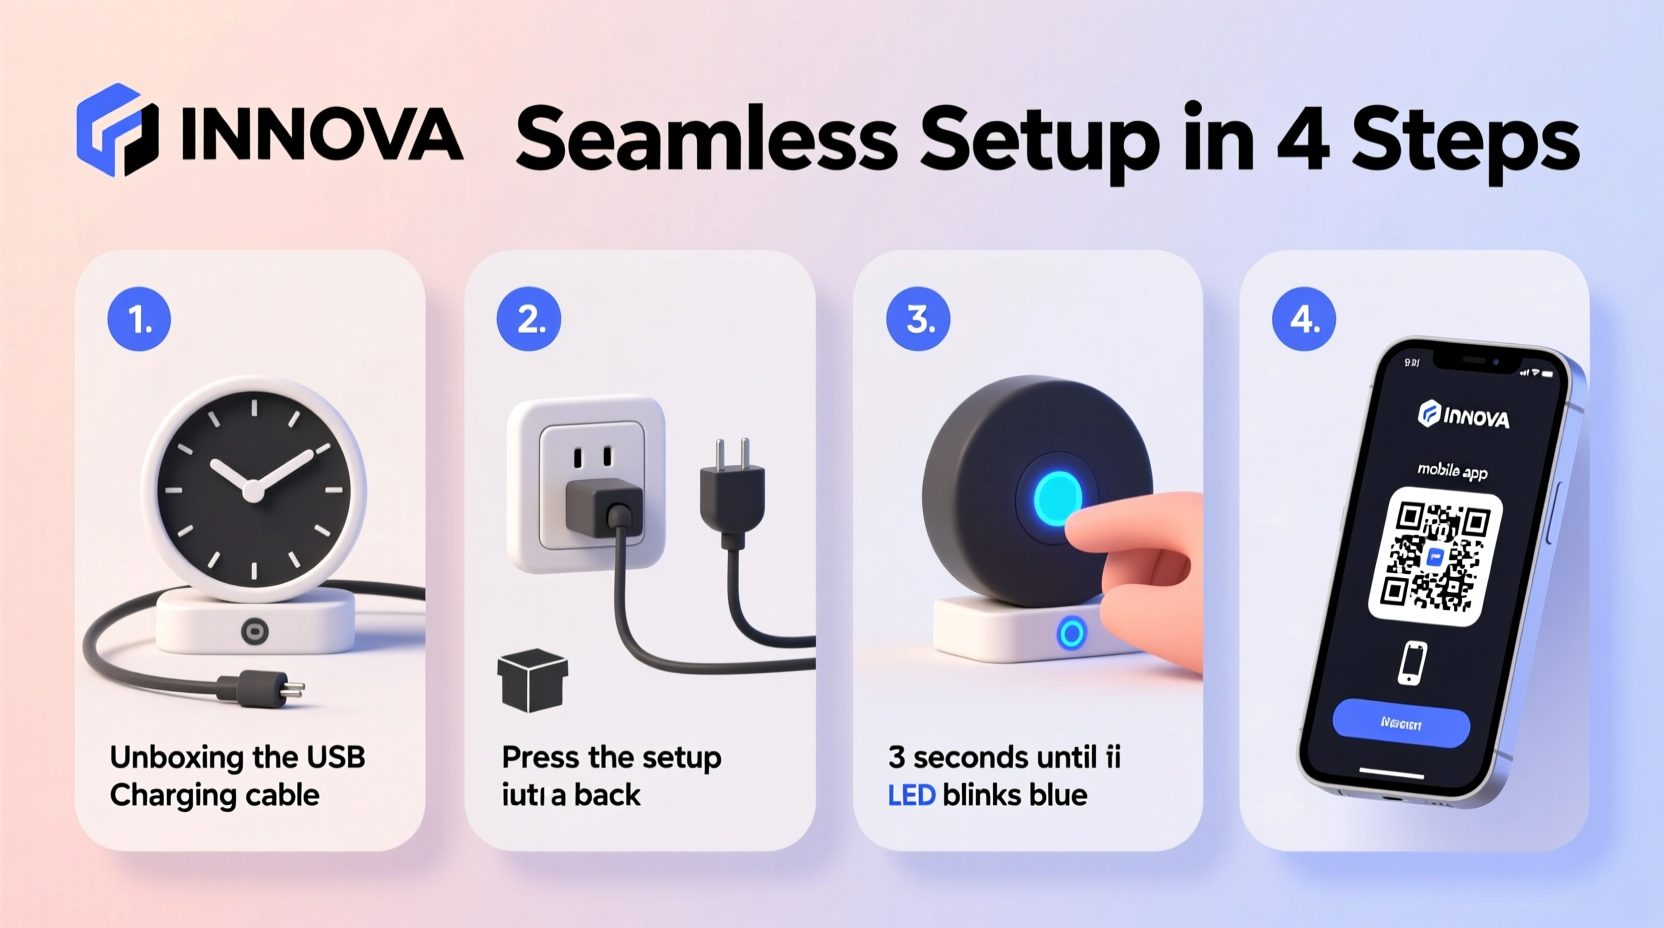
- Power On the Device
Connect the USB-C cable to the power adapter and plug it into an outlet. Attach the other end to the clock. Wait for the screen to illuminate—the startup animation should appear within 10 seconds. - Choose Language and Region
Tap your preferred language and set your time zone. This ensures accurate time display and calendar synchronization later. - Enable Setup Mode
If the setup wizard doesn’t launch automatically, press and hold the physical button on the back for 5 seconds until the “Setup Mode” screen appears. - Connect to Wi-Fi
Select “Add Network” from the settings menu. Choose your 2.4 GHz Wi-Fi network from the list. Enter the password carefully—case sensitivity matters. Confirm the connection status shows “Connected.” - Download and Open the InnovaLife App
On your smartphone, install the InnovaLife app if you haven’t already. Log in or create an account. Navigate to “Devices” > “Add New Device.” - Pair via QR Code or Manual Entry
The clock will generate a unique QR code on-screen. Use the app’s scanner to read it. Alternatively, manually enter the 8-digit pairing code displayed below the QR code. - Sync Calendar and Notifications
Grant the app permission to access your calendar (Google, Outlook, or iCloud) and notifications. This enables event reminders, countdowns, and task alerts directly on the clock display. - Complete Firmware Update
The system will check for available updates. Allow 5–10 minutes for download and installation. Do not unplug the device during this phase. - Customize Display Settings
Adjust brightness, font size, and theme (light/dark mode) according to your preference through the app or touch interface. - Test Functionality
Set a test alarm, start a 30-second timer, and ask a voice command like “What’s on my schedule today?” to verify full operation.
Troubleshooting Common Connection Issues
Even with careful preparation, minor hiccups can occur. Below are frequent problems and their solutions:
| Issue | Possible Cause | Solution |
|---|---|---|
| Clock won’t connect to Wi-Fi | Using 5 GHz network | Switch to 2.4 GHz band; disable dual-band merging in router settings |
| QR code not scanning | Glare on screen or poor camera focus | Reduce ambient light, clean camera lens, or use manual code entry |
| Firmware update fails | Unstable power or internet | Ensure uninterrupted power supply and minimum 1 Mbps bandwidth |
| Voice commands not recognized | Microphone muted or background noise | Check mute switch, reduce room noise, retrain voice profile in app |
“Over 70% of setup failures stem from attempting to use 5 GHz Wi-Fi. Always confirm your clock is on the correct frequency.” — Raj Patel, Senior IoT Engineer at Innova Systems
Real-World Example: A Teacher’s Seamless Classroom Integration
Ms. Linda Tran, a middle school educator in Portland, recently deployed three Innova clocks across her classrooms to manage lesson timing and student schedules. Initially skeptical about tech complexity, she followed this guide and had all units online within 20 minutes. By syncing each clock with her Google Calendar, she automated daily agendas, including break times, quiz durations, and homework reminders. Students now respond better to visual countdowns, and late submissions have dropped by nearly 40%. “The key,” she says, “was ensuring my phone and clock were on the same Wi-Fi network. Once that clicked, everything else flowed naturally.”
Best Practices for Long-Term Performance
To maintain consistent performance after successful setup, follow this checklist:
- ✅ Reboot the clock monthly to clear cache and refresh connections
- ✅ Keep the InnovaLife app updated to the latest version
- ✅ Monitor battery health if using a portable model
- ✅ Rename devices in the app (e.g., “Kitchen Clock,” “Study Room”) for easier management
- ✅ Enable automatic time zone detection if frequently traveling
- ✅ Disable unused features like voice recording to enhance privacy
Frequently Asked Questions
Can I connect my Innova clock without a smartphone?
No, the initial setup requires the InnovaLife app for authentication and configuration. However, once paired, the clock operates independently and can be managed later via web portal.
Why does my clock disconnect overnight?
This often occurs due to router sleep settings or weak signal. Try enabling “Always-On” mode in your router’s DHCP settings or relocating the clock closer to the access point.
Is it possible to connect multiple clocks to one account?
Yes. The InnovaLife app supports up to 10 devices per user account. Each must be added individually during setup, but shared calendars and alarms can be synchronized across all units.
Final Steps and Moving Forward
With your Innova clock successfully connected, take a moment to explore its advanced functions. Create recurring timers for workouts, link it to your smart lights for sunrise simulations, or enable do-not-disturb hours during sleep. The device becomes more powerful the deeper you integrate it into your routine.
Remember, technology should simplify life—not complicate it. By following this guide, you’ve taken control of your time in a smarter, more intentional way. Don’t stop here—experiment with automations, share settings with family members, and revisit the app periodically to discover new features.


 浙公网安备
33010002000092号
浙公网安备
33010002000092号 浙B2-20120091-4
Comments
No comments yet. Why don't you start the discussion?