
Leather tissue dispensers are more than just functional—they add elegance to bathrooms, guest rooms, or office spaces. Crafted from premium materials, they blend utility with aesthetic appeal. But like any quality item, their longevity depends on proper care. Refilling and maintaining a leather tissue dispenser isn’t complicated, but doing it correctly ensures smooth operation, prevents material damage, and preserves its refined look. This guide walks you through the entire process—from selecting the right tissues to routine maintenance—with practical steps and insider tips.
Why Proper Maintenance Matters
A leather tissue dispenser sits in high-moisture environments like bathrooms or near entryways where humidity fluctuates. Over time, exposure to moisture, dust, and frequent handling can degrade both the leather exterior and internal mechanism. Without regular upkeep, zippers may stick, stitching can loosen, and the leather might crack or discolor.
Maintenance isn’t just about appearance; it’s about functionality. A well-maintained dispenser ensures tissues pull out smoothly without tearing, reduces waste, and keeps the unit hygienic. According to interior design specialist Marcus Lin, “A leather tissue holder is a small luxury that reflects attention to detail. When cared for properly, it ages beautifully and becomes part of a home’s character.”
“Consistent cleaning and mindful refills extend the life of leather accessories by up to five years.” — Clara Nguyen, Home Product Durability Analyst
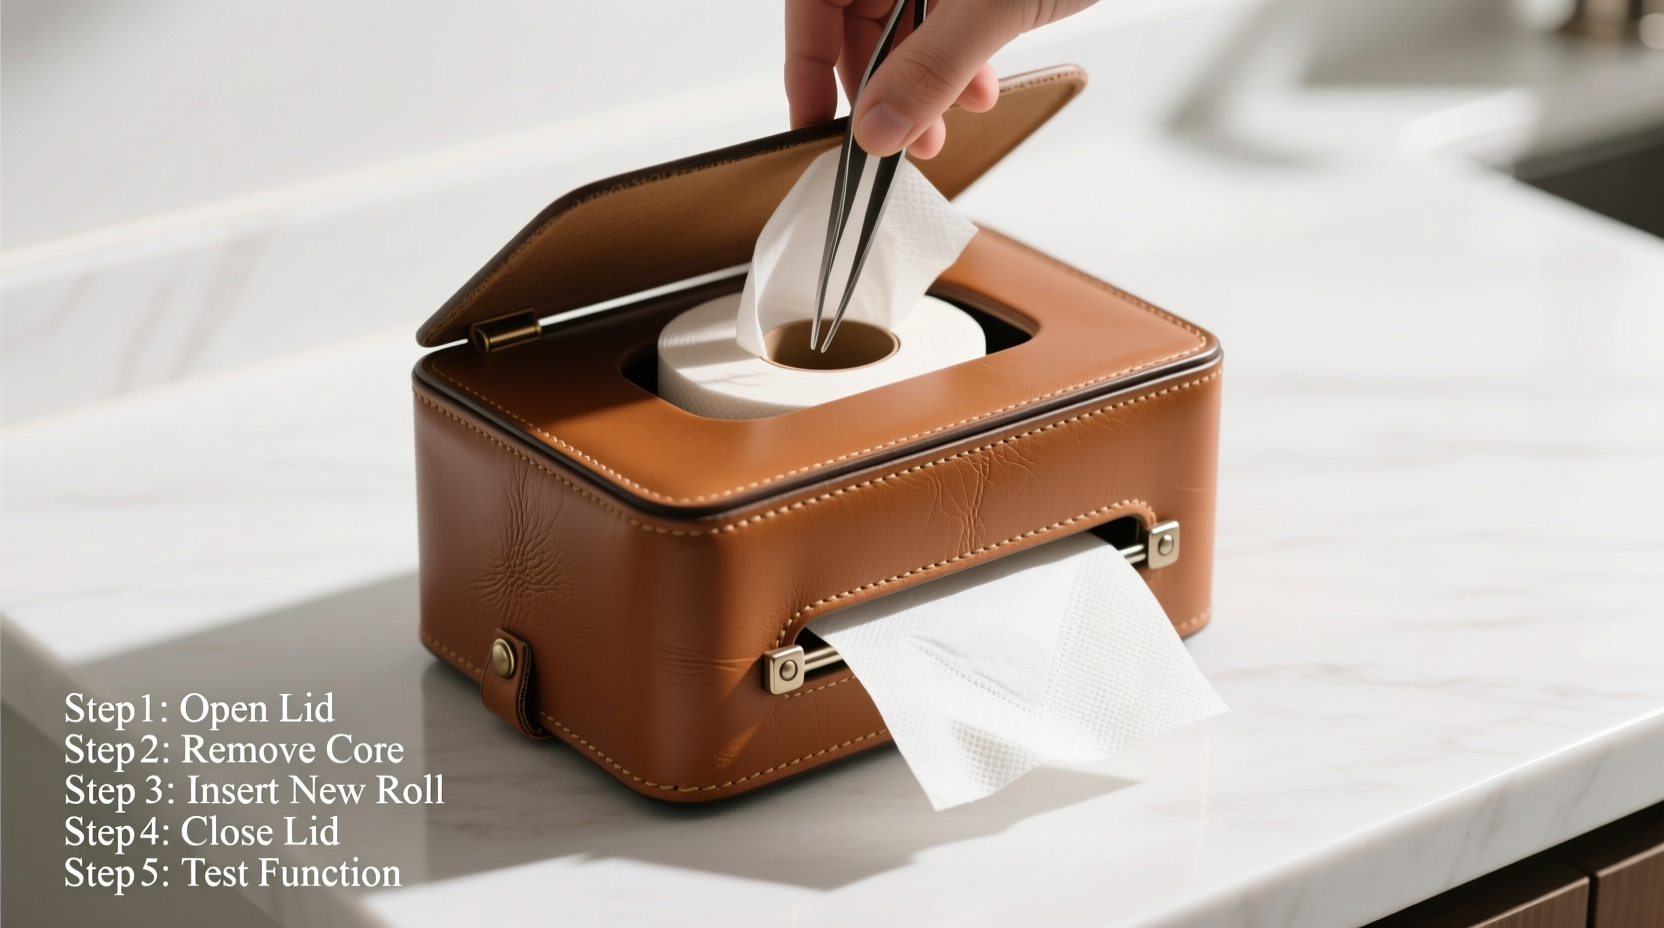
Step-by-Step Guide to Refilling Your Leather Tissue Dispenser
Refilling seems simple, but skipping key steps can lead to jams, misaligned tissues, or stress on the leather seams. Follow this precise sequence to ensure a seamless refill every time.
- Remove the dispenser from its mounting location. If it's wall-mounted, gently detach it. For countertop models, simply pick it up. This gives you full access and prevents accidental spills.
- Open the compartment carefully. Most leather dispensers use a zipper, snap button, or magnetic closure. Pull slowly to avoid straining the leather around the opening.
- Empty any remaining tissue fragments. Use a soft brush or dry cloth to remove lint, dust, or leftover paper bits inside the chamber. These can clog the feed slot over time.
- Select the right tissue size. Standard pocket tissues (approx. 5.5 x 6.5 inches) work best. Avoid oversized or folded novelty tissues—they don’t dispense cleanly and increase friction.
- Fold the stack neatly in half. This creates a compact block that feeds smoothly. Insert the folded stack with the embossed or decorative side facing down so the top tissue pulls out cleanly.
- Align the top tissue with the dispensing slit. Gently tug the leading edge through the opening until about half an inch protrudes. Ensure it’s centered and not twisted.
- Close the compartment securely. Zipper models should be fully closed without forcing. Snap closures must click into place. Over-tightening stresses leather fibers.
- Reinstall the dispenser. Return it to its mount or surface. Test the first pull to confirm smooth release.
Essential Maintenance Checklist
To keep your dispenser in top condition, follow this monthly maintenance routine:
- Wipe exterior with a slightly damp microfiber cloth
- Clean interior compartment and remove debris
- Inspect stitching for loose threads or wear
- Check closure mechanism (zipper/snap) for smooth operation
- Condition leather using a pH-balanced product
- Ensure no moisture has accumulated inside
- Verify tissue feed remains consistent
Do’s and Don’ts: Leather Care Best Practices
| Do’s | Don’ts |
|---|---|
| Use a leather-specific conditioner every 6–8 weeks | Expose the dispenser to direct sunlight or radiators |
| Clean spills immediately with a dry cloth | Use alcohol-based cleaners or household detergents |
| Store spare tissues in a sealed bag to prevent moisture absorption | Overfill the dispenser—leave ½ inch space at the top |
| Rotate dispensers if using multiple units to ensure even wear | Allow water to pool inside or around the base |
| Use a soft-bristle brush to remove dust from textured leather | Apply excessive force when pulling tissues |
Real Example: How One Hotel Chain Maintains 500+ Units
The Grand Laurel Hotels group uses leather tissue dispensers across all guest bathrooms in their 12 properties. With over 500 units in service, consistency is critical. Their housekeeping protocol includes a bi-weekly inspection cycle: staff remove each dispenser, vacuum the interior, wipe the leather with a lanolin-infused cloth, and refill with pre-folded, hotel-branded tissues. They report a 78% reduction in replacement costs since implementing this system. “We found that waiting until a dispenser looked worn was too late,” says head facilities manager Derek Hale. “Scheduled maintenance prevents issues before they arise.”
How to Condition Leather Without Damaging It
Leather dries out over time, especially in heated or air-conditioned spaces. Conditioning restores natural oils and prevents cracking. Here’s how to do it safely:
- Choose a non-silicone, pH-neutral leather conditioner.
- Apply a pea-sized amount to a soft, lint-free cloth—never directly onto the leather.
- Gently rub in circular motions along the grain, focusing on high-touch areas like handles and edges.
- Let it absorb for 15–20 minutes.
- Buff lightly with a dry section of the cloth to restore shine.
Avoid over-conditioning. Too much product builds up residue and attracts dust. Once every six to eight weeks is sufficient for most environments.
FAQ
Can I use baby wipes to clean the leather surface?
No. Most baby wipes contain alcohol, citric acid, or fragrances that strip natural oils from leather and cause premature aging. Stick to a dry or slightly damp microfiber cloth for cleaning.
What should I do if the zipper sticks?
First, check for fabric puckering or misalignment. Gently realign the leather around the zipper track. If it still resists, apply a tiny amount of beeswax or zipper lubricant—not oil—to the teeth. Slide the zipper back and forth slowly to distribute the lubricant.
Are all tissue sizes compatible with leather dispensers?
No. Standard pocket tissues (5.5” x 6.5”) are ideal. Larger tissues may jam, while travel packs often lack the bulk needed for reliable feeding. Always test a single pack before buying in bulk.
Conclusion: Small Habits, Lasting Results
A leather tissue dispenser combines everyday function with timeless design. By following a structured refill process and committing to light but consistent maintenance, you preserve both its beauty and performance. These habits take only minutes each month but significantly extend the dispenser’s lifespan and keep it operating flawlessly.


 浙公网安备
33010002000092号
浙公网安备
33010002000092号 浙B2-20120091-4
Comments
No comments yet. Why don't you start the discussion?