
Embroidering a cushion cover is a rewarding way to add personality and handmade charm to your home. It’s an accessible craft that blends creativity with practicality, especially for those just starting out in textile arts. With the right tools, a few basic stitches, and a simple design, you can transform a plain fabric square into a decorative centerpiece. This guide walks you through every stage—from choosing materials to finishing your embroidered piece—with clear instructions tailored for beginners.
Gather Your Materials
Before you begin stitching, ensure you have all the necessary supplies. Embroidery doesn’t require many tools, but using quality materials makes a noticeable difference in both the process and final result.
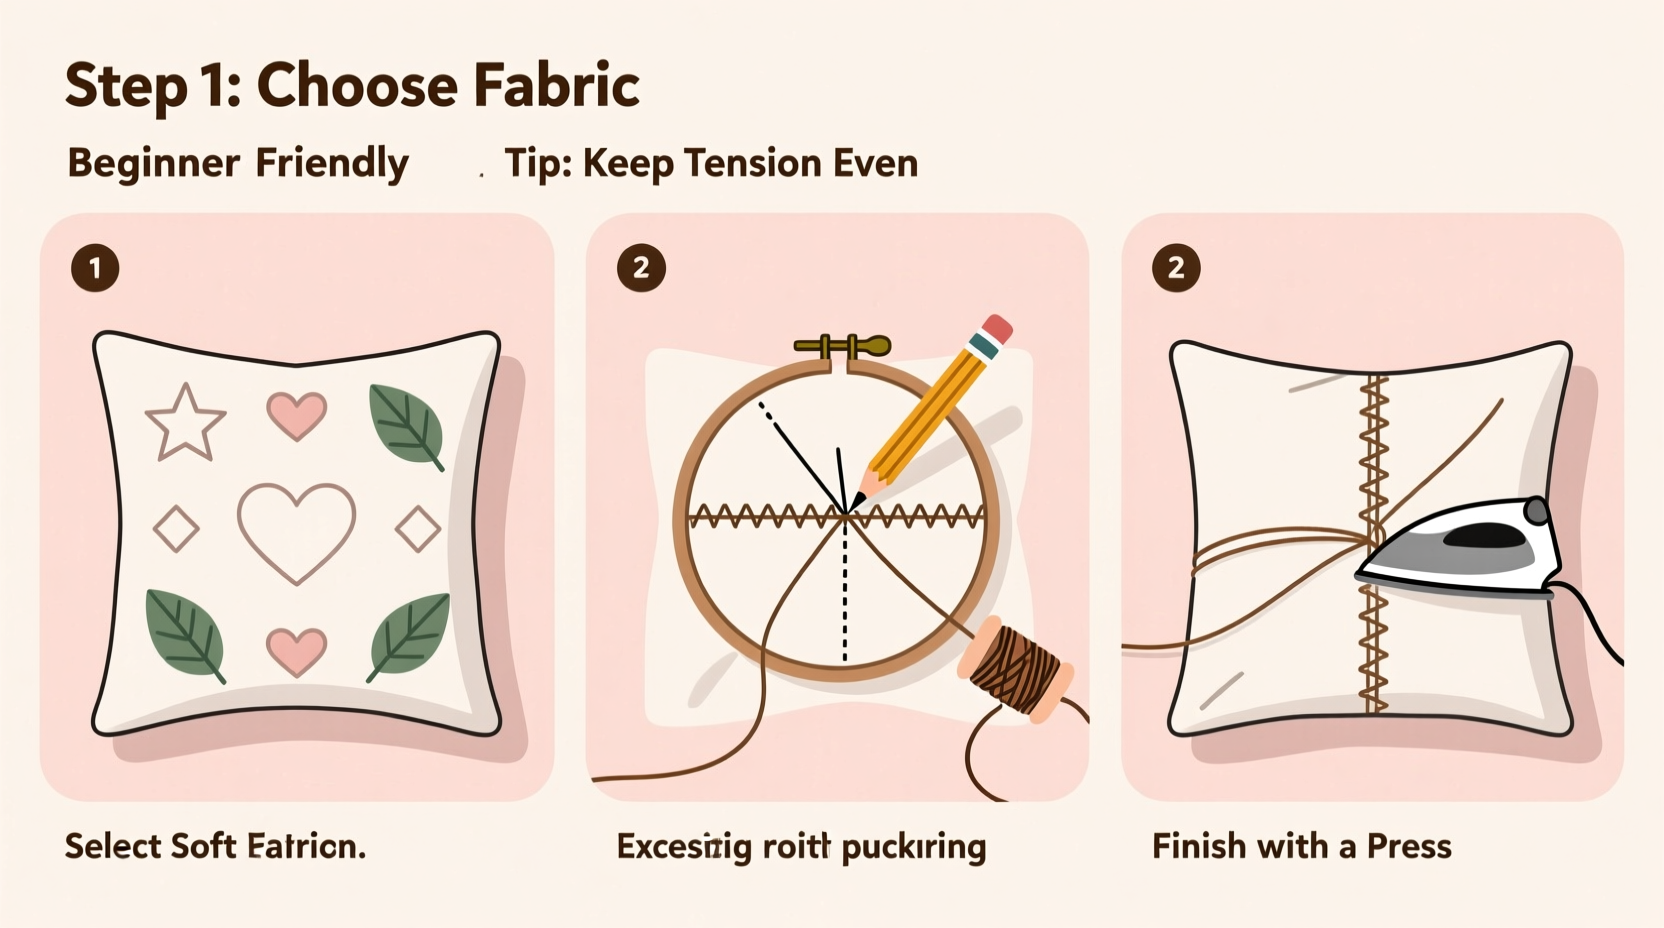
- Cushion cover fabric: Cotton, linen, or cotton-linen blends work best. Avoid stretchy or synthetic fabrics as they don’t hold embroidery well.
- Embroidery hoop: A 6–8 inch wooden or plastic hoop keeps fabric taut while stitching.
- Needles: Use embroidery (crewel) needles, which have sharp points and large eyes for easy thread passage.
- Embroidery floss: Six-strand cotton floss in colors of your choice. Brands like DMC are widely available and colorfast.
- Scissors: Small, sharp scissors for cleanly cutting threads.
- Water-soluble fabric marker or chalk pencil: For transferring patterns without permanent marks.
- Pattern template: Simple designs like flowers, leaves, stars, or geometric shapes are ideal for beginners.
Choose and Transfer a Beginner-Friendly Pattern
Selecting the right design is crucial for a satisfying first project. Start with something small and symmetrical—like a daisy, heart, or sunburst—that fits comfortably within a 4-inch diameter space on your cushion cover.
To transfer the design:
- Print or draw your chosen pattern on paper.
- Place the paper under the fabric and tape it to a sunny window. Trace the outline using a water-soluble pen.
- Alternatively, use carbon transfer paper placed between the design and fabric. Trace over the lines firmly with a pencil.
- Let any markings dry completely before stitching.
| Pattern Type | Why It’s Good for Beginners | Suggested Stitch |
|---|---|---|
| Flower with center and petals | Symmetrical, repetitive elements build muscle memory | French knots (center), satin stitch (petals) |
| Geometric shapes (circle, triangle, diamond) | Clear lines help practice straight and curved stitching | Backstitch or stem stitch for outlines |
| Simple leaf or branch | Introduces shading and directional stitches | Lazy daisy or fishbone stitch |
Master Three Essential Stitches
You don’t need to learn dozens of stitches to create a beautiful embroidered cushion. These three foundational techniques will carry you through most beginner designs.
1. Backstitch – For Outlines
Used to define shapes and create clean lines. Bring the needle up at point A, down at B, then up again at C (just behind B). Repeat, always stepping back into the previous stitch.
2. Satin Stitch – For Filled Areas
Ideal for petals or solid shapes. Work parallel stitches side by side across a defined area. Keep tension even and edges neat for a smooth finish.
3. French Knot – For Dots and Centers
Wrap the thread around the needle once or twice, hold tight, then insert the needle close to where it came up. Pull through gently to form a small knot on the surface.
“Beginners often rush to finish, but slow, even stitches make the biggest difference in quality.” — Lena Patel, Textile Artist and Craft Instructor
Step-by-Step Embroidery Process
Follow this timeline to complete your embroidered cushion cover from start to finish.
- Prepare the fabric: Wash and iron your cushion cover to remove wrinkles and sizing. This prevents puckering later.
- Secure in the hoop: Loosen the screw, place the fabric over the inner ring, press the outer ring down, then tighten. Ensure the fabric is drum-tight.
- Thread your needle: Cut about 18 inches of floss. Separate 2–3 strands and thread them through the needle. Knot the end.
- Start stitching: Begin from the center of your design to maintain balance. Use the backstitch to outline shapes first.
- Fill in details: Move to satin stitch or French knots as needed. Change colors by tying off neatly on the back.
- Maintain consistent tension: Don’t pull too tightly—this distorts the fabric. Let the needle do the work.
- Remove markings: Once stitching is complete, lightly dampen the fabric to erase water-soluble lines. Air dry flat.
- Finish the back: Trim excess threads and secure loose ends with small knots or by weaving them under existing stitches.
Real Example: Maria’s First Embroidered Cushion
Maria, a hobbyist with no prior sewing experience, wanted to personalize a plain linen cushion for her living room. She chose a simple daisy design with a yellow center and white petals. Using a printed template, she transferred the outline with a blue water-soluble pen. Over two weekend afternoons, she stitched the center with French knots, outlined the petals with backstitch, and filled them with satin stitch using two strands of floss. After rinsing off the pen marks, she was amazed at how professional it looked. The cushion now sits proudly on her sofa, sparking compliments from guests.
Common Pitfalls and How to Avoid Them
- Fabric puckering: Caused by uneven tension or over-stretching in the hoop. Re-tighten the hoop periodically and avoid pulling stitches too hard.
- Knots on the front: Often due to tangled thread. Use shorter lengths of floss and re-thread if tangling occurs.
- Uneven fills: In satin stitch, gaps appear if stitches aren’t close enough. Work slowly and align each stitch precisely.
- Color bleeding: Always test floss on a swatch before washing. Stick to reputable brands to minimize risk.
Checklist: Your Embroidery Project Roadmap
- ☐ Choose a simple design (flower, star, heart)
- ☐ Print or draw the pattern
- ☐ Transfer the design to the cushion cover
- ☐ Prepare hoop and fabric
- ☐ Thread needle with 2–3 strands of floss
- ☐ Practice stitches on scrap fabric
- ☐ Outline the design using backstitch
- ☐ Fill in details with satin stitch or French knots
- ☐ Rinse off markings and air dry
- ☐ Inspect the back and trim loose threads
Frequently Asked Questions
Can I machine wash an embroidered cushion cover?
Yes, but with care. Hand wash or use a gentle cycle with cold water. Turn the cover inside out and place it in a mesh laundry bag. Air dry flat to preserve the embroidery.
What if I make a mistake in my stitching?
Small errors can often be corrected by unstitching carefully with a seam ripper or small scissors. If the fabric is damaged, consider turning the mistake into part of the design—add a leaf or swirl to cover it creatively.
How long does it take to embroider a cushion cover as a beginner?
A simple design with moderate coverage typically takes 6–10 hours, spread over several sessions. Larger or more detailed pieces may take longer, but speed improves with practice.
Bring Your Vision to Life
Embroidering a cushion cover isn’t just about decoration—it’s a mindful practice that connects you to the rhythm of needle and thread. Each stitch becomes a quiet act of intention, transforming ordinary fabric into something deeply personal. You don’t need years of experience or expensive tools to create something beautiful. With patience, a few basic techniques, and a willingness to learn, your first embroidered piece can be both meaningful and lasting.


 浙公网安备
33010002000092号
浙公网安备
33010002000092号 浙B2-20120091-4
Comments
No comments yet. Why don't you start the discussion?