
Bringing custom 3D models from Blender into Roblox opens up vast creative possibilities for game developers. Whether you're designing unique buildings, characters, or props, preserving textures and colors during the import process is essential for professional results. However, many creators struggle with missing materials, distorted geometry, or failed imports due to incorrect settings. This guide walks through the complete workflow—from modeling in Blender to publishing your asset in Roblox Studio—with precise steps to ensure textures and colors transfer correctly.
1. Prepare Your Model in Blender
Before exporting, ensure your model is optimized for Roblox. The platform uses a strict mesh format (typically DAE or FBX) and has limitations on polygon count, UV mapping, and material usage. Start by simplifying complex geometry and applying all transformations.
- Select your object and press Ctrl+A, then choose “All Transforms” to apply scale, rotation, and location.
- Use the “Decimate” modifier if necessary to reduce polygons without losing visual fidelity.
- Ensure all parts of the model are joined (Ctrl+J) if they should act as a single part in Roblox.
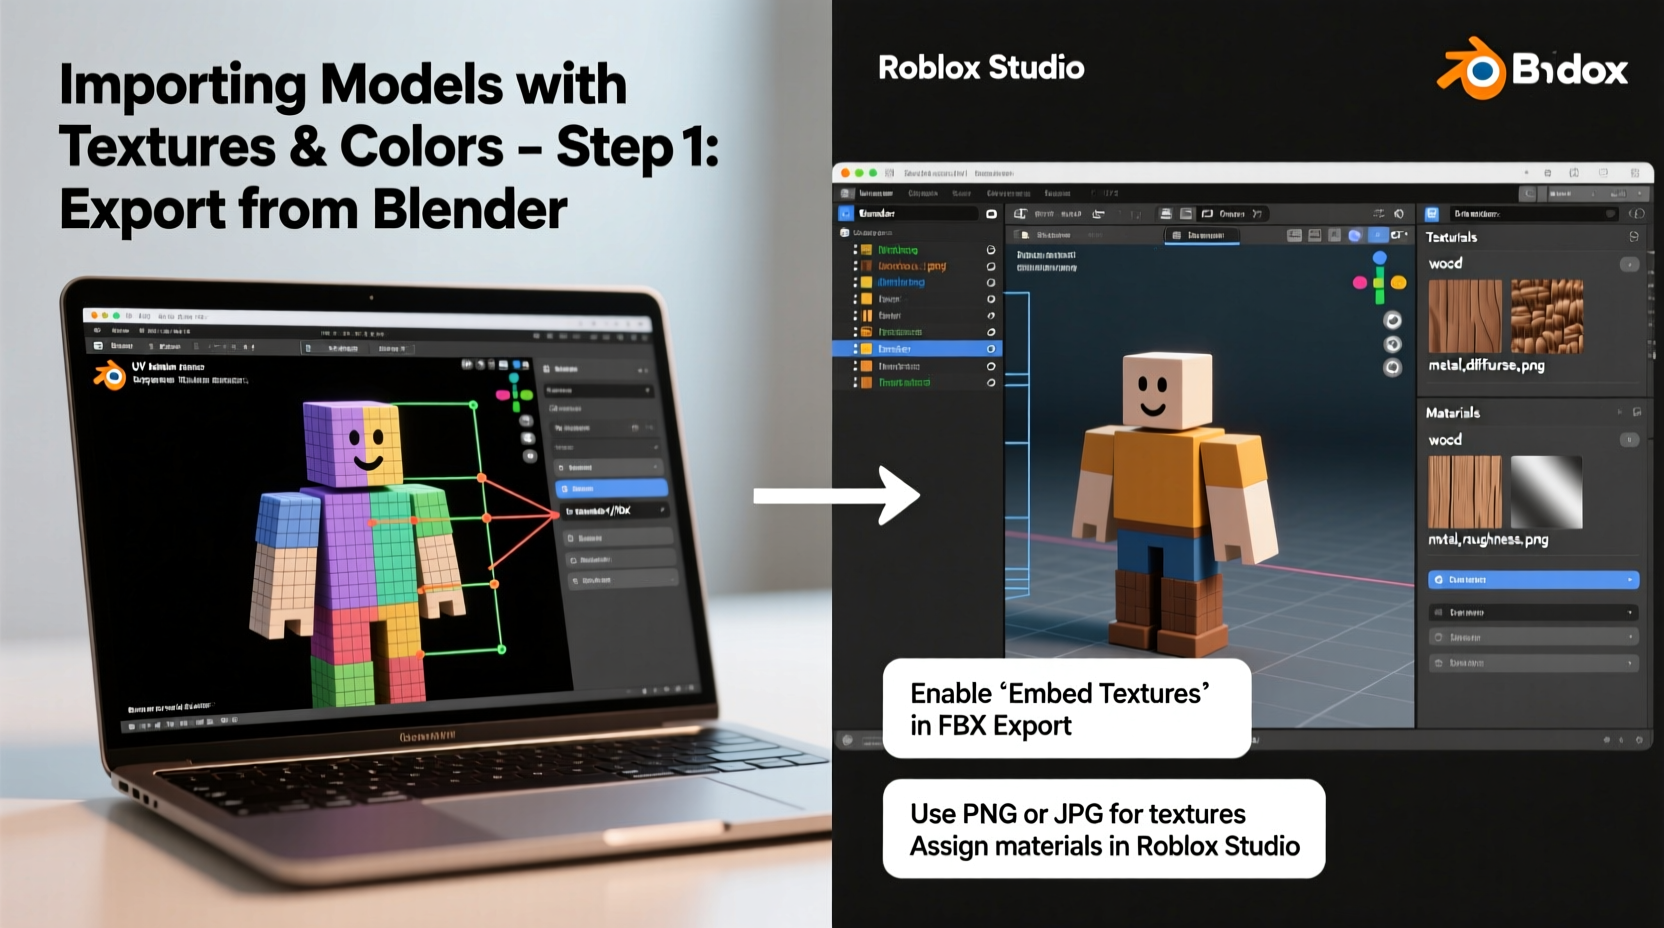
- Assign materials and paint textures within Blender using the Shader Editor and UV/Image Editor.
UV unwrap your model properly so textures map accurately. Use smart UV project or manual unwrapping depending on complexity. Always test your texture layout in the viewport using Material Preview mode.
2. Exporting from Blender with Textures Preserved
The key to successful import lies in correct export settings. Roblox supports both COLLADA (.dae) and FBX formats, but COLLADA is often more reliable for retaining texture paths when used with compatible tools.
To export via COLLADA:
- Go to File > Export > COLLADA (.dae).
- In the export options, check:
- Include > Selected Objects (if only exporting one model)
- Geometry > Include UVs and Materials
- Object Types > Mesh Only
- Transform > Apply Scalings: FBX Units Scale
- Enable “Copy” under **Export Group** to embed textures into the same folder.
- Click “Export COLLADA” and save in a dedicated project folder.
Blender will generate a .dae file and copy associated image textures into the same directory. Verify that PNG or JPEG files are present alongside the model.
| Setting | Recommended Value | Purpose |
|---|---|---|
| Include UVs | Checked | Preserves texture coordinates |
| Include Materials | Checked | Keeps material names and references |
| Texture Path Mode | COPY + relative path | Ensures textures stay with model |
| Apply Scalings | FBX Units Scale | Matches Roblox’s scale system |
3. Converting and Uploading via GLTF Pipeline
Roblox does not directly accept .dae files. You must convert your model to a format compatible with the Roblox Plugin ecosystem—typically glTF (.gltf or .glb). A reliable method involves using the open-source tool COLLADA2GLTF.
Download COLLADA2GLTF from the official KhronosGroup GitHub repository. Run the converter and input your .dae file path, setting output to .glb (binary glTF).
- Open terminal or command prompt in the COLLADA2GLTF directory.
- Run:
./COLLADA2GLTF -i model.dae -o model.glb - Confirm the output includes embedded textures.
Once converted, use the Free Roblox Model Converter plugin in Roblox Studio:
- Open Roblox Studio and go to **Plugins > Free Roblox Model Converter**.
- Upload the .glb file.
- The plugin processes geometry, materials, and textures automatically.
- After conversion, the model appears in your workspace with color and texture intact.
“Using standardized pipelines like glTF ensures consistent rendering across platforms.” — Alex Turner, 3D Tools Developer at Roblox Community Dev Team
4. Troubleshooting Common Import Issues
Even with proper setup, issues can arise. Here are frequent problems and their solutions:
Missing Textures
If textures don’t appear, verify that images were copied during export and that file paths in the .dae are relative. Re-export with “Copy” enabled. In some cases, manually reassign textures in Roblox Studio under the Material property may be required.
Incorrect Scale or Rotation
Roblox uses a Y-up coordinate system, matching Blender. But scaling discrepancies occur if transforms weren't applied. Always apply scale (Ctrl+A > Scale) before export.
Black or Gray Materials
This often means the shader data wasn’t interpreted correctly. Avoid using complex node setups like emission, transparency mix nodes, or normal maps unless supported by the target pipeline. Stick to Principled BSDF with base color, roughness, and metallic inputs.
5. Final Integration and Optimization in Roblox Studio
After successful import, treat the model as a static mesh or dynamic part depending on function. If it’s meant to be interactive (e.g., a door), break it into separate parts and anchor them appropriately.
To preserve performance:
- Keep triangle count under 10,000 per imported model where possible.
- Combine multiple small textures into a single atlas to reduce draw calls.
- Use compression-friendly PNGs (8-bit or 24-bit) instead of uncompressed TGA files.
- Name instances clearly for easy scripting access.
For animated models (like rotating fans or doors), consider using Blender’s armature system and exporting with skinning enabled. Note that animation support requires additional configuration and is best tested incrementally.
Mini Case Study: Importing a Custom House Model
Jamal, an indie developer, created a detailed cabin in Blender with wood planks, stone foundation, and shingled roof. He UV-unwrapped each section and painted textures using procedural noise and image mixing. After applying all transforms and exporting as .dae with copied textures, he used COLLADA2GLTF to convert to .glb. Upon upload via the Roblox plugin, most textures loaded—but the roof appeared pink. Investigation revealed the texture file was named “roof_texture.png.jpg” due to a double extension. Renaming the file and re-uploading fixed the issue. Jamal now maintains a checklist for every export to prevent naming errors.
Frequently Asked Questions
Can I use PBR materials from Blender in Roblox?
Roblox has limited support for physically based rendering. While you can set metallic and roughness values in Blender, these won’t fully translate. Use the StandardMaterial in Roblox Studio to manually adjust reflectance and glossiness after import.
Why is my model invisible in Roblox Studio?
This usually indicates a scale issue (too small or too large) or backface culling. Check if the model exists far from the origin. Also, ensure normals are facing outward in Blender (use “Recalculate Normals” in Edit Mode).
Do I need to triangulate faces before exporting?
No. Blender automatically triangulates upon export to COLLADA or glTF. Manual triangulation is unnecessary and may cause artifacts.
Checklist: Successful Blender to Roblox Workflow
- ✅ Apply all transforms (scale, rotation, location)
- ✅ UV unwrap and assign clear material names
- ✅ Export as COLLADA (.dae) with UVs, materials, and copied textures
- ✅ Convert .dae to .glb using COLLADA2GLTF
- ✅ Upload via Free Roblox Model Converter plugin
- ✅ Inspect texture alignment and lighting response
- ✅ Optimize part count and naming in Studio
Conclusion
Importing Blender models into Roblox with full texture and color fidelity is achievable with attention to detail at every stage. From preparing clean geometry to managing texture paths and leveraging conversion tools, each step plays a role in a smooth pipeline. As Roblox continues to expand its 3D capabilities, mastering this workflow empowers creators to build richer, more immersive experiences. Take time to test each model thoroughly, document your process, and refine your techniques with every project.


 浙公网安备
33010002000092号
浙公网安备
33010002000092号 浙B2-20120091-4
Comments
No comments yet. Why don't you start the discussion?