
A flexible phone guard—often made from thermoplastic polyurethane (TPU)—offers reliable protection against scratches, drops, and daily wear. Unlike rigid cases, these guards conform closely to your device’s shape, preserving its sleek profile while enhancing durability. However, improper installation often leads to trapped air bubbles, misalignment, or dust contamination, undermining both function and aesthetics. The good news: with the right tools and technique, you can apply a flexible phone guard flawlessly at home. This guide walks you through every stage of the process, ensuring a smooth, bubble-free finish that looks professionally installed.
Why Proper Installation Matters
A poorly applied phone guard doesn’t just look unprofessional—it can compromise protection. Gaps along the edges allow dust and moisture to seep in, increasing the risk of internal damage. Air bubbles not only mar the visual appeal but can also create pressure points that lead to cracking over time. A perfectly adhered guard ensures full edge-to-edge coverage, maintains touchscreen sensitivity, and resists peeling during daily use.
“Even the highest-quality TPU guard is only as effective as its application. Precision during installation directly impacts longevity and performance.” — Marcus Tran, Mobile Device Protection Specialist
What You’ll Need Before You Begin
Gathering the correct tools sets the foundation for success. Skipping essential items may seem like a time-saver, but it often leads to rework or irreversible flaws. Here’s what to prepare:
- Flexible TPU phone guard (compatible with your model)
- Microfiber cleaning cloth (lint-free)
- Isopropyl alcohol (70% or higher) or screen cleaning wipe
- Cotton swabs
- Plastic card (e.g., old credit card or squeegee tool)
- Dust removal sticker or adhesive tape (optional but recommended)
- Well-lit, dust-free workspace
Step-by-Step Installation Process
Follow this timeline carefully. Rushing any phase increases the likelihood of errors. Allocate 15–20 minutes for the entire process to ensure precision.
- Power off your device – This prevents accidental inputs during installation and makes it easier to inspect alignment.
- Clean the phone surface thoroughly – Dampen a corner of the microfiber cloth with isopropyl alcohol. Wipe down the entire back panel, paying close attention to edges and camera cutouts. Use cotton swabs for hard-to-reach areas.
- Dry completely – Let the phone air dry for at least 60 seconds. Residual moisture interferes with adhesion.
- Remove dust particles – Press a piece of adhesive tape or use a dedicated dust removal sticker on the phone’s surface. Lift gently to pick up microscopic debris. Repeat if necessary.
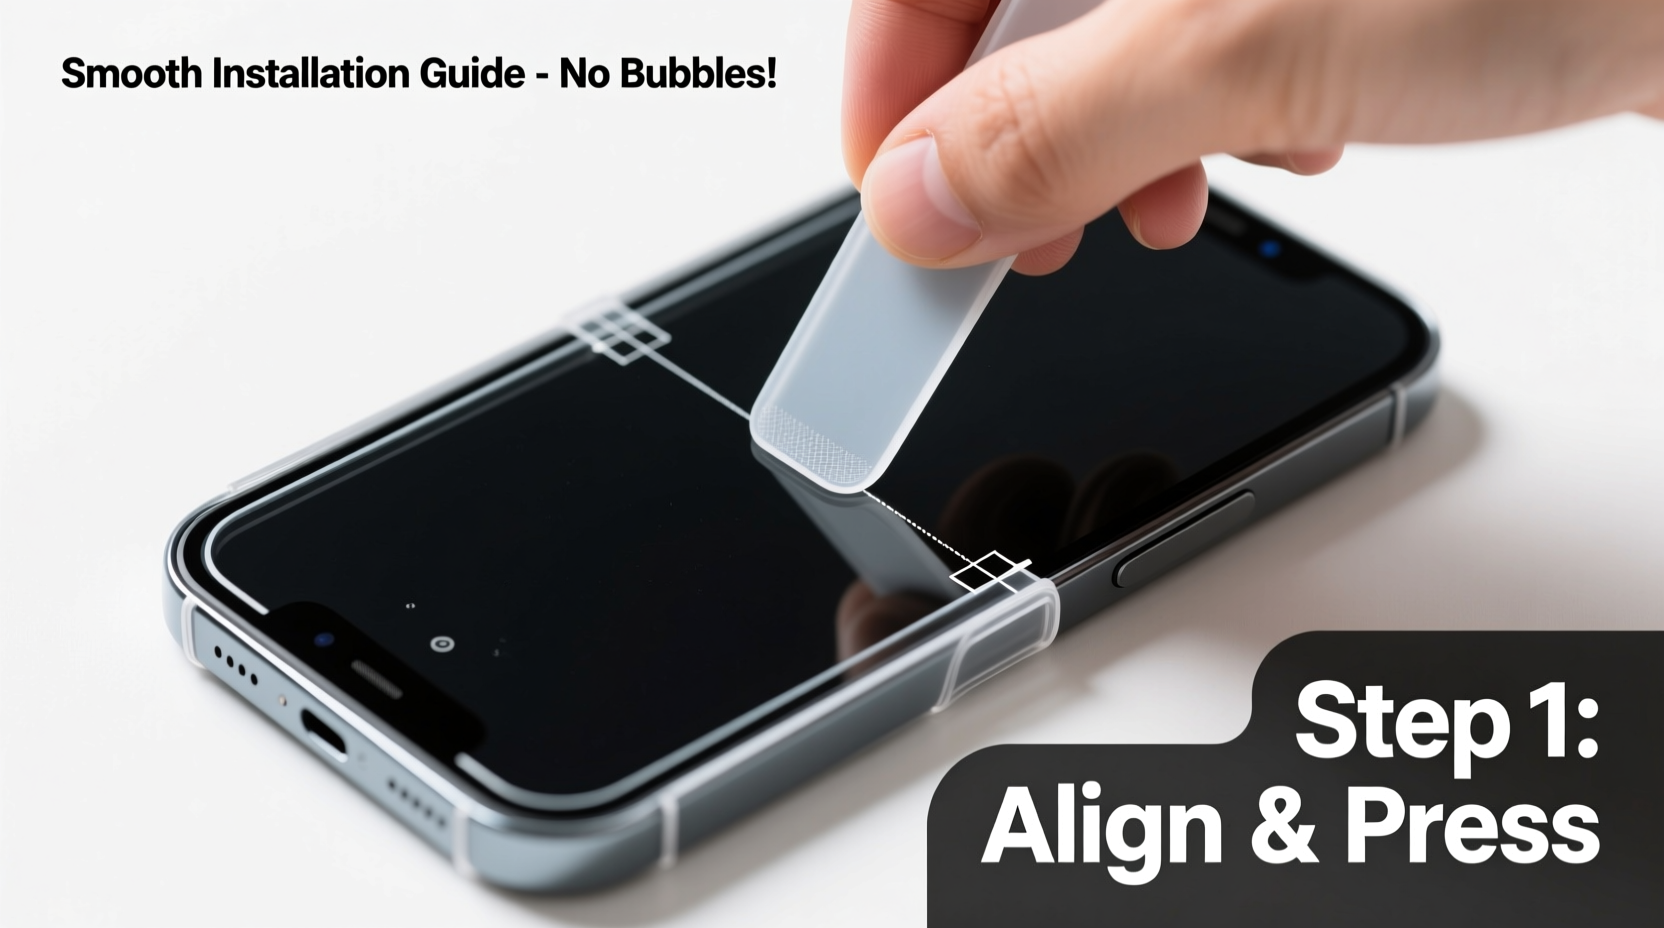
- Peel the backing from the guard slowly – Start at one corner. Hold the phone steady and align the guard precisely over the top edge, matching cutouts for the camera and sensors.
- Lower the guard using the hinge method – Do not fully remove the backing yet. Instead, peel back about half, then gently lower the exposed side onto the phone starting from the top. Think of it like closing a book—this minimizes air entrapment.
- Press down and smooth outward – Once the first half is in place, use a plastic card to gently sweep from the center toward the edges. Apply even pressure to push out any forming bubbles.
- Peel the remaining backing and repeat smoothing – Finish removing the protective film and continue using the card to glide across the surface, working from middle to periphery.
- Inspect and correct minor bubbles – If small bubbles appear, lift the guard slightly at the affected edge and re-smooth. For stubborn bubbles, press gently with your fingertip to encourage movement toward the edge.
- Let it settle for 10 minutes – Avoid handling the phone immediately. This allows the adhesive layer to bond fully with the surface.
Do’s and Don’ts During Installation
| Do’s | Don’ts |
|---|---|
| Work in a low-dust environment (e.g., closed room, away from windows) | Install near open windows or fans that circulate dust |
| Use a lint-free cloth to avoid fiber residue | Wipe the phone with clothing or paper towels |
| Apply slow, even pressure when smoothing | Press too hard and stretch the TPU material |
| Double-check alignment before final adhesion | Rush the process once the guard starts sticking |
| Reapply heat with a hairdryer on cool setting if needed | Use high heat, which can warp the guard |
Troubleshooting Common Issues
Even with care, minor problems can occur. Most are fixable without replacing the guard.
- Small air bubbles: Gently nudge them toward the nearest edge using your finger or a soft card. Do not puncture.
- Dust specks under the surface: Carefully lift the nearest edge, remove the particle with tape, then reseal.
- Guard not lying flat at corners: Warm the area slightly with a hairdryer (cool setting) for 10–15 seconds, then press down firmly.
- Misaligned camera cutout: If caught early, peel back and realign. Once fully adhered, correction is difficult without damaging the adhesive.
Mini Case Study: Fixing a Bubble After First Attempt
Sophie, an office worker in Seattle, tried installing her new TPU guard during lunch break at her desk. Despite wiping the phone, a speck of lint caused a visible bubble near the charging port. Instead of starting over, she used a strip of Scotch tape to lift the bottom edge slightly, removed the debris, and smoothed the guard again with a gift card. The second attempt was flawless. Her experience highlights that minor mistakes don’t mean failure—patience and the right technique make all the difference.
Expert Tips for Long-Term Performance
Once installed, proper maintenance extends the life of your flexible guard. Follow these recommendations to keep it looking fresh:
- Wipe the guard weekly with a dry microfiber cloth to remove oils and smudges.
- Avoid exposing the phone to extreme temperatures, which can cause warping or yellowing over time.
- Remove the guard periodically (every 6–12 months) to clean the phone’s back panel and prevent trapped grime.
- If the guard starts peeling at the edges, it’s time for replacement—continued use risks incomplete protection.
“The best phone guards are invisible when applied correctly. That seamless look comes from preparation, not luck.” — Lena Park, Tech Accessory Designer at ShieldLab
FAQ
Can I reuse a flexible phone guard after removing it?
No. Once removed, the adhesive loses its tackiness and may leave residue. Reapplication rarely results in a secure or bubble-free fit. Always use a new guard after removal.
Why does my guard feel sticky after installation?
Some TPU guards have a silicone coating that feels slightly tacky initially. This usually dissipates within 24 hours. If stickiness persists, check whether the product is counterfeit—authentic guards should feel smooth, not gummy.
Is it safe to use a hairdryer to help the guard adhere?
Yes, but only on the coolest setting and held at least 12 inches away. Heat activates the adhesive and helps eliminate wrinkles, but excessive heat can melt or distort the TPU material.
Final Checklist: Did You Get It Right?
Before declaring the job complete, run through this quick verification list:
- ✅ No visible air bubbles or trapped dust
- ✅ Full coverage with no lifting at corners or edges
- ✅ All ports, buttons, and camera cutouts properly aligned
- ✅ Surface feels smooth and consistent to the touch
- ✅ Touch responsiveness unaffected
Conclusion
Installing a flexible phone guard smoothly and bubble-free is a skill that combines preparation, patience, and precision. By following this detailed process, you protect your investment while maintaining the elegant design of your device. Whether you’re upgrading to a new phone or refreshing an older model, taking the time to apply the guard correctly pays off in durability and appearance. Now that you know the secrets of a flawless finish, equip your workspace and give your phone the defense it deserves.


 浙公网安备
33010002000092号
浙公网安备
33010002000092号 浙B2-20120091-4
Comments
No comments yet. Why don't you start the discussion?