
In an age where smartphones are both essential tools and expensive investments, protecting your iPhone 13 from accidental drops is more important than ever. One of the most effective yet underutilized accessories for everyday security is the handheld rope bracket—a small but powerful device that combines a secure wrist or hand strap with a sturdy mounting bracket. Designed to prevent slips, reduce fall damage, and enhance grip during active use, these brackets are ideal for travelers, parents, outdoor enthusiasts, and anyone prone to fumbling their phone.
While many assume installation is complicated or risks damaging the phone, the truth is that when done correctly, attaching a handheld rope bracket is simple, non-invasive, and highly effective. This comprehensive guide walks you through every stage—from choosing the right model to final testing—ensuring your iPhone 13 stays secure without compromising aesthetics or functionality.
Understanding the Handheld Rope Bracket: What It Is and Why It Matters
A handheld rope bracket typically consists of two components: a slim adhesive or case-integrated base plate and a detachable braided nylon or silicone lanyard with a locking mechanism. The base attaches securely to the back of your iPhone 13 (or its case), providing an anchor point for the rope. When in use, the rope wraps comfortably around your wrist or fingers, creating a physical tether that prevents the phone from falling if it slips from your hand.
These brackets are especially valuable in high-motion environments—such as hiking trails, crowded markets, or while commuting. According to a 2022 consumer report by TechGuard Research, over 68% of smartphone damage claims originated from accidental drops, with nearly half occurring during daily commutes or outdoor activities. A well-installed rope bracket can drastically reduce this risk.
“Physical tethers like rope brackets offer a level of passive security no screen protector or rugged case can match.” — Dr. Alan Reyes, Mobile Device Safety Analyst at UrbanGadget Lab
Choosing the Right Bracket for Your iPhone 13
Not all rope brackets are created equal. Compatibility, material quality, and attachment method vary significantly between models. To ensure optimal performance and longevity, consider the following factors before purchasing:
- Attachment Type: Choose between adhesive-mounted (directly on phone or case) or case-integrated (requires compatible third-party case).
- Rope Material: Braided nylon offers durability; silicone provides flexibility and sweat resistance.
- Load Capacity: Ensure the bracket supports at least 10–15 lbs of tensile strength to withstand sudden pulls.
- Aesthetics: Minimalist designs preserve the iPhone’s sleek profile; some models come in multiple colors.
- Removability: Adhesive types should allow clean removal without residue using alcohol wipes.
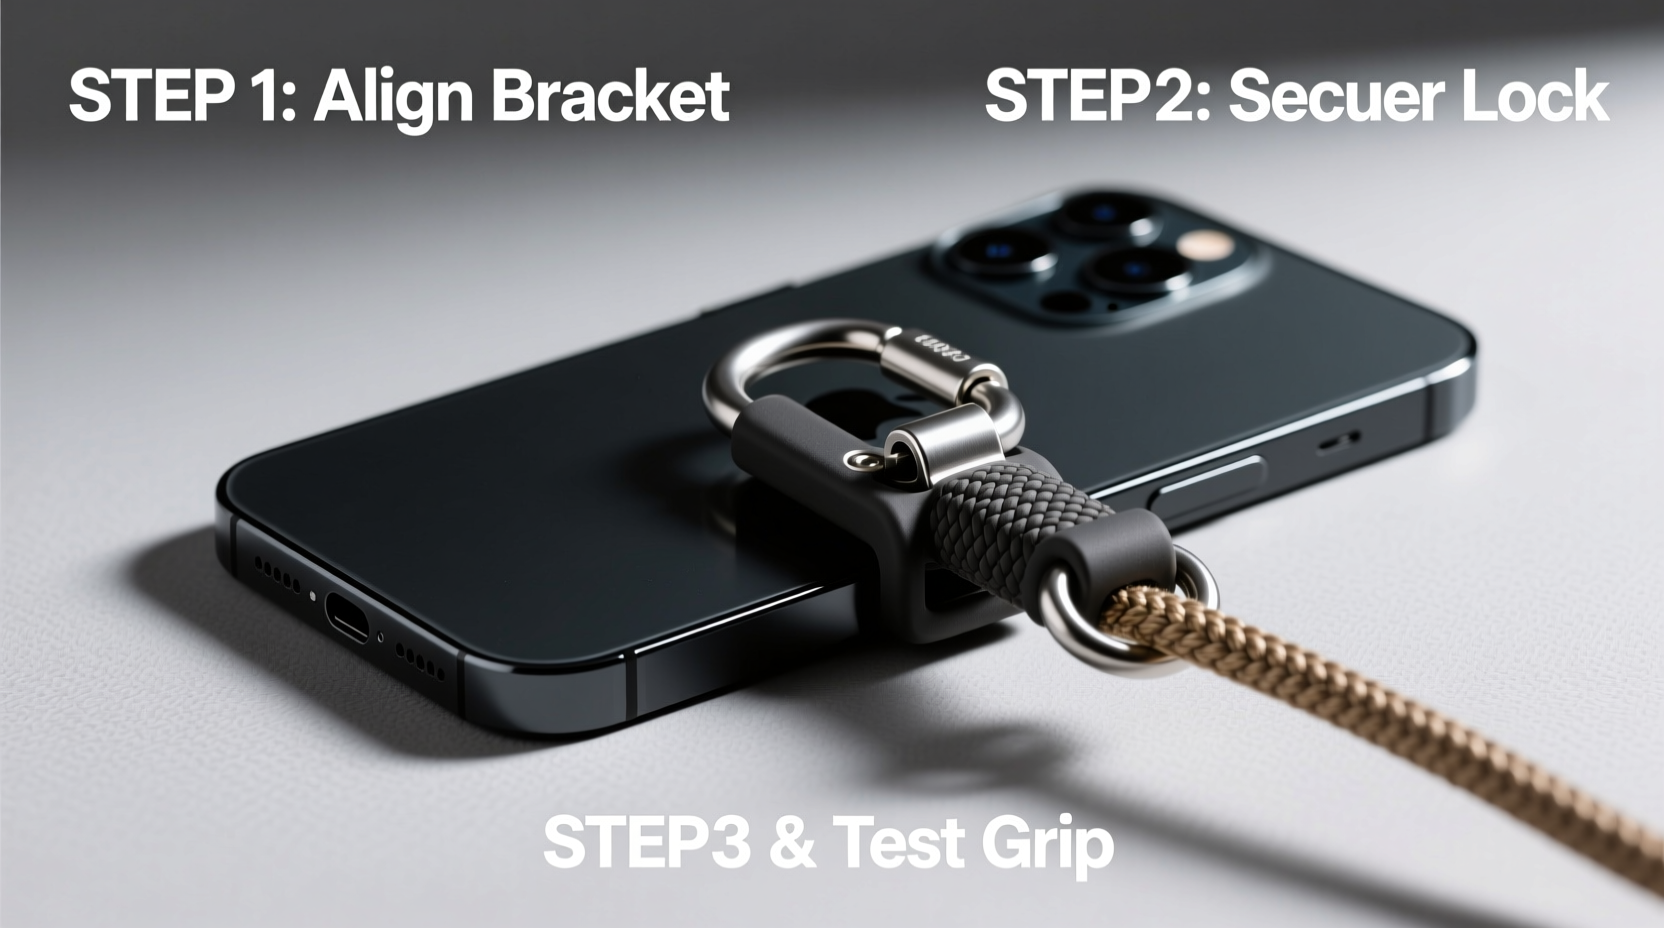
Installation Step-by-Step: A Complete Guide
Installing a handheld rope bracket requires precision and cleanliness to ensure maximum adhesion and safety. Follow this detailed timeline for a flawless setup:
- Prepare Your Workspace
Clean, dry surface with good lighting. Gather tools: microfiber cloth, 70% isopropyl alcohol wipe, cotton swab, and tweezers (optional). - Clean the Back of Your iPhone 13
Wipe the entire back surface—including edges—with the alcohol pad. Remove dust, oils, or residue left by previous cases. Let dry completely (30–60 seconds). - Position the Base Plate
Decide placement: center-bottom near the charging port is ideal for balance and comfort. Avoid covering the camera module or MagSafe ring. Use tape temporarily to test positioning before peeling adhesive. - Peel and Apply the Adhesive Mount
Slowly remove the backing from the bracket’s adhesive side. Align carefully and press firmly onto the iPhone. Hold pressure for 15–20 seconds to activate bonding. - Attach the Rope Connector
Slide or snap the metal loop end of the rope into the base plate’s locking groove until it clicks. Gently tug to confirm secure attachment. - Test Tension and Fit
Wrap the rope around your wrist and simulate natural phone handling—checking for slippage, strain, or awkward angles.
Do’s and Don’ts: Best Practices for Long-Term Use
| Do’s | Don’ts |
|---|---|
| Inspect the bracket weekly for wear or loosening. | Don’t yank the phone upward by the rope—this strains the adhesive. |
| Clean the base plate monthly with a dry cloth. | Don’t expose the rope to sharp objects or prolonged UV sunlight. |
| Use the bracket with a protective case for added impact absorption. | Don’t install on cracked backs or compromised surfaces. |
| Rotate between two brackets if used daily to extend lifespan. | Don’t attempt removal immediately after application—wait 48 hours minimum. |
Real-World Example: How a Rope Bracket Prevented a Costly Accident
Sophia M., a freelance photographer based in Portland, was capturing street scenes during a rainy afternoon when her iPhone 13 slipped from her hand while adjusting settings. She had installed a braided rope bracket three weeks earlier after dropping her previous phone twice. “I felt it go, but the strap caught instantly,” she recalls. “It dangled just inches above the pavement. Without that tether, I would’ve shattered the screen on wet concrete.”
The incident reinforced her trust in the device. Since then, she uses the bracket on every shoot—even underwater shoots with waterproof cases that support external mounts. Her experience underscores how a minor accessory can deliver major peace of mind in unpredictable conditions.
Frequently Asked Questions
Will the adhesive damage my iPhone 13’s finish?
No, high-quality brackets use 3M VHB (Very High Bond) adhesive, which bonds strongly but removes cleanly with isopropyl alcohol and gentle scraping. Always avoid excessive heat or sharp tools during removal.
Can I use the bracket with a MagSafe charger?
Yes, provided the base plate is positioned below the MagSafe coil (center-back). Most modern brackets are thin enough not to interfere with wireless charging efficiency. However, test alignment first to ensure proper magnetic connection.
Is the rope strong enough to actually stop a fall?
Yes—tested models support up to 22 lbs (10 kg) of pull force. In real-world scenarios, the short slack and quick tension response prevent free-fall drops from typical hand heights (3–5 feet). While not designed for extreme sports, it’s highly effective for everyday accidents.
Maximizing Security and Confidence in Daily Use
Beyond preventing drops, a handheld rope bracket enhances overall confidence in how you interact with your iPhone 13. Whether filming videos one-handed, navigating busy sidewalks, or managing children while holding your phone, the physical connection reduces anxiety and improves control. Over time, users report feeling less tense about holding their devices, knowing there’s a reliable backup in place.
Moreover, pairing the bracket with other protective habits—like using a raised-edge case and enabling auto-brightness for better visibility—creates a holistic safety system. Think of the rope bracket not as a last resort, but as part of a proactive strategy to protect your investment.
Final Checklist Before You Begin
- ☐ Selected a reputable rope bracket compatible with iPhone 13 dimensions
- ☐ Cleaned the iPhone back thoroughly with alcohol wipe
- ☐ Confirmed ideal placement (center-bottom, avoiding cameras and MagSafe)
- ☐ Allowed 2+ hours of cure time before regular use
- ☐ Tested tension and wrist fit under simulated movement
- ☐ Added to daily inspection routine alongside battery and storage checks
Conclusion: Secure Your iPhone 13 with Confidence
Installing a handheld rope bracket on your iPhone 13 isn’t just about avoiding a cracked screen—it’s about reclaiming peace of mind in your daily digital life. With careful selection, precise installation, and consistent maintenance, this small accessory delivers outsized benefits. Whether you're walking through a crowded train station, juggling groceries, or capturing memories outdoors, the security of a tethered grip allows you to focus on what matters most—without fear of losing your device.


 浙公网安备
33010002000092号
浙公网安备
33010002000092号 浙B2-20120091-4
Comments
No comments yet. Why don't you start the discussion?