
As smartphones become increasingly central to daily life, protecting them without sacrificing functionality is essential. Magnetic iPhone cases have surged in popularity thanks to their seamless compatibility with MagSafe accessories, effortless attachment, and enhanced durability. However, improper installation can compromise both protection and performance. A poorly aligned case may interfere with wireless charging, weaken magnetic hold, or expose vulnerable edges to drops. This comprehensive guide walks through the correct process of installing a magnetic iPhone case to ensure optimal protection, alignment, and everyday convenience.
Why Proper Installation Matters
A magnetic case isn’t just a cover—it’s an integrated part of your iPhone’s ecosystem. The internal magnet array must align precisely with the ring in your iPhone (iPhone 12 and later) to enable full MagSafe functionality, including fast wireless charging, secure accessory attachment, and accurate compass use. Misalignment can result in slower charging speeds, unstable mounting, or even overheating over time.
Additionally, structural fit affects drop protection. Gaps around buttons, ports, or corners leave your device exposed. A correctly installed case ensures raised edges shield the screen and camera lens during face-down drops while maintaining tactile button responsiveness.
“Precision in case installation directly impacts long-term device safety and accessory compatibility.” — Jordan Lee, Mobile Device Engineer at TechShield Labs
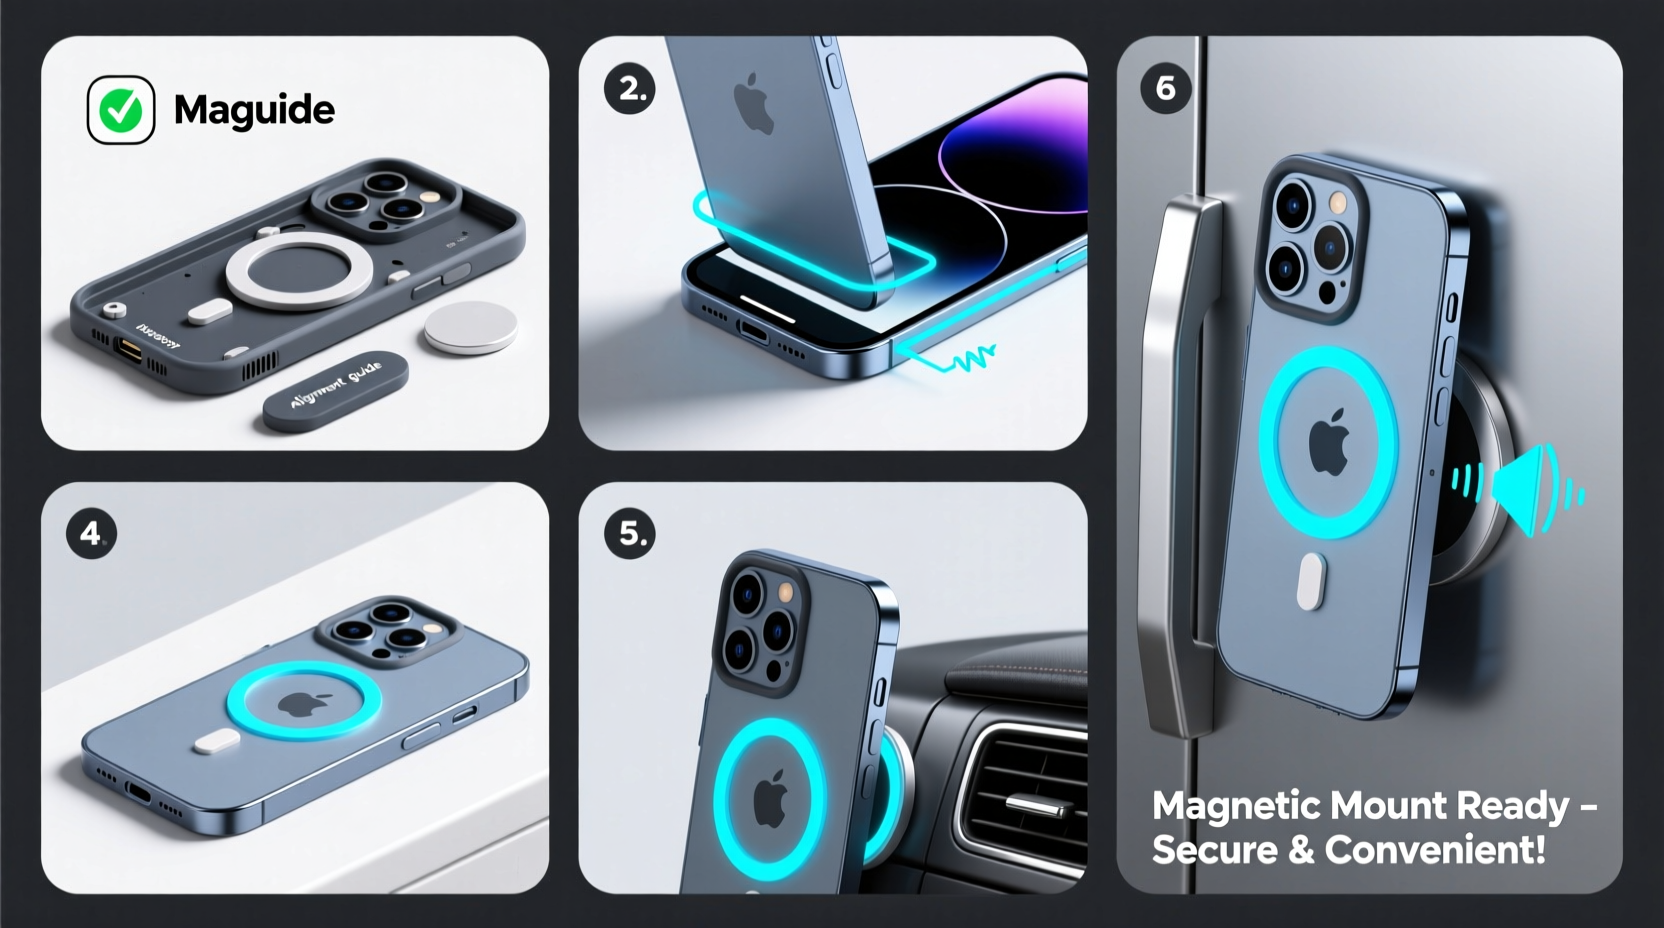
Step-by-Step Installation Process
Step 1: Prepare Your Workspace
Choose a clean, flat surface free of dust, lint, or debris. Use a soft microfiber cloth to wipe down your iPhone thoroughly, especially along the edges and around the camera bump. Any particles trapped between the phone and case can cause misalignment or scratching.
Step 2: Inspect the Case Components
Examine the interior of the magnetic case. Confirm that the magnet ring is centered and securely embedded. Check for any manufacturing defects such as warping, uneven thickness, or loose lining. If the case has a two-part design (inner liner + outer shell), assemble it first according to the manufacturer’s instructions.
Step 3: Align the Camera and Ports
Hold the case above your iPhone and carefully line up the cutouts. The camera module should fit snugly into the elevated bezel. Ensure the Lightning port opening matches the connector size—too tight could block plug insertion; too wide reduces dust resistance.
Step 4: Insert the iPhone from the Bottom Up
Start by guiding the bottom edge of the iPhone into the case, aligning the speaker grille and port with the corresponding openings. Then gently press the top of the phone into place. Avoid forcing the device; if resistance occurs, recheck alignment. For slim-fit cases, apply even pressure across both sides rather than pushing one corner at a time.
Step 5: Verify Magnet Alignment
Once seated, rotate your iPhone near a MagSafe charger. It should snap into place with a distinct magnetic pull and center automatically. If it attaches off-center or wobbles, remove the case and reseat the phone, double-checking internal alignment.
Step 6: Test Functionality
After installation, test all features:
- Press each button to confirm tactile feedback and full actuation.
- Plug in a Lightning cable to verify port access.
- Attach a MagSafe wallet or car mount to check magnetic strength and stability.
- Enable wireless charging to ensure no error messages appear.
Do’s and Don’ts During Installation
| Do’s | Don’ts |
|---|---|
| Use a lint-free cloth to clean the phone before installation | Install the case on a dusty or uneven surface |
| Align camera and port cutouts before pressing down | Force the phone into the case if there’s resistance |
| Check magnetic alignment using a MagSafe accessory | Use third-party adhesive rings under the case |
| Test button responsiveness after installation | Stretch or twist flexible cases during insertion |
| Verify wireless charging compatibility immediately | Leave protective films on the case interior |
Common Issues and How to Avoid Them
Even high-quality cases can underperform if installed incorrectly. One frequent issue is lateral shift—where the phone sits slightly askew inside the case, causing the internal magnets to misalign with the iPhone’s built-in array. This leads to inefficient charging and reduced accessory grip.
Another problem is compression damage. Over-tight cases, especially those made from low-grade TPU, can exert constant pressure on the volume or power buttons, leading to premature wear or unresponsiveness.
Real-World Example: Sarah’s Commute Upgrade
Sarah, a digital marketing consultant in Chicago, relied on her iPhone throughout her daily commute. She purchased a premium magnetic case to pair with a MagSafe car mount but noticed the phone frequently detached when driving over bumps. After inspecting the setup, she realized the case had been slightly rotated during installation, shifting the magnet position by just 2 millimeters. Reinstalling the case with precise alignment resolved the instability. Now, her phone stays locked in place, and she charges wirelessly at her desk without removing the case.
This minor correction improved both safety and efficiency—proving that attention to detail during installation delivers tangible benefits.
Essential Checklist for Successful Installation
- Power off the iPhone before beginning.
- Clean the phone’s surface with a microfiber cloth.
- Inspect the case for defects or debris inside.
- Align camera, ports, and buttons precisely.
- Insert the phone gently from bottom to top.
- Confirm magnetic snap and centering with a MagSafe charger.
- Test all physical buttons and connectivity ports.
- Verify wireless charging works without interruptions.
- Ensure the case doesn’t add bulk that hinders pocket carry.
- Recheck fit after 24 hours of use for any settling or shifting.
Frequently Asked Questions
Can I use a non-MagSafe case with MagSafe accessories?
No, standard cases lack the embedded magnet ring required for proper alignment and power transfer. Using a metal disc or adhesive ring with a regular case may damage your iPhone or cause overheating and is not recommended by Apple.
Will a magnetic case affect my iPhone’s battery life?
When properly installed and used with certified MagSafe chargers, magnetic cases do not negatively impact battery health. In fact, precise alignment improves charging efficiency and reduces heat buildup, which is beneficial for long-term battery longevity.
How often should I remove and reinstall the case?
There’s no need to routinely remove the case unless cleaning or switching devices. However, inspect the fit every few months. Dust accumulation or case degradation can loosen the grip, so occasional removal and reinstallation help maintain optimal contact.
Maximize Protection and Daily Convenience
A magnetic iPhone case offers more than just defense against drops—it integrates seamlessly into a connected lifestyle. From quick-mount navigation to reliable wireless charging, the right installation unlocks full functionality. Taking a few extra minutes to align, seat, and test the case ensures years of dependable use. Whether you're upgrading your current setup or replacing a worn case, precision now prevents frustration later.


 浙公网安备
33010002000092号
浙公网安备
33010002000092号 浙B2-20120091-4
Comments
No comments yet. Why don't you start the discussion?