
Upgrading your Apple Watch with a diamond bracelet band instantly elevates its elegance and personal style. These bands, often crafted with stainless steel links and embedded crystals or lab-grown diamonds, offer luxury without sacrificing functionality. However, improper installation can lead to scratches on the watch case, misalignment of lugs, or even damage to the band mechanism. Following a precise, careful process ensures both safety and long-term wearability. This guide walks through every stage—from preparation to final inspection—with expert-backed methods to preserve your investment.
Why Proper Installation Matters
A diamond bracelet band is more than just a fashion statement; it’s a precision accessory designed to complement the sleek engineering of the Apple Watch. Unlike silicone or nylon straps, metal bands require exact alignment when attaching to the watch’s proprietary lug system. The pressure from ill-fitted connections can stress internal components or compromise water resistance over time. Additionally, many diamond-accented bands use delicate settings that may loosen if subjected to abrupt force during installation.
Apple designs its bands with user-replaceable mechanisms, but luxury variations—especially third-party models with gemstone embellishments—often have tighter tolerances. Rushing the process risks cosmetic blemishes or mechanical failure. Taking deliberate steps not only protects your device but also maintains warranty eligibility, as physical damage from misuse isn’t covered under standard terms.
“Even minor misalignment during band installation can accelerate wear on the watch’s connectors. With high-end bands, especially those with intricate detailing, patience is non-negotiable.” — Daniel Park, Senior Watch Technician at LuxTime Repairs
Preparation: Tools and Environment Setup
Before handling your Apple Watch or new band, create a clean, organized workspace. Choose a flat surface away from edges to prevent accidental drops. Use a soft microfiber cloth to lay the watch on, minimizing contact with hard materials like wood or glass that could scratch the display.
You won’t need specialized tools for most Apple Watch bands, including diamond bracelet styles, since they use Apple’s quick-release mechanism. However, having the following items on hand improves control and reduces risk:
- Clean, lint-free gloves (to avoid transferring oils)
- Magnifying glass or bright task lighting (for inspecting tiny mechanisms)
- Small container (to hold screws or pins if replacing link-based bands)
- Isopropyl alcohol wipes (for cleaning lugs before attachment)
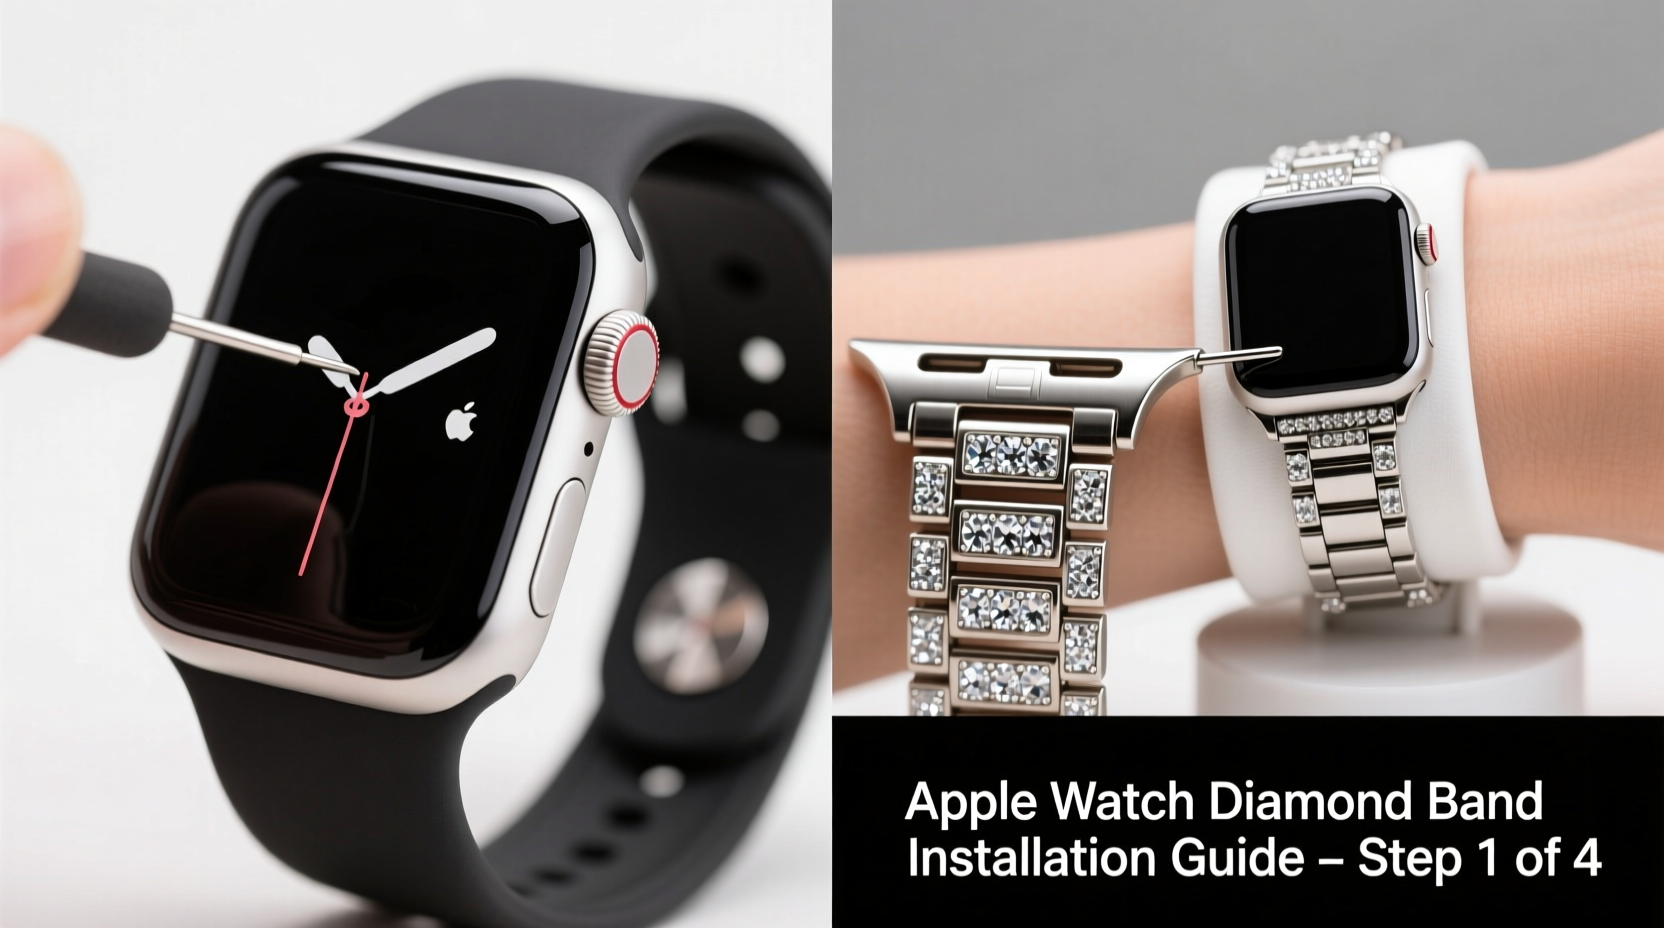
Step-by-Step Installation Process
Follow this chronological sequence to ensure secure and safe attachment of your diamond bracelet band:
- Inspect Both Components: Check the band’s connectors for debris or manufacturing defects. Examine the watch lugs for cracks or prior wear. Ensure the release buttons on the band are functional.
- Clean the Watch Lugs: Gently wipe around each lug with an alcohol-dampened swab. Allow to dry completely. Dust or residue can interfere with proper seating.
- Align the First Connector: Hold the band at a 45-degree angle and insert one end into the lower lug (case side). Apply light, steady pressure until you hear a soft click. Do not force it.
- Secure the Second Side: Pivot the other connector toward the upper lug. Keep fingers clear of the hinge area. Press straight in until fully seated. You should feel firm resistance followed by a definitive snap.
- Test Stability: Gently tug the band in multiple directions. There should be no lateral movement or wobbling. If loose, detach and repeat alignment.
- Verify Display Clearance: Place the watch face-down on a soft cloth. Confirm the band doesn’t press against the screen. Some oversized designs may require adjustment.
Adjusting Fit for Comfort
If your diamond bracelet band includes removable links, adjust sizing before final wear. Use a pin removal tool to extract links symmetrically from both sides. Always recheck connection security after resizing. Over-tightening can warp the clasp mechanism, while too loose increases the chance of snagging.
| Action | Recommended Practice | Common Mistake to Avoid |
|---|---|---|
| Connector Alignment | Insert at a slight upward angle | Pushing straight in, causing misalignment |
| Pressure Applied | Firm but gradual pressure | Using excessive force or leverage |
| Post-Installation Check | Rotate band gently to test pivot | Assuming “clicked” means secure without testing |
| Cleaning Frequency | Wipe lugs monthly with alcohol | Neglecting buildup that affects fit |
Real-World Example: A Cautionary Tale
Sophia, a marketing executive in Chicago, purchased a premium diamond-accented bracelet band online for her Series 8 Apple Watch. Excited to wear it to a client dinner, she attempted installation on her kitchen counter without gloves. In her haste, she failed to notice a speck of sand lodged in the lower lug. When she pressed the connector in, the grit scratched the titanium casing near the hinge. Though the band functioned normally, the visible mark diminished the aesthetic appeal. After consulting an authorized service provider, she learned that microscopic abrasions could worsen over time due to metal-on-metal friction. She now follows a strict pre-installation cleaning ritual and keeps a dedicated toolkit in her jewelry box.
Essential Checklist for Safe Installation
Use this checklist before, during, and after installation to minimize risks:
- ✅ Wash and dry hands or wear lint-free gloves
- ✅ Power off the Apple Watch
- ✅ Clean lugs and band connectors with isopropyl alcohol
- ✅ Inspect all parts for defects or debris
- ✅ Align connectors at a 45° angle before pressing
- ✅ Engage one side first, then pivot and secure the second
- ✅ Test stability with gentle pulling motions
- ✅ Visually confirm flush seating on both ends
- ✅ Perform final check after wearing for 10 minutes
Frequently Asked Questions
Can I install a third-party diamond bracelet band without voiding my warranty?
Yes, using a third-party band does not void your Apple Watch warranty unless damage occurs during installation. Apple explicitly states that accessory compatibility doesn’t affect coverage. However, any physical harm caused by improper fitting—such as bent lugs or cracked casings—is considered user damage and excluded from protection.
How tight should the band feel when attached?
The band should be immovable side-to-side but still allow smooth pivoting where it meets the watch. If you detect play or hear clicking when moving the watch face, detachment is likely imminent. Reinstall immediately to prevent loss or impact damage.
Are diamond bracelet bands compatible with all Apple Watch models?
Most are designed for specific case sizes (e.g., 41mm, 45mm) and finishes (aluminum, stainless steel, titanium). Always verify compatibility with your exact model before purchase. Older bands may not fit newer curved lugs introduced in Series 6 and later.
Final Thoughts and Next Steps
Your Apple Watch is both a technological marvel and a personal accessory. Pairing it with a diamond bracelet band enhances its presence, whether in professional settings or evening events. But luxury demands care. By treating the installation process with the same attention as selecting the band itself, you preserve both function and beauty. Small habits—like cleaning lugs monthly, checking fit weekly, and storing components properly—compound into years of flawless performance.


 浙公网安备
33010002000092号
浙公网安备
33010002000092号 浙B2-20120091-4
Comments
No comments yet. Why don't you start the discussion?