
Changing the strap on your smartwatch is one of the easiest ways to refresh its look or improve comfort during workouts, sleep tracking, or formal events. However, improper installation can lead to loose fittings, accidental drops, or even damage to the watch lugs. A secure strap isn’t just about aesthetics—it’s essential for safety and functionality. Whether you’re switching from a silicone band to a leather strap or upgrading to a metal mesh, doing it correctly ensures durability and peace of mind.
Understanding Watch Strap Types and Compatibility
Before beginning, confirm that your new strap is compatible with your smartwatch model. Most popular devices—like Apple Watch, Samsung Galaxy Watch, Garmin, and Fitbit Sense—use proprietary quick-release systems or standard lug widths. Mismatched straps won’t attach properly, increasing the risk of detachment.
Common strap types include:
- Silicone/Rubber: Ideal for sports and swimming; water-resistant and flexible.
- Leather: Stylish for daily wear but not suitable for moisture-heavy activities.
- Stainless Steel/Mesh: Durable and adjustable, often used for professional settings.
- Nylon/Fabric: Lightweight and breathable, great for casual use.
- Third-party bands: Ensure they list compatibility with your exact model (e.g., “Fits Apple Watch 9 & Ultra 2”)
Tools You’ll Need for Installation
You don’t always need tools, but having the right ones makes the process faster and safer. Here’s what to gather before starting:
| Tool | Purpose | Optional? |
|---|---|---|
| Micro screwdriver or plastic pry tool | Leverage for releasing straps without scratching | Yes, if using fingers carefully |
| Cleaning cloth | Wipe down lugs and connectors to remove debris | No – prevents grit buildup |
| Magnifying glass (optional) | Inspect tiny mechanisms for wear or misalignment | Yes |
| New strap with correct hardware | Ensure included pins or adapters match your device | No – critical |
Never force a connection. If parts don’t align smoothly, double-check orientation and compatibility before applying pressure.
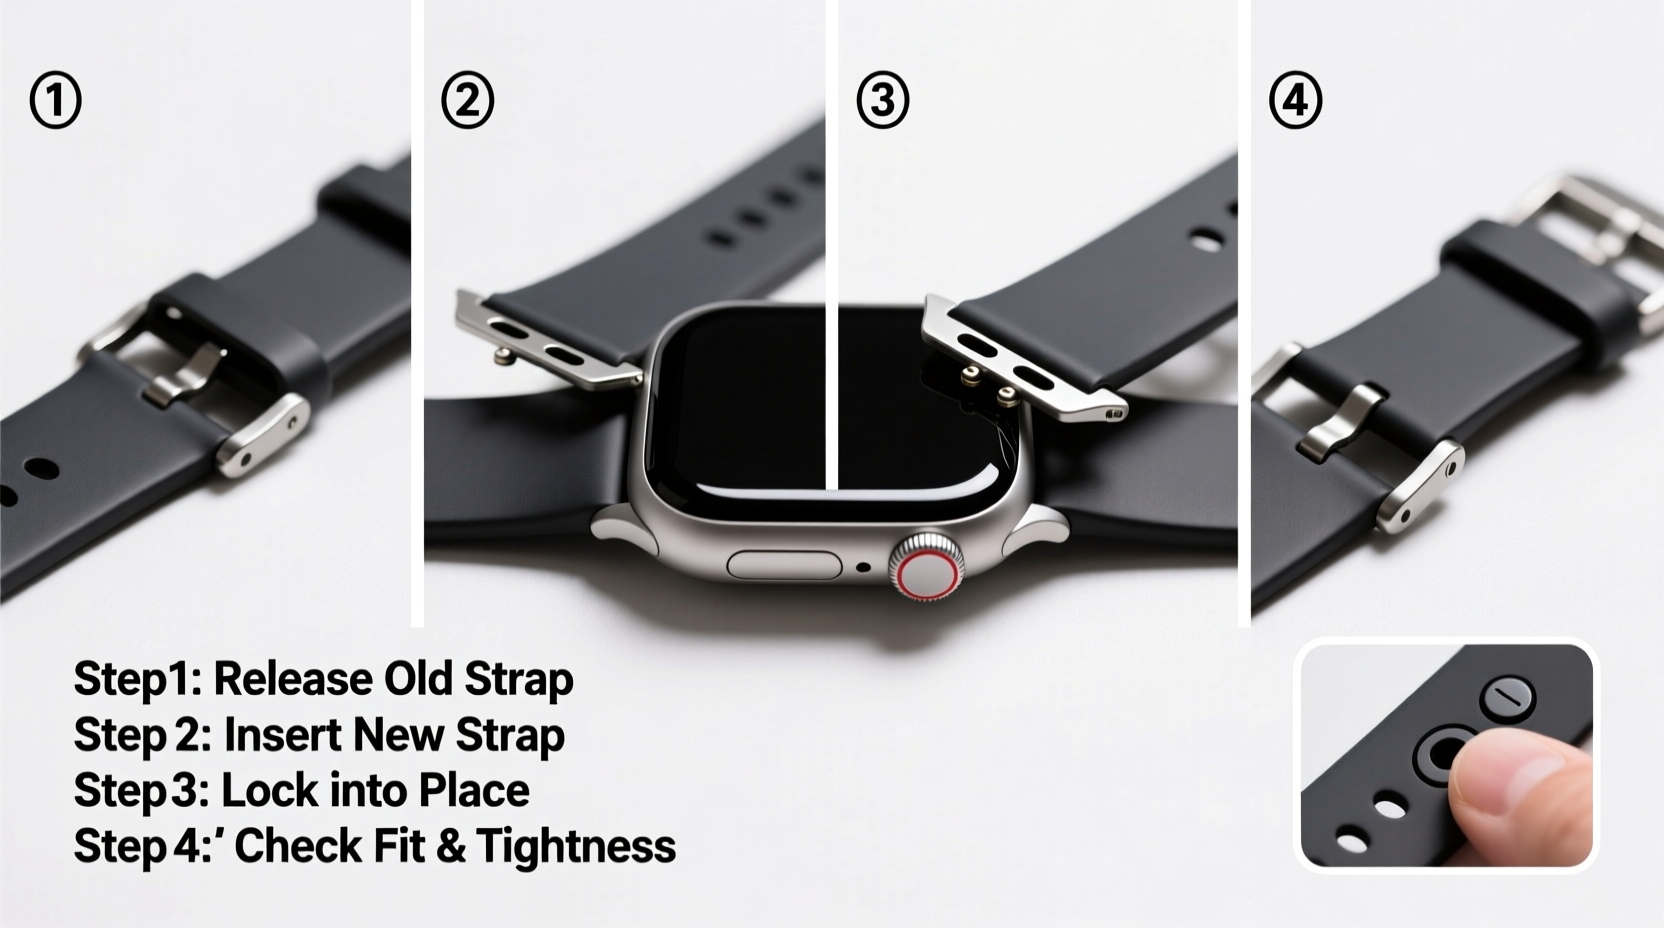
Step-by-Step Guide to Installing Your Smartwatch Strap
- Power down your smartwatch (optional but recommended): While not required, turning off the device reduces the chance of accidental input during handling.
- Position the watch face-down on a soft surface: Use a microfiber cloth to prevent scratches on the screen or casing.
- Locate the release mechanism: On Apple Watches, press the small button near the lug; on Samsung models, slide the lever sideways. Some third-party bands have spring bars accessible via narrow gaps.
- Gently detach the old strap: Apply light pressure to the release point and pull the strap straight out. Do not twist or yank.
- Inspect the lug area: Look for dirt, bent pins, or signs of wear. Clean gently with a dry cotton swab if needed.
- Align the new strap with the lugs: Match the connector end precisely with the slot. For spring bar systems, compress the bar slightly to fit into place.
- Insert and lock the strap: Push firmly until you hear or feel a click. Wiggle the strap gently to test stability.
- Repeat on the opposite side: Attach the other end using the same method. Ensure both sides are seated evenly.
- Test movement and tension: Rotate the watch head slightly to confirm there’s no excessive play. A small amount of wiggle is normal; large gaps indicate poor fit.
- Turn the device back on and wear it: Monitor how it feels over the first few hours. Adjust tightness as needed for comfort.
“Over 70% of smartwatch damage from falls occurs due to improperly secured straps. Taking five extra minutes to verify attachment can save hundreds in repair costs.” — Jordan Lee, Wearable Device Technician at TechCare Labs
Securing the Strap for Long-Term Safety
Installation isn’t complete once the strap clicks into place. True security comes from post-installation checks and habits.
Follow these steps to ensure lasting reliability:
- Recheck connections after 24 hours of wear—materials can settle or shift slightly.
- Avoid exposing leather or fabric bands to water unless explicitly rated for it.
- Rotate straps regularly to reduce stress on individual connectors.
- Store spare straps in labeled containers to avoid mix-ups between models.
Mini Case Study: How a Loose Strap Led to Costly Damage
Mark, a fitness instructor in Denver, switched to a budget nylon band for his Apple Watch Series 8 before a high-intensity class. He assumed the quick-release system was universal and didn’t verify the pin depth. Midway through a jump rope session, the watch detached unnoticed and landed face-down on concrete. The screen cracked, and moisture entered the casing through a compromised seal. Repair cost: $249. A simple 30-second verification could have prevented this. Now, Mark keeps a checklist taped inside his charging drawer: “Check strap. Confirm fit. Test wiggle.”
Do’s and Don’ts When Changing Smartwatch Straps
| Do’s | Don’ts |
|---|---|
| Verify compatibility before purchase | Force a strap that doesn’t align easily |
| Clean lugs and connectors monthly | Use metal tools near delicate pins |
| Carry a backup strap for emergencies | Leave a loose strap unattended on hard surfaces |
| Inspect for wear every two weeks | Soak non-waterproof straps in cleaning solutions |
Frequently Asked Questions
Can I use any third-party strap on my smartwatch?
Only if it's specifically designed for your model. While some brands adhere to standard lug widths (e.g., 20mm, 22mm), many—including Apple and Samsung—use custom connectors. Using incompatible straps may void warranties or cause permanent lug damage.
How tight should my smartwatch strap be?
Tight enough to stay secure during motion but loose enough to allow one finger between the band and your wrist. Over-tightening restricts circulation and accelerates skin irritation, especially with silicone bands.
Why does my strap keep coming loose?
This usually indicates worn spring bars, damaged lugs, or incorrect installation. Replace aging hardware promptly. Also, consider environmental factors—heat and sweat can expand materials temporarily, leading to perceived looseness later.
Final Checklist Before Wearing
📋 Smartwatch Strap Installation Checklist:- ✅ Confirmed strap compatibility with device model
- ✅ Watch powered off and placed on soft surface
- ✅ Old strap removed without force or twisting
- ✅ Lug areas cleaned and inspected for damage
- ✅ New strap aligned and fully engaged on both sides
- ✅ Secure fit verified with gentle tug test
- ✅ Watch worn for short trial period to assess comfort
Conclusion
A well-installed smartwatch strap enhances both performance and personal style. More importantly, it protects a valuable investment from preventable accidents. By following precise installation techniques, conducting regular inspections, and choosing quality-compatible accessories, you extend the life of your device and maintain confidence in its reliability. Don’t overlook the small details—they make the biggest difference when you're on the move.


 浙公网安备
33010002000092号
浙公网安备
33010002000092号 浙B2-20120091-4
Comments
No comments yet. Why don't you start the discussion?