
Drawing anime characters can seem like a complex art form, but every expert started where you are now—with a blank page and a desire to create. The secret to building consistent, expressive characters lies not in talent, but in structure. By breaking down anime figures into simple geometric forms, you develop spatial awareness, proportion control, and artistic confidence. This guide walks you through a proven method of constructing anime characters from circles, ovals, rectangles, and lines—transforming abstract shapes into dynamic, stylized figures.
Why Start with Basic Shapes?
Basic shapes serve as the architectural blueprint for any drawing. In anime art, where proportions are often exaggerated—large eyes, small noses, elongated limbs—starting with structured forms prevents distortion and maintains balance. Circles define heads and joints, ovals shape torsos, and straight lines map out limbs and posture. These foundational elements act as placeholders, allowing you to focus on anatomy before diving into details.
Professional illustrators and animation studios use this approach daily. It streamlines production and ensures consistency across multiple frames and characters. When you master shape-based construction, you’re not just learning to draw—you're learning to think like a designer.
“Most beginners skip the basics and go straight for the details. That’s why their drawings lack coherence. Shape-first thinking builds visual logic.” — Hiroshi Tanaka, Lead Animator at Studio Ghibli (retired)
The Core Shapes and Their Roles in Anime Sketching
Understanding how each shape functions within a character's design is essential. Below is a breakdown of the primary geometric forms and their applications:
- Circles: Used for heads, eyes, joints (elbows, knees), and facial features.
- Ovals: Ideal for torsos, pelvises, hands, feet, and ribcages.
- Rectangles and Cylinders: Represent limbs, necks, and simplified muscle groups.
- Lines: Define posture, spine alignment, gesture flow, and limb direction.
- Triangles: Occasionally used for hair masses, shoulders, or dynamic poses.
These aren’t rigid templates—they’re flexible guides. As your skill grows, you’ll adjust and refine these shapes intuitively, but early precision ensures long-term improvement.
Step-by-Step Guide: Constructing an Anime Character from Shapes
Follow this structured timeline to build a full anime character from scratch. This process takes 15–30 minutes per sketch and should be repeated regularly to build muscle memory.
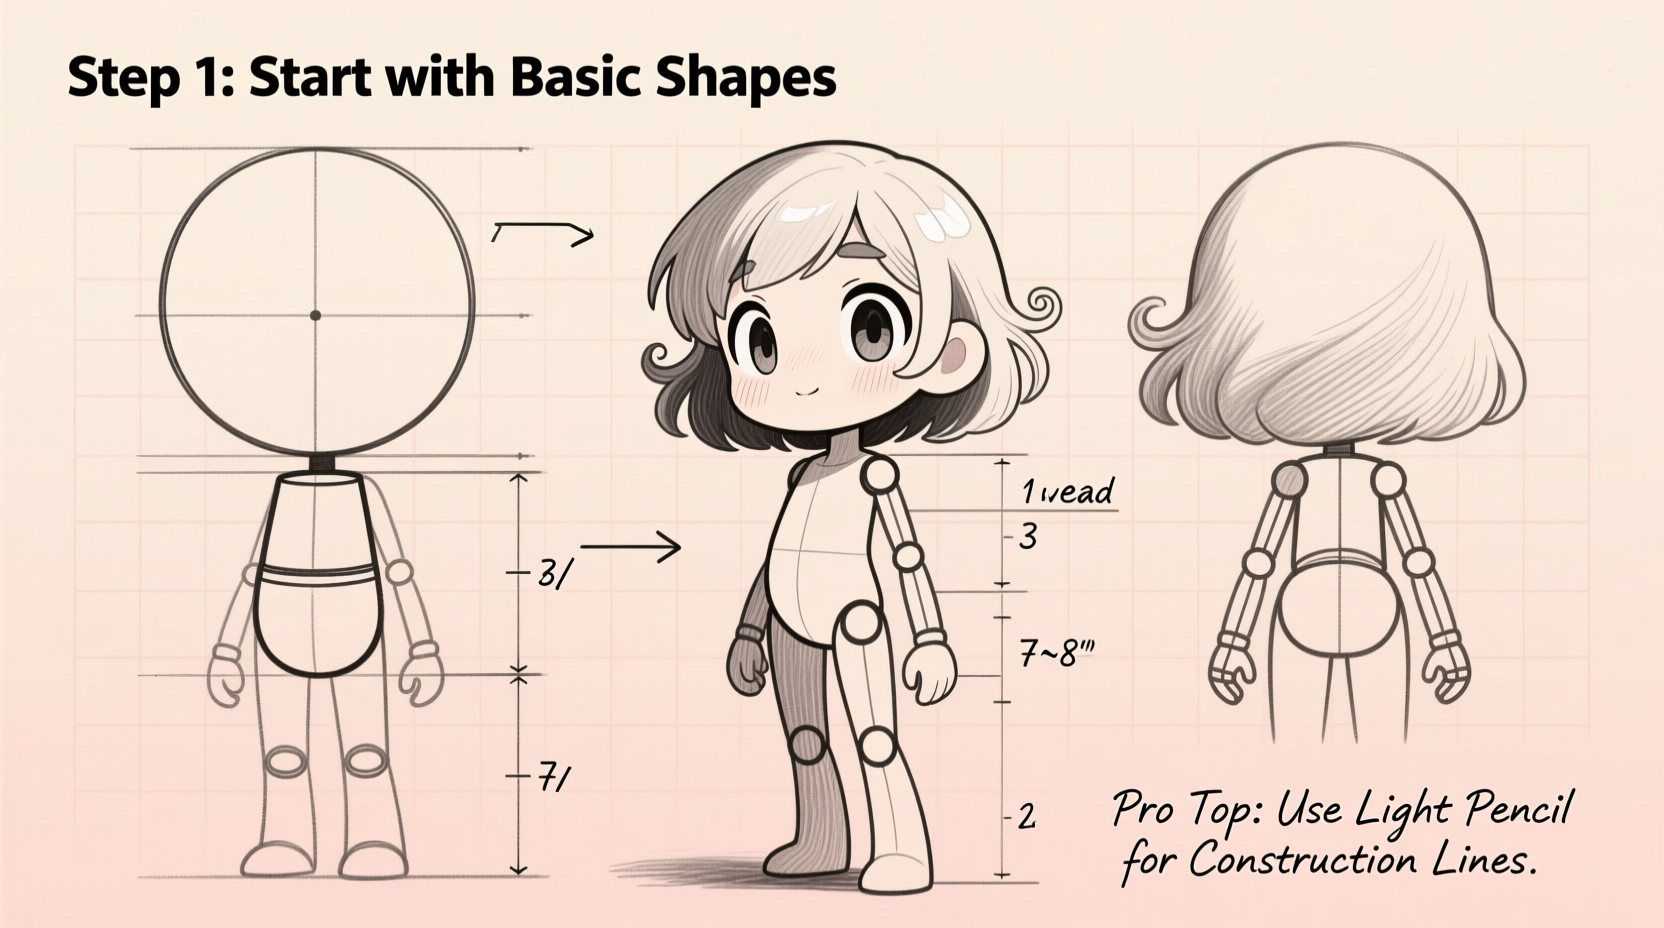
- Establish the Head Circle
Draw a clean circle near the top third of your page. This will be the cranium. Avoid making it too large—most anime heads are one-fifth to one-seventh of the total body height. - Add the Chin Line (Jaw Guide)
Beneath the circle, sketch a vertical centerline extending downward. At the bottom, draw a soft U-shape or tapered oval for the jaw. This creates the full head form: circle + chin. - Define the Eye Line
Draw a horizontal line through the center of the head circle. Eyes typically sit along this midline. A second horizontal line below it marks the nose level, and another halfway between nose and chin sets the mouth position. - Construct the Torso
Below the head, draw an elongated oval or capsule shape for the chest. Slightly tilt it to suggest natural posture. Add a smaller oval beneath for the pelvis, aligned or slightly offset depending on stance. - Connect with the Spine Line
Draw a gentle curve from the base of the head through the chest and pelvis. This represents the spine and helps maintain fluid posture. If the character leans, bend this line accordingly. - Sketch Limbs Using Cylinders
Arms and legs are built from paired lines forming cylinders. Start with shoulder points, extend lines for upper arms, add elbow circles, then forearm lines ending in hand ovals. Repeat for legs, connecting hips to knees and ankles. - Refine Proportions
Anime characters range from chibi (2–4 heads tall) to realistic (7–8 heads). Measure the head height and stack it vertically to check limb placement. For example, fingertips should reach mid-thigh in a relaxed pose. - Add Hands and Feet
Treat hands as small ovals with three tiny circles for knuckles. Feet are egg-shaped with a pointed toe end. Position them according to weight distribution—flat on ground, angled, or lifted. - Outline the Final Form
Once satisfied with the underlying structure, trace over the shapes with cleaner, more defined lines. Adjust curves for naturalism—soften shoulders, taper limbs, refine the jawline. - Erase Guidelines and Add Details
Carefully erase construction lines. Begin adding facial features: large eyes on the eye line, small nose on the nose line, subtle mouth below. Style hair by following head contours with flowing lines anchored at the scalp.
Common Pitfalls and How to Avoid Them
Even with a solid framework, beginners often fall into predictable traps. Recognizing these early saves months of frustration.
| Pitfall | Why It Happens | How to Fix It |
|---|---|---|
| Disproportionate heads | Starting too large or misjudging scale | Use head-height measurement to plan full figure before detailing |
| Stiff, robotic poses | Rigid alignment of shapes without flow | Emphasize the spine curve and offset hips/shoulders |
| Uneven eyes or facial asymmetry | Adding details before establishing symmetry | Use crosshairs on head circle to align features precisely |
| Limb misalignment | Attaching arms/legs without joint circles | Mark shoulders, elbows, wrists, hips, knees, and ankles with dots first |
| Over-detailing too soon | Focusing on hair or clothes before structure | Complete full under-structure before adding clothing folds or accessories |
Real Example: From Beginner to Confident Sketcher
Sophie, a 22-year-old art student, struggled for months drawing consistent anime faces. Her characters looked different every time, even when intended as the same person. After attending a workshop focused on shape-based construction, she began applying the circle-and-line method daily. For two weeks, she drew nothing but wireframes—heads, torsos, limbs—without adding features.
By week three, her confidence grew. She could draw a character in six different poses with accurate proportions. Within a month, her friends noticed a dramatic improvement in her portfolio. “I was trying to draw ‘a girl,’ but I wasn’t building her,” Sophie said. “Now I start with shapes like I’m assembling a model. It changed everything.”
Essential Checklist for Every Sketch Session
Before starting your next drawing, run through this checklist to ensure a strong foundation:
- ✅ Paper and pencil (or digital tablet) ready
- ✅ Reference image open (if using)
- ✅ Light source considered (for future shading)
- ✅ Head circle placed correctly on page
- ✅ Vertical centerline and eye line drawn
- ✅ Torso and pelvis ovals aligned with spine curve
- ✅ Limb cylinders connected through joint circles
- ✅ Proportions checked using head-unit measurement
- ✅ Final outline refined before erasing guides
- ✅ Facial features added symmetrically using crosshairs
Advanced Tips for Refining Your Style
Once you’re comfortable with the fundamentals, begin experimenting within the framework:
- Vary head shapes: While most anime use perfect circles, try slightly squashed or stretched ovals for unique silhouettes—ideal for distinguishing character personalities.
- Exaggerate proportions: Chibi characters use 2–3 head heights; heroic leads may stretch to 8. Maintain internal consistency once you choose a style.
- Use overlapping shapes: Let the arm cylinder partially cover the torso oval to create depth and dimension.
- Incorporate dynamic angles: Tilt the head circle, twist the spine line, or foreshorten limbs using compressed cylinders.
- Study real anatomy: Even stylized anime is rooted in human movement. Understanding bone and muscle structure improves believability.
“The best anime artists don’t ignore realism—they reinterpret it. Shapes are the bridge between anatomy and style.” — Mika Sato, Character Designer at Aniplex
Frequently Asked Questions
How long does it take to master anime sketching with basic shapes?
With consistent practice (3–5 sessions per week), most learners see noticeable improvement within 4–6 weeks. Mastery—defined as drawing any pose confidently from imagination—typically takes 6–12 months. Progress depends more on deliberate practice than time spent.
Can I use digital tools for this method?
Absolutely. Digital platforms like Clip Studio Paint, Procreate, or Photoshop offer layers, which are ideal for separating construction lines from final linework. Use a low-opacity brush for initial shapes and a clean ink brush for outlining.
What if my drawings still look stiff?
Stiffness usually comes from symmetrical posing and straight limbs. Introduce slight bends in elbows and knees, shift the weight to one leg, and curve the spine into an S-shape. Even small adjustments create lifelike motion.
Conclusion: Start Simple, Think Structurally
Mastering anime character sketching isn’t about copying favorites perfectly on the first try—it’s about developing a repeatable process that turns imagination into reality. Starting with basic shapes gives you control, reduces overwhelm, and builds a technical foundation that supports creative freedom. Every line you draw strengthens your eye for proportion, balance, and expression.
You don’t need expensive tools or formal training. Just a pencil, paper, and the willingness to practice. Begin today with a single circle. Turn it into a head, then a body, then a character with personality. Repeat. Refine. Evolve. The journey from shaky outlines to confident sketches begins with one deliberate stroke.


 浙公网安备
33010002000092号
浙公网安备
33010002000092号 浙B2-20120091-4
Comments
No comments yet. Why don't you start the discussion?