
Customizing your footwear with painted soles is more than just a trend—it's an expression of individuality. Whether you're refreshing worn-out sneakers or creating bold fashion statements, mastering the art of sole painting elevates your style game. Done correctly, painted soles can last months, even under regular wear. But without proper preparation and technique, the paint chips within days. This comprehensive guide walks you through every phase of the process, from selecting the right materials to sealing your design for maximum durability.
Why Paint Shoe Soles?
The outsole—the bottom part of your shoe—is often overlooked, yet it offers a unique canvas for creativity. Artists, sneaker enthusiasts, and DIYers alike use sole painting to personalize their footwear, commemorate events, or align with seasonal themes. Beyond aesthetics, repainting worn soles can extend a shoe’s life and protect rubber from further degradation.
However, this isn’t a simple craft project. The sole endures constant friction, moisture, and flexing. That demands specialized materials and methods. A successful paint job must resist peeling, maintain color integrity, and bond securely with rubber or EVA foam.
Essential Materials and Tools
Using the correct supplies is half the battle. Standard craft paints won’t adhere to rubber surfaces. Below is a curated list of what you’ll need for professional-grade results:
- Rubber-specific primer – Creates a bonding surface for paint on non-porous rubber.
- Acrylic paint for fabric/rubber – Brands like Angelus Direct or Jacquard offer flexible, fade-resistant options.
- Fine-tipped detail brushes – For intricate designs; synthetic bristles hold shape better.
- Masking tape or liquid latex – Protects upper material and ensures clean edges.
- Sanding block (150–220 grit) – Roughens the sole to improve paint adhesion.
- Isopropyl alcohol (70% or higher) – Cleans oils and residues pre-paint.
- Dual-part resin sealer (e.g., Angelus Finisher) – Provides a tough, clear protective coat.
- Toothpicks or dotting tools – Ideal for small patterns or textures.
“Most failed sole paint jobs come down to skipping prep. Sanding and cleaning aren't optional—they’re foundational.” — Marcus Tran, Custom Footwear Artist with 12 years of experience
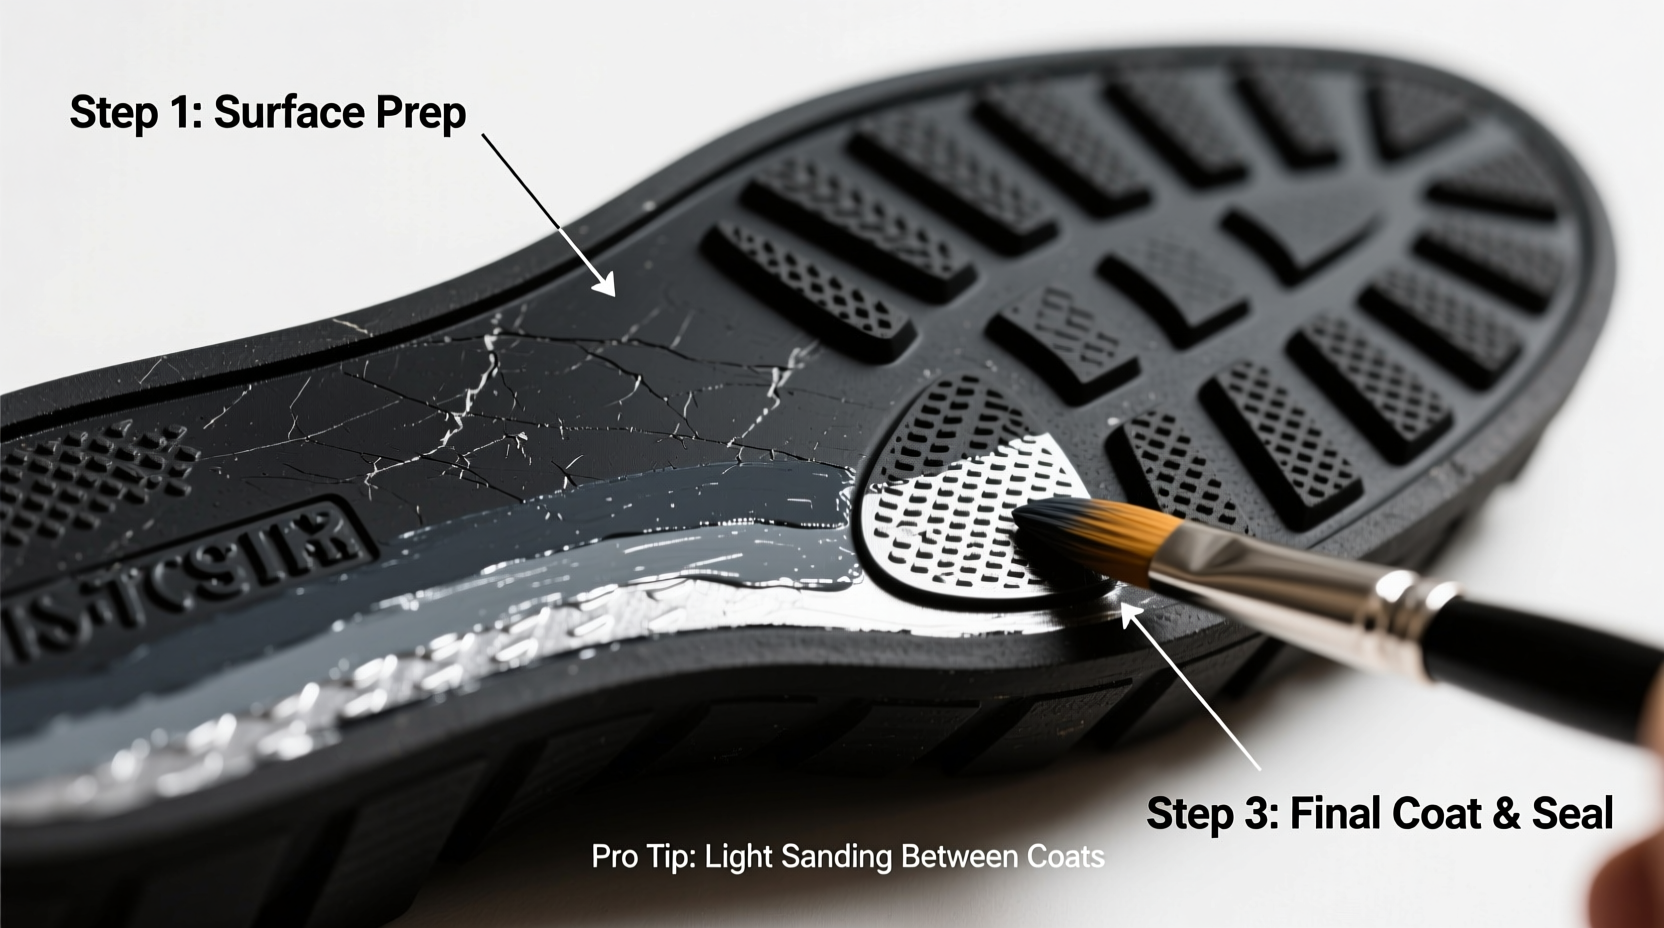
Step-by-Step Painting Process
Follow this detailed sequence to achieve crisp, lasting results:
- Remove laces and clean shoes: Wipe down the entire shoe with mild soap and water. Let dry completely.
- Mask off areas: Use high-quality masking tape to cover the midsole, upper, and any parts you don’t want painted. For complex curves, apply liquid latex and peel off after painting.
- Sand the sole: Gently scuff the entire surface with medium-grit sandpaper. Focus on glossy areas. Wipe away dust with a lint-free cloth.
- Clean with alcohol: Dampen a cotton pad with isopropyl alcohol and thoroughly wipe the sole. This removes invisible oils that hinder adhesion.
- Apply primer: Use a thin, even coat of rubber primer. Let dry 15–20 minutes. Do not skip this step—even if your paint claims “no primer needed.”
- Paint base layer: Apply your first coat of acrylic rubber paint with steady, overlapping strokes. Let dry 30 minutes. Apply a second coat if needed.
- Add details: Once the base is fully dry, use smaller brushes for designs, logos, or gradients. Work patiently—rushing leads to smudges.
- Cure the paint: Allow at least 24 hours for full curing before sealing. Some artists recommend heat-setting with a hairdryer (low heat) for 2–3 minutes to accelerate bonding.
- Seal with finisher: Apply 2–3 thin coats of dual-part resin sealer, waiting 1 hour between layers. This creates a glass-like shield against abrasion.
- Final cure: Wait 48 hours before wearing. Avoid wet conditions during this period.
Do’s and Don’ts: Common Mistakes to Avoid
| Do’s | Don’ts |
|---|---|
| Use rubber-specific paints and sealers | Use regular acrylic craft paint |
| Sand and clean the sole thoroughly | Paint over dirty or glossy rubber |
| Apply multiple thin coats instead of one thick layer | Apply heavy globs of paint that take forever to dry |
| Allow full curing time before wearing | Wear freshly painted shoes immediately |
| Store shoes in a cool, dry place away from direct sunlight | Leave shoes in hot cars or damp basements |
Real Example: Transforming Vintage Sneakers
Jamie, a streetwear enthusiast in Portland, inherited a pair of classic white-soled Converse from her older brother. After years of use, the yellowed soles looked dull and unappealing. Instead of discarding them, she decided to restore them with a bold black-and-gold geometric pattern.
She followed the full prep process—sanding, priming, and cleaning—and used Angelus paints for precision. After two base coats and hand-drawn gold accents, she sealed everything with a matte-satin hybrid finisher. The result? A head-turning custom pair that lasted over six months with minimal chipping, even with daily urban walking.
“People constantly ask where I bought them,” Jamie said. “I love that I gave old shoes new life—and made them uniquely mine.”
Expert Tips for Longevity and Style
To get the most out of your painted soles, consider these advanced insights:
- Rotate your shoes: Avoid wearing painted footwear every day. Alternating pairs reduces stress on the coating.
- Touch-up kit: Keep leftover paint and a mini brush in a small pouch for minor repairs.
- Reapply sealer every 4–6 weeks: Especially if you live in rainy climates or walk frequently on rough terrain.
- Use UV-resistant paints: Prevents fading if you spend time outdoors.
- Experiment on cheap shoes first: Practice gradients, stencils, or freehand art on less valuable pairs.
Frequently Asked Questions
How long do painted soles typically last?
With proper prep and sealing, painted soles can last 3 to 6 months under regular use. High-wear areas like heels may show wear sooner. Reapplying a fresh coat of sealer monthly extends lifespan significantly.
Can I paint colored or transparent soles?
Yes, but light-colored paints may require extra base coats on dark or translucent rubber. For best opacity, start with a white rubber paint underlayer before adding your final color.
Is it safe to wash painted shoes?
Avoid machine washing. Spot-clean with a damp cloth and mild detergent. Submerging the soles in water weakens the bond over time, especially before full curing.
Final Checklist Before You Begin
- Preparation
- ☐ Remove laces and clean shoes
- ☐ Mask off upper sections
- ☐ Sand sole surface lightly
- ☐ Wipe with isopropyl alcohol
- Painting
- ☐ Apply rubber primer
- ☐ Paint 2 thin base coats
- ☐ Add designs once base is dry
- Finishing
- ☐ Cure for 24 hours
- ☐ Seal with 2–3 resin coats
- ☐ Final cure for 48 hours before wear
Conclusion: Step Into Your Creative Potential
Painting shoe soles isn’t just about color—it’s about craftsmanship, patience, and personal flair. With the right materials and methodical approach, anyone can achieve results that rival professional customizers. The key lies in respecting the process: prepare thoroughly, choose quality products, and protect your work with proper sealing.
Your shoes are an extension of your identity. Why settle for mass-produced when you can create something truly one-of-a-kind? Grab your brushes, lay out your supplies, and transform that blank sole into a statement piece. The only limit is your imagination.


 浙公网安备
33010002000092号
浙公网安备
33010002000092号 浙B2-20120091-4
Comments
No comments yet. Why don't you start the discussion?