
Cheesecake bites are a crowd-pleasing dessert that combines rich, velvety texture with the convenience of portion control. Whether you're preparing for a party, a family gathering, or simply indulging in a personal treat, homemade creamy cheesecake bites offer superior flavor and quality compared to store-bought versions. The key lies not just in the ingredients, but in the technique. With attention to detail and a few essential practices, you can achieve a silky-smooth consistency every time—no cracks, no graininess, just perfection in a bite-sized form.
Why Homemade Cheesecake Bites Are Worth the Effort
Commercial mini cheesecakes often rely on stabilizers and preservatives to maintain shape and shelf life, sacrificing flavor and mouthfeel. When made at home, you control the ingredients: real cream cheese, pure vanilla, fresh butter, and high-quality graham crackers for the crust. The result is a dessert that melts in your mouth, with balanced sweetness and a luxurious richness that’s hard to replicate otherwise.
Beyond taste, the process itself is surprisingly simple when broken down into clear steps. Unlike full-sized cheesecakes, which can be intimidating due to their size and baking sensitivity, cheesecake bites are forgiving, quicker to cool, and easier to customize. You can experiment with flavors, toppings, and even dietary adjustments without wasting large quantities if a batch doesn’t turn out as expected.
The Essential Ingredients and Equipment
Using the right components sets the foundation for success. Below is a breakdown of what you’ll need for classic creamy cheesecake bites:
Core Ingredients
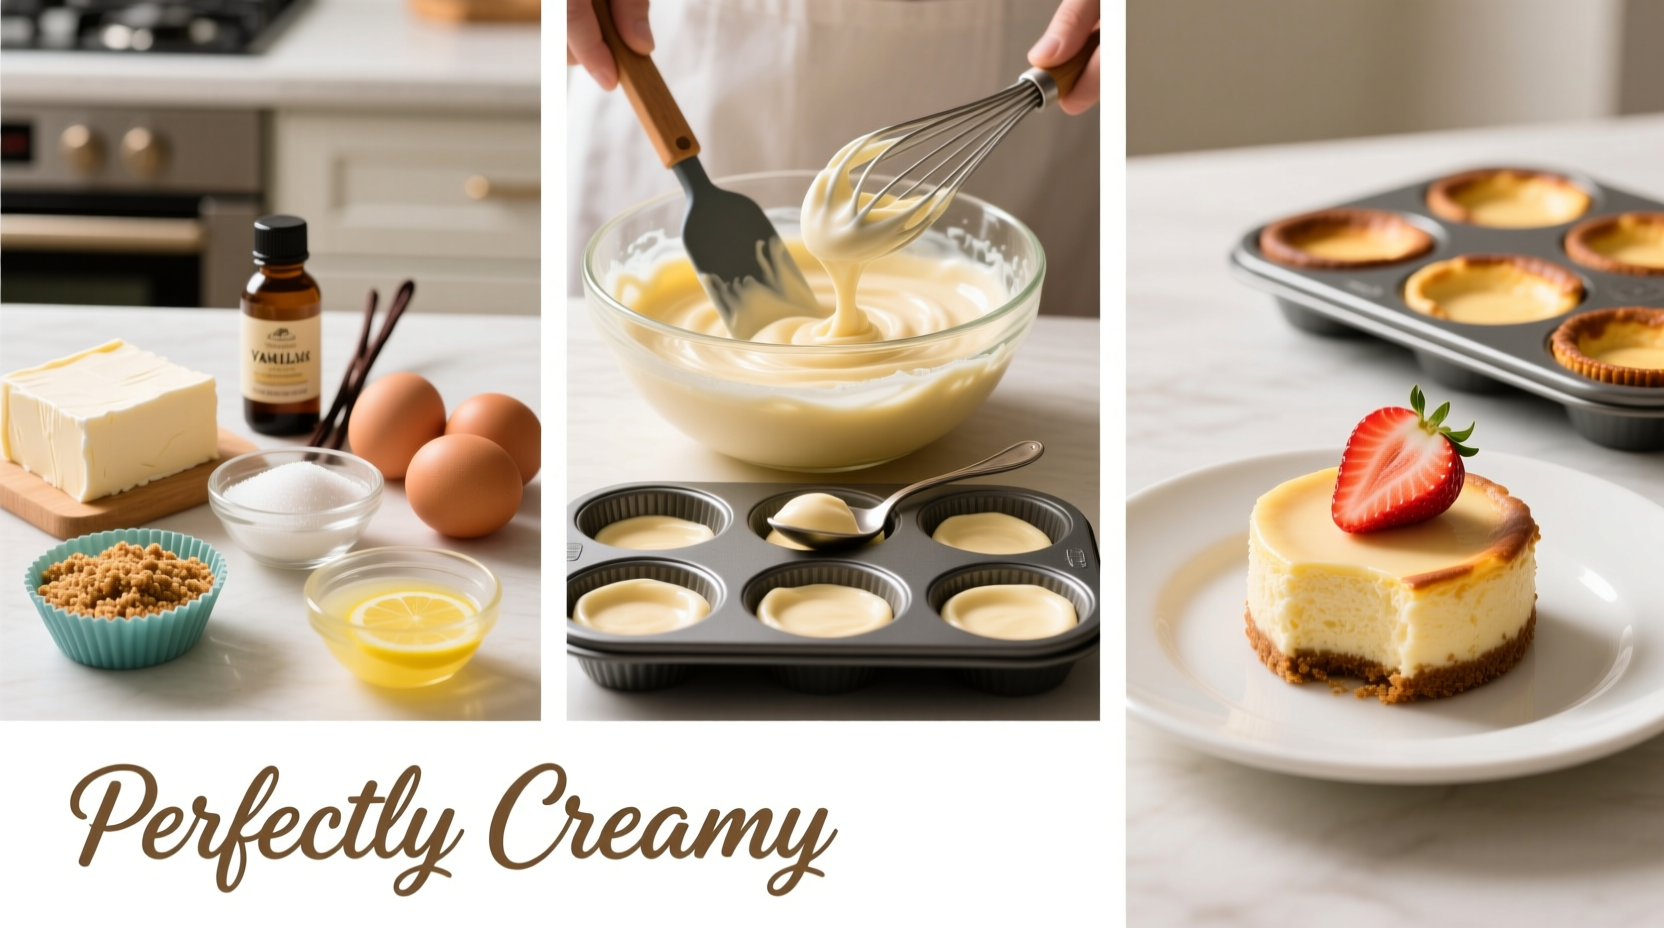
- Cream cheese: Full-fat, brick-style (not spreadable tubs). Philadelphia brand is preferred for its consistency.
- Granulated sugar: For sweetness and structure; superfine sugar dissolves more easily.
- Eggs: Large, room temperature. Cold eggs can cause lumps and uneven mixing.
- Sour cream or heavy cream: Adds moisture and tang, contributing to a creamy texture.
- Vanilla extract: Pure, not imitation, for authentic flavor depth.
- Graham crackers: For the crust base. Substitute with digestive biscuits or gluten-free alternatives if needed.
- Butter: Unsalted, melted, to bind the crust together.
Equipment Checklist
- Mini muffin tin (24-cup standard)
- Paper or silicone liners (recommended for easy removal)
- Electric hand mixer or stand mixer
- Mixing bowls (one large, one medium)
- Fine-mesh sieve (for smoothing batter)
- Spatula
- Cooling rack
Step-by-Step Guide to Perfect Cheesecake Bites
Follow this detailed timeline to create consistently creamy, crack-free cheesecake bites.
Step 1: Prepare the Crust (10 minutes + chilling)
- Preheat oven to 325°F (160°C).
- Crush 10–12 graham crackers into fine crumbs using a food processor or rolling pin.
- Mix in 3 tablespoons melted butter until the mixture resembles wet sand.
- Press 1 teaspoon of the mixture firmly into the bottom of each lined muffin cup.
- Bake for 5 minutes, then cool completely before filling.
Step 2: Make the Filling (15 minutes)
- In a large bowl, beat 16 oz (2 packages) softened cream cheese on medium speed until smooth and creamy (~2 minutes).
- Add 1/3 cup granulated sugar and continue beating until fully incorporated.
- Scrape down the sides, then add 1/4 cup sour cream and 1 tsp vanilla extract. Mix until uniform.
- Add one room-temperature egg at a time, mixing just until blended after each addition. Overmixing introduces air, which can cause cracks.
- For extra smoothness, pass the batter through a fine-mesh sieve to remove any lumps.
Step 3: Fill and Bake (30 minutes + cooling)
- Divide the batter evenly among the cooled crusts using a small spoon or piping bag (~1 tablespoon per cup).
- Tap the pan gently on the counter to release air bubbles.
- Bake for 18–22 minutes. The centers should still jiggle slightly but not be liquid.
- Turn off the oven, crack the door open, and let the bites cool inside for 30 minutes to prevent sudden temperature shifts that cause cracking.
- Remove from oven and cool completely on a wire rack.
Step 4: Chill and Serve (Minimum 4 hours)
- Refrigerate uncovered for at least 4 hours, preferably overnight.
- Peel away liners just before serving.
- Top with fruit compote, chocolate drizzle, or a dollop of whipped cream if desired.
| Stage | Time Required | Key Outcome |
|---|---|---|
| Crust Prep | 10 min + 5 min bake | Firm, golden base |
| Filling Mixing | 15 min | Smooth, lump-free batter |
| Baking | 20 min + 30 min cooling in oven | Set edges, slight center jiggle |
| Chilling | 4+ hours | Firm, creamy texture |
Avoiding Common Mistakes: Do’s and Don’ts
Even experienced bakers can encounter issues like cracking, sinking, or grainy texture. Use this guide to troubleshoot ahead of time.
| Do | Don't |
|---|---|
| Use room-temperature dairy ingredients | Use cold cream cheese or eggs |
| Mix filling just until combined | Overbeat the batter after adding eggs |
| Cool gradually in the oven | Remove from oven immediately after baking |
| Chill thoroughly before serving | Serve warm or under-chilled |
| Line pans with parchment or silicone | Bake without liners (hard to remove) |
“Temperature control is the secret to creamy cheesecake. Sudden changes cause stress in the custard, leading to cracks. Slow cooling is non-negotiable.” — Chef Lydia Tran, Pastry Instructor at Boston Culinary Institute
Real Example: From Failure to Perfection
Sarah, a home baker from Portland, initially struggled with cracked, dense cheesecake bites. Her first attempt used cold cream cheese and overmixed batter, resulting in a lumpy texture. After researching techniques, she adjusted her method: letting ingredients sit out for two hours, using a sifter for the batter, and cooling the bites slowly in the turned-off oven. The second batch emerged smooth, creamy, and completely crack-free. She now makes them monthly for her book club, often adding seasonal fruit swirls like raspberry or pumpkin.
Flavor Variations and Customizations
Once you’ve mastered the classic version, experiment with these easy twists:
- Lemon zest: Add 1 tbsp finely grated lemon zest for a bright, citrusy note.
- Chocolate swirl: Drop melted chocolate into unbaked batter and swirl with a toothpick.
- Berry ripple: Layer a spoonful of strained raspberry puree at the bottom before adding batter.
- Gluten-free: Use almond flour or gluten-free graham cracker crumbs for the crust.
- Lower sugar: Replace sugar with erythritol or monk fruit blend (1:1 ratio).
FAQ
Can I freeze cheesecake bites?
Yes. Freeze untopped bites on a tray, then transfer to an airtight container. Thaw in the refrigerator for 3–4 hours before serving. They keep well for up to 2 months.
Why did my cheesecake bites sink in the middle?
This usually happens when the batter is overmixed (adding too much air) or when they’re removed from the oven too quickly. Always cool them gradually and avoid vigorous mixing after adding eggs.
Can I make them without a mixer?
You can, but it requires more effort. Warm the cream cheese thoroughly and use a whisk or sturdy spatula to beat it until completely smooth before incorporating other ingredients.
Final Tips for Consistent Success
Conclusion
Perfectly creamy cheesecake bites are within reach for any home cook willing to follow a precise, thoughtful process. By focusing on ingredient temperature, gentle mixing, controlled baking, and proper chilling, you eliminate the most common pitfalls and achieve restaurant-quality results. These little desserts are not only delicious but also versatile and impressive with minimal effort. Once you master the basics, the variations are endless—seasonal flavors, elegant toppings, and dietary adaptations keep them exciting year-round.


 浙公网安备
33010002000092号
浙公网安备
33010002000092号 浙B2-20120091-4
Comments
No comments yet. Why don't you start the discussion?