
If your Whirlpool washing machine isn't starting, is stuck on a cycle, or displays erratic behavior, the timer (commonly referred to as the \"clock\") could be the culprit. This mechanical or electronic component controls the sequence of operations—from fill to spin—and when it fails, the entire machine can grind to a halt. Replacing or inspecting the timer often resolves these issues. However, accessing and removing it requires precision, patience, and safety awareness. This guide walks you through every stage of removing the clock from your Whirlpool washer, ensuring the job is done correctly without damaging internal components or risking personal injury.
Understanding the Washing Machine Timer (\"Clock\")
The term “clock” in older Whirlpool models refers to the electromechanical timer that orchestrates the wash cycle. Even in newer digital front-loaders, a similar control module performs the same function. Though modern machines use electronic boards, many top-loading Whirlpool units still rely on physical timers. These are typically located behind the control panel and connected to a series of wires and mounting brackets.
When the timer fails, symptoms include:
- Washer not starting at all
- Machine stopping mid-cycle
- Dial not advancing
- No water filling despite power
- Spin cycle not engaging
Before assuming the timer is faulty, verify that power is reaching the unit and that fuses or circuit breakers haven’t tripped. But if those are functional and the issue persists, removing and testing the clock becomes the logical next step.
“Over 30% of service calls for non-starting Whirlpool washers end up being timer-related. It’s one of the most common failure points in legacy models.” — Greg Thompson, Appliance Repair Technician with 18 years of field experience
Essential Tools and Safety Precautions
Safety must come first. A washing machine contains electrical components, springs, and moving parts that can pose risks if mishandled. Before beginning, gather the following tools:
Tools You’ll Need:
- Phillips and flathead screwdrivers
- Nut driver set (5–8mm)
- Needle-nose pliers
- Multimeter (for testing continuity later)
- Gloves (rubber or work-grade for grip and protection)
- Flashlight or headlamp
- Small container for screws and hardware
Safety Checklist:
- Disconnect power: Unplug the washer from the wall outlet. Do not rely on turning off a switch—physically unplug it.
- Turn off water supply: Close both hot and cold water valves behind the machine.
- Drain residual water: If the tub has standing water, run a drain-only cycle beforehand or use a wet-dry vacuum.
- Work on a dry surface: Ensure the floor around the machine is dry to prevent slipping or electrical hazards.
- Use insulated tools: Prevent accidental short circuits.
Step-by-Step Removal Process
Follow this sequence carefully. Rushing or skipping steps can lead to broken tabs, severed wires, or misalignment upon reassembly.
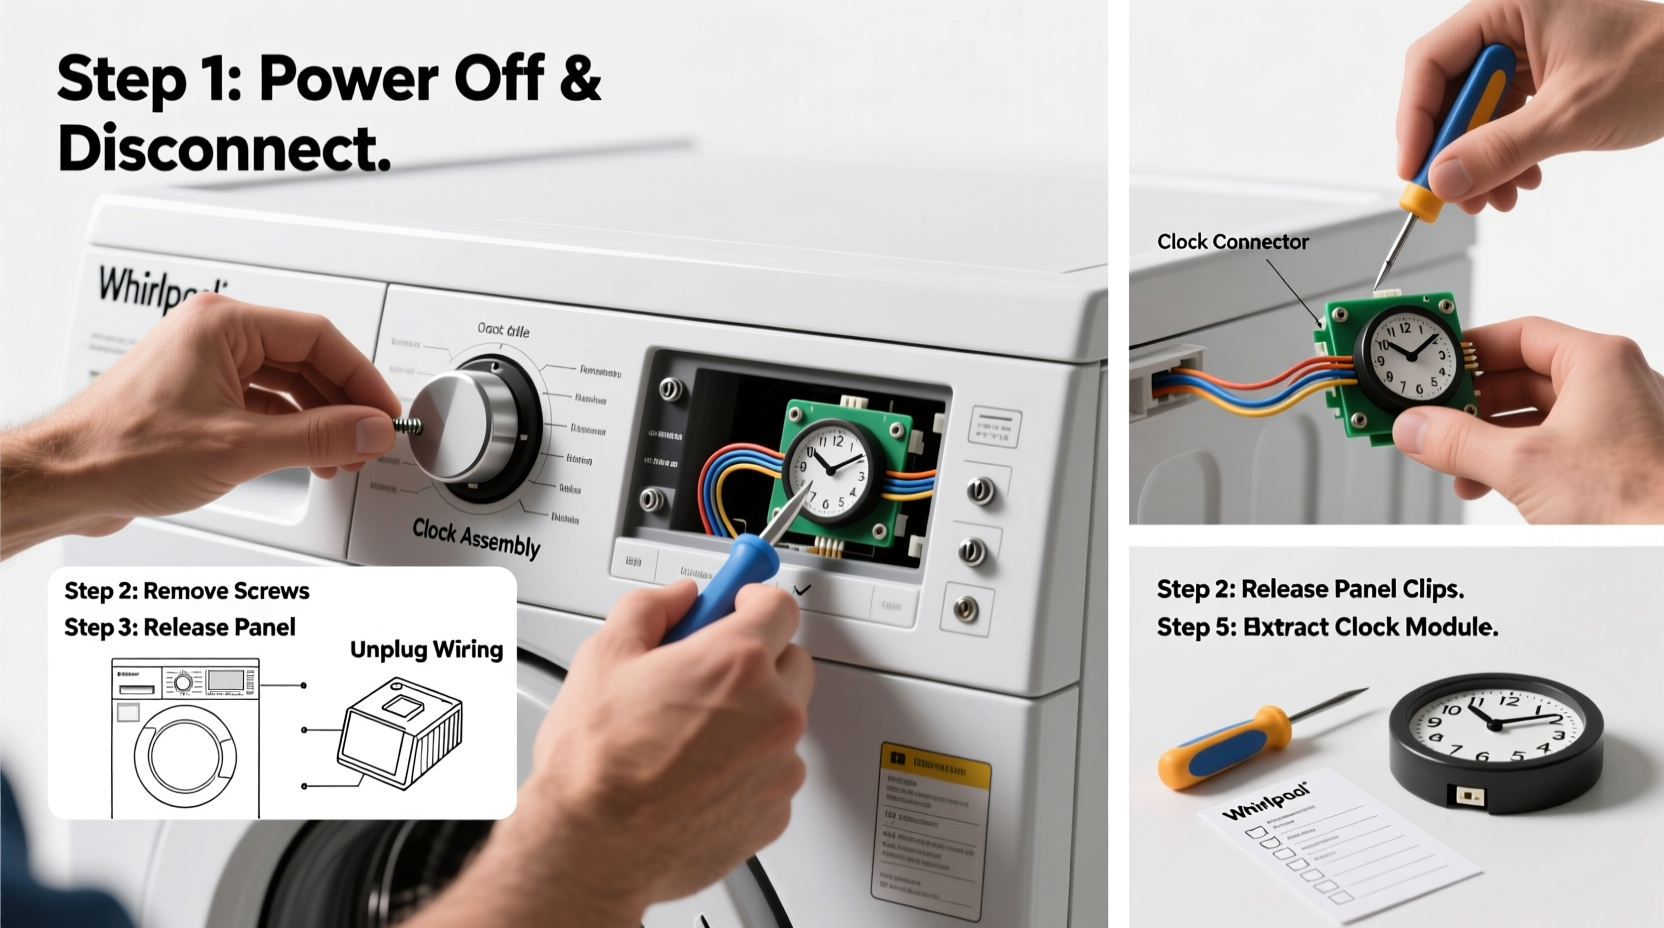
Step 1: Remove the Control Panel Console
Most Whirlpool top-loaders have a console that flips forward or lifts off. Look for retaining clips at the back near the wall. Use a putty knife or plastic pry tool to gently release them. For models with hidden screws under the dispenser drawer, open the drawer and remove the screws underneath using a Phillips head.
Once released, flip the console forward over the top of the washer. Lay it gently across the washer rim—do not let it hang by the wires.
Step 2: Locate the Timer Assembly
The timer is usually mounted on the right-hand side of the control panel housing, secured with two or three screws. It connects to the cycle knob via a metal stem and has a bundle of colored wires attached to its base.
Step 3: Disconnect the Wire Harness
Using needle-nose pliers, carefully press the locking tab on each connector and pull straight back. Avoid tugging on the wires themselves. Set connectors aside where they won’t get pinched.
Step 4: Remove Mounting Screws
Use a nut driver or screwdriver to remove the screws holding the timer in place. Keep them in a labeled container. Once free, gently pull the timer forward, being mindful of any remaining linkages or brackets.
Step 5: Detach the Knob and Shaft (If Necessary)
In some cases, the timer knob must be removed first. Pull it straight off the shaft. If it’s stuck, wrap a cloth around the base and gently rock it back and forth while pulling. Do not use excessive force.
Step 6: Extract the Timer
With all connections and fasteners removed, carefully extract the timer from the console. Inspect the wiring harness for signs of heat damage, melting, or corrosion.
Step 7: Test Before Replacement (Optional)
If replacing the timer, skip ahead. But if diagnosing, use a multimeter to test for continuity across terminals as specified in your model’s service manual. No continuity means the timer is defective.
| Step | Action | Estimated Time |
|---|---|---|
| 1 | Remove console | 5–8 minutes |
| 2 | Locate timer | 2 minutes |
| 3 | Disconnect wires | 3–5 minutes |
| 4 | Remove screws | 2 minutes |
| 5 | Pull out timer | 3 minutes |
| Total | Approx. 15–20 minutes |
Common Mistakes and How to Avoid Them
Even experienced DIYers make errors when working inside appliances. Here are frequent pitfalls and how to sidestep them:
- Mixing up wire connections: Always label or photograph each wire before removal. Refer back during reassembly.
- Forcing plastic clips: Many consoles use fragile plastic tabs. Applying too much pressure cracks them, making reassembly difficult.
- Leaving power connected: Never bypass unplugging. Residual current in capacitors can deliver shocks.
- Reinstalling a known-faulty timer: If the washer wasn’t working before, don’t assume the old timer is good just because it looks intact.
Do’s and Don’ts Summary
| Do | Don’t |
|---|---|
| Unplug the machine | Work while plugged in |
| Label all wires | Guess wire placement |
| Use proper lighting | Work in dim conditions |
| Handle knobs gently | Yank off stuck parts |
| Test new timer function | Assume replacement part works |
Real-World Example: Sarah’s Saturday Fix
Sarah noticed her Whirlpool LA7000 washer wouldn’t advance past the wash cycle. She’d already checked the lid switch and pump—both fine. After researching online, she suspected the timer. On a quiet Saturday morning, she followed the steps above: unplugged the unit, removed the console, and disconnected the timer. Upon inspection, one of the wire connectors showed discoloration from overheating. She ordered a replacement part ($38 online) and installed it the next day. The washer ran perfectly afterward. Total time invested: under two hours. Cost: less than half a service call.
This scenario illustrates how a methodical approach saves money and builds confidence in home appliance maintenance.
Frequently Asked Questions
Can I replace the timer myself if I’ve never done appliance repair?
Yes, provided you follow safety protocols and take your time. Most steps involve basic hand tools and visible connections. If you’re uncomfortable, consult a technician—but many homeowners successfully complete this repair.
Where can I find the correct replacement timer?
Use your washer’s model number (usually on a tag inside the lid or on the back). Enter it into appliance parts websites like AppliancePartsPros, Sears PartsDirect, or RepairClinic. Match the part number exactly.
What if the washer still doesn’t work after replacing the timer?
Other potential issues include a faulty lid switch, drive belt, motor coupler, or control board. Test these components systematically. If unsure, a professional diagnosis may be needed.
Final Steps and Recommendations
After removing the timer, decide whether to clean, test, or replace it. If installing a new one, reverse the removal steps carefully. Ensure all wires are fully seated and screws tightened securely. Before restoring power, double-check that no tools or debris remain inside the cabinet.
Once reassembled, plug in the washer, turn on the water supply, and run a brief test cycle. Monitor for unusual noises, leaks, or failure to progress through stages. If everything operates smoothly, the repair is complete.


 浙公网安备
33010002000092号
浙公网安备
33010002000092号 浙B2-20120091-4
Comments
No comments yet. Why don't you start the discussion?