
Hidden files in Windows 7 serve an essential purpose: they protect critical system components from accidental deletion or modification. However, there are legitimate reasons users need to access these files—whether troubleshooting software issues, recovering lost data, or managing personal backups stored in hidden folders. While the process is straightforward, it requires careful navigation to avoid unintended changes that could affect system stability.
This guide provides a detailed, secure method for revealing hidden files in Windows 7. It also covers best practices, common pitfalls, and practical scenarios where accessing hidden content becomes necessary. By following these steps, you gain control over your file system while minimizing risks.
Understanding Hidden Files and Folders in Windows 7
Windows 7 uses file attributes to determine visibility. When a file or folder has the \"hidden\" attribute enabled, it does not appear in standard Explorer views. This includes both user-created hidden items (such as private documents) and system-critical directories like C:\\Users\\YourName\\AppData or C:\\ProgramData.
The operating system hides certain folders to prevent inexperienced users from altering configurations that could lead to instability. For example, the AppData folder stores application settings, cache files, and licensing information. Accidentally deleting contents here may cause programs to malfunction or reset preferences.
Despite their invisibility, hidden files remain active and accessible when permissions allow. Revealing them doesn’t modify the files themselves—it only changes how they're displayed in File Explorer.
“Accessing hidden files should be approached with caution. Visibility doesn’t imply permission to alter.” — Robert Lin, Senior Systems Administrator
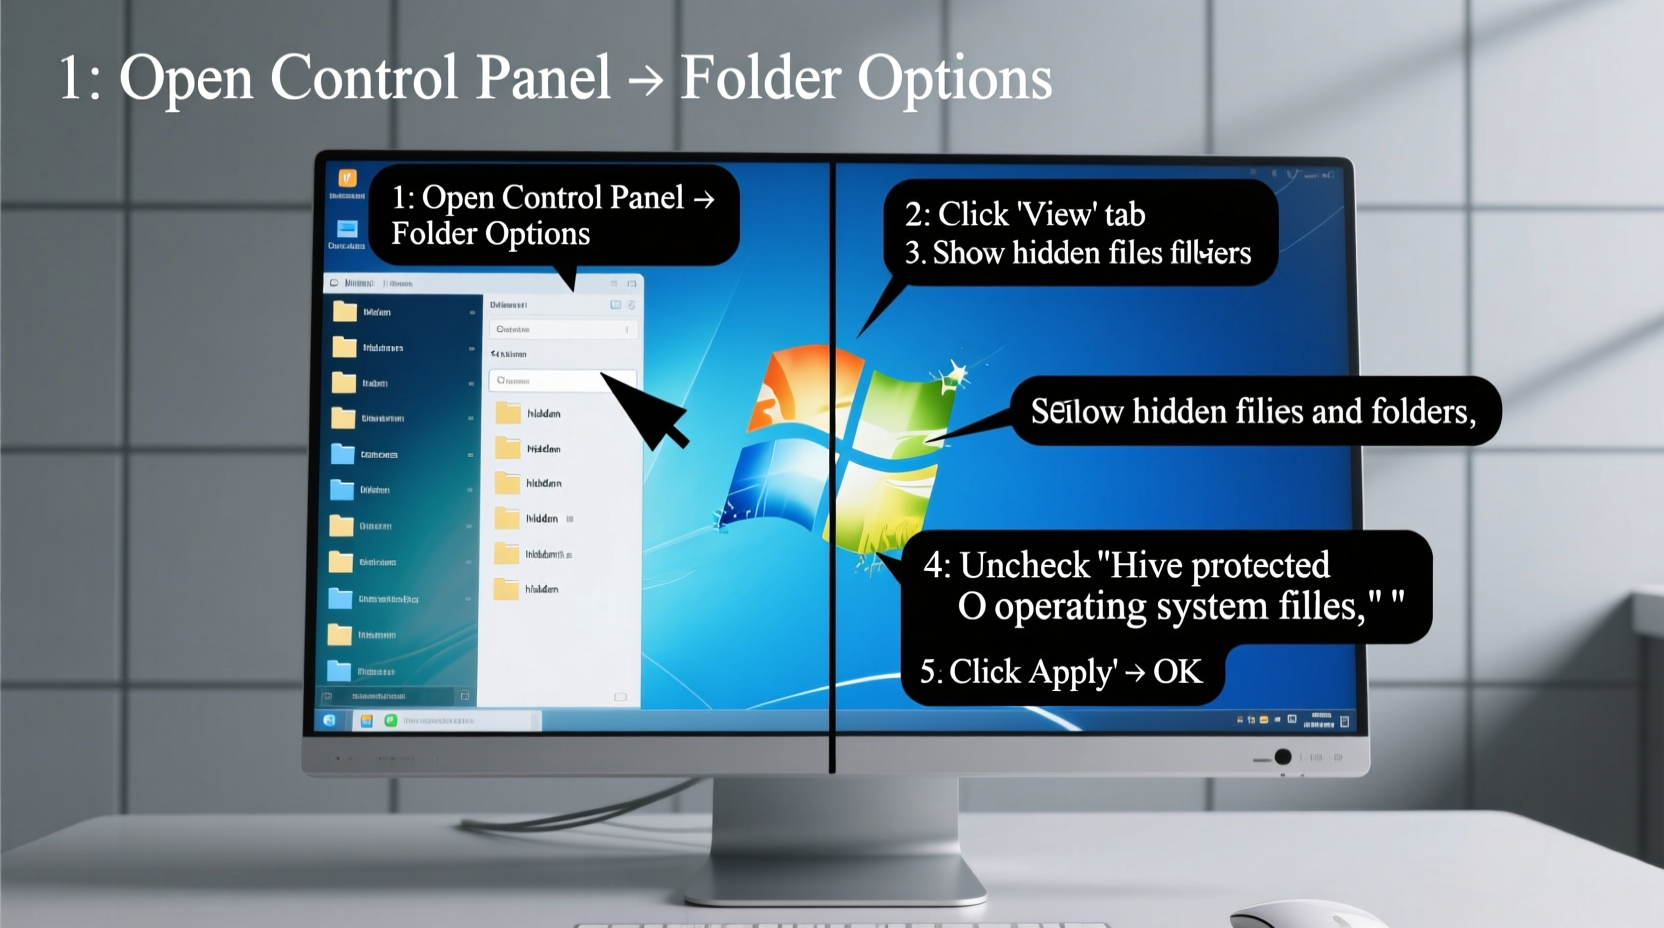
Step-by-Step Guide to Show Hidden Files and Folders
To reveal hidden files across all drives and locations in Windows 7, follow this sequence of actions carefully. Each step ensures full access without compromising system integrity.
- Open Control Panel: Click the Start button, then select “Control Panel” from the right-hand menu.
- Navigate to Appearance and Personalization: In the Control Panel view (either Category or Icon view), locate and click on “Appearance and Personalization.”
- Select Folder Options: Under this section, click “Show hidden files and folders” or directly choose “Folder Options” if available.
- Switch to the View Tab: In the Folder Options dialog box, go to the “View” tab. This panel controls advanced display settings.
- Adjust Hidden Files Settings: Scroll down the list of options and find:
- Show hidden files, folders, and drives
- Optional – Hide Protected Operating System Files: Below the main setting, you’ll see a checkbox labeled “Hide protected operating system files (Recommended).” Unchecking this will expose core system files such as
ntldr,boot.ini, and others marked as critical.Tip: Only disable this protection temporarily and re-enable it after completing your task. Modifying system files can render Windows unbootable. - Apply Changes: Click “Apply,” then “OK” to save your settings. Close the Folder Options window.
- Verify Results: Open Computer or any directory (e.g., C:\\Users\\YourName) and look for previously invisible folders like AppData, Local Settings, or Recycle.Bin. These should now be visible with a slightly dimmed icon appearance.
Managing Access Safely: Best Practices and Warnings
Revealing hidden files opens up powerful capabilities but comes with responsibility. Here’s what to keep in mind when navigating sensitive areas of your file system.
| Action | Do | Don't |
|---|---|---|
| Browsing hidden directories | Review contents for troubleshooting or recovery purposes | Make changes unless you understand the consequences |
| Editing system files | Create a backup before modifying anything | Directly delete or rename critical files like pagefile.sys |
| Using third-party tools | Use trusted utilities like Sysinternals Suite for deeper inspection | Run unknown scripts or registry cleaners without verification |
| Sharing findings online | Ask questions with general descriptions | Paste screenshots of system files publicly |
Real-World Example: Recovering Lost Browser Profiles
Sarah, a freelance writer using Windows 7, noticed her Chrome browser had reset all bookmarks and extensions. She suspected a profile corruption but couldn’t find her old data. After researching, she realized her user profile might still exist in a hidden location.
Following the steps outlined above, Sarah revealed hidden files and navigated to C:\\Users\\Sarah\\AppData\\Local\\Google\\Chrome\\User Data. There, she discovered multiple folders named “Profile 1,” “Backup_old,” and a newly created “Default.” The “Backup_old” folder contained her previous settings and bookmarks.
By copying the relevant data into the current Default profile (after closing Chrome), she successfully restored her work environment. Her experience highlights how understanding hidden file access empowers users to solve complex problems independently.
Frequently Asked Questions
Will showing hidden files slow down my computer?
No. Displaying hidden files affects only visual rendering in File Explorer and has no impact on system performance. The files were already present; they’re simply made visible.
Can malware hide inside system files once I unhide them?
Malware often exploits hidden attributes to stay undetected. However, merely viewing these files won’t activate threats. Use updated antivirus software to scan suspicious entries. If you notice unfamiliar executables in system directories, research them before taking action.
How do I hide files again after I’m done?
Return to Folder Options > View tab and reselect “Don’t show hidden files, folders, and drives.” Also, re-enable “Hide protected operating system files (Recommended)” for added safety.
Essential Checklist for Safe File Management
- ✅ Back up important data before exploring hidden folders
- ✅ Use administrative privileges only when necessary
- ✅ Avoid renaming or moving system files like ntuser.dat or bootmgr
- ✅ Keep antivirus software active during deep file inspections
- ✅ Re-hide protected operating system files after use
- ✅ Document any changes made for future reference
Conclusion: Take Control with Confidence
Knowing how to reveal hidden files in Windows 7 transforms your ability to manage, troubleshoot, and recover digital assets effectively. Whether retrieving lost configurations, diagnosing startup errors, or auditing storage usage, this skill unlocks deeper insight into your system's inner workings.
The key lies not just in knowing the steps, but in applying them wisely. Always respect the purpose behind file hiding—protection—and balance access with caution. With proper knowledge and disciplined habits, you maintain both flexibility and security.


 浙公网安备
33010002000092号
浙公网安备
33010002000092号 浙B2-20120091-4
Comments
No comments yet. Why don't you start the discussion?