
Mechanical keyboards are precision instruments, built for responsiveness, durability, and tactile satisfaction. Over time, dust, debris, oils from fingertips, and environmental particles accumulate beneath keycaps and inside switch housings. This buildup can lead to inconsistent actuation, double-tapping, missed keystrokes, or even long-term damage. While many users clean their keycaps regularly, the switches themselves are often overlooked. Cleaning them properly isn’t just about aesthetics—it’s essential for maintaining performance and longevity.
Unlike membrane keyboards, mechanical switches have moving parts that can be compromised by grime. However, improper cleaning can cause more harm than good. This guide walks through a safe, thorough process to clean individual switches without damaging internal components. Whether you're a daily typist, competitive gamer, or casual user, these steps will help preserve your keyboard’s integrity and keep every keystroke crisp and reliable.
Why Switch-Level Cleaning Matters
Most keyboard maintenance stops at removing keycaps and wiping the plate. But beneath each switch lies a stem, spring, and housing where lint, skin flakes, and dust gather. These contaminants interfere with the switch’s ability to reset properly and may cause friction or misalignment. For linear switches, this can create a gritty feel; for tactile and clicky variants, it may mute the feedback or make it uneven.
Over months of use, especially in environments with pets, carpets, or dry air, fine particles infiltrate the switch through microscopic gaps. Moisture from hand sweat can also corrode metal contacts over time, particularly in humid climates. Regular switch cleaning mitigates these risks and ensures consistent electrical contact between the PCB and the switch mechanism.
“Switch contamination is one of the most common causes of inconsistent keystroke registration in otherwise high-quality mechanical keyboards.” — Adrian Lin, Keyboard Hardware Engineer at Input Labs
Tools and Materials You’ll Need
Cleaning switches requires specific tools to avoid damage. Standard household cleaners or improvised methods (like using water-soaked cloths) can short circuits or degrade plastics. Below is a curated list of safe, effective supplies:
| Item | Purpose | Recommended Type |
|---|---|---|
| Isopropyl Alcohol (IPA) | Dissolves oils and disinfects without residue | 90% or higher concentration |
| Soft-bristle brush | Dislodges dry debris from crevices | Toothbrush (unused), paintbrush (fine tip) |
| Compressed air | Blows out loose particles before wet cleaning | Canned air with straw nozzle |
| Tweezers | Handles small components and debris | Anti-static, fine-point |
| Microfiber cloth | Dries surfaces without scratching | Lens-cleaning grade |
| Silicone grease (optional) | Lubricates switch stems for smoother travel | Diatomaceous or Krytox-style |
| Ziplock bags or containers | Stores removed switches and keycaps | Labelable, resealable |
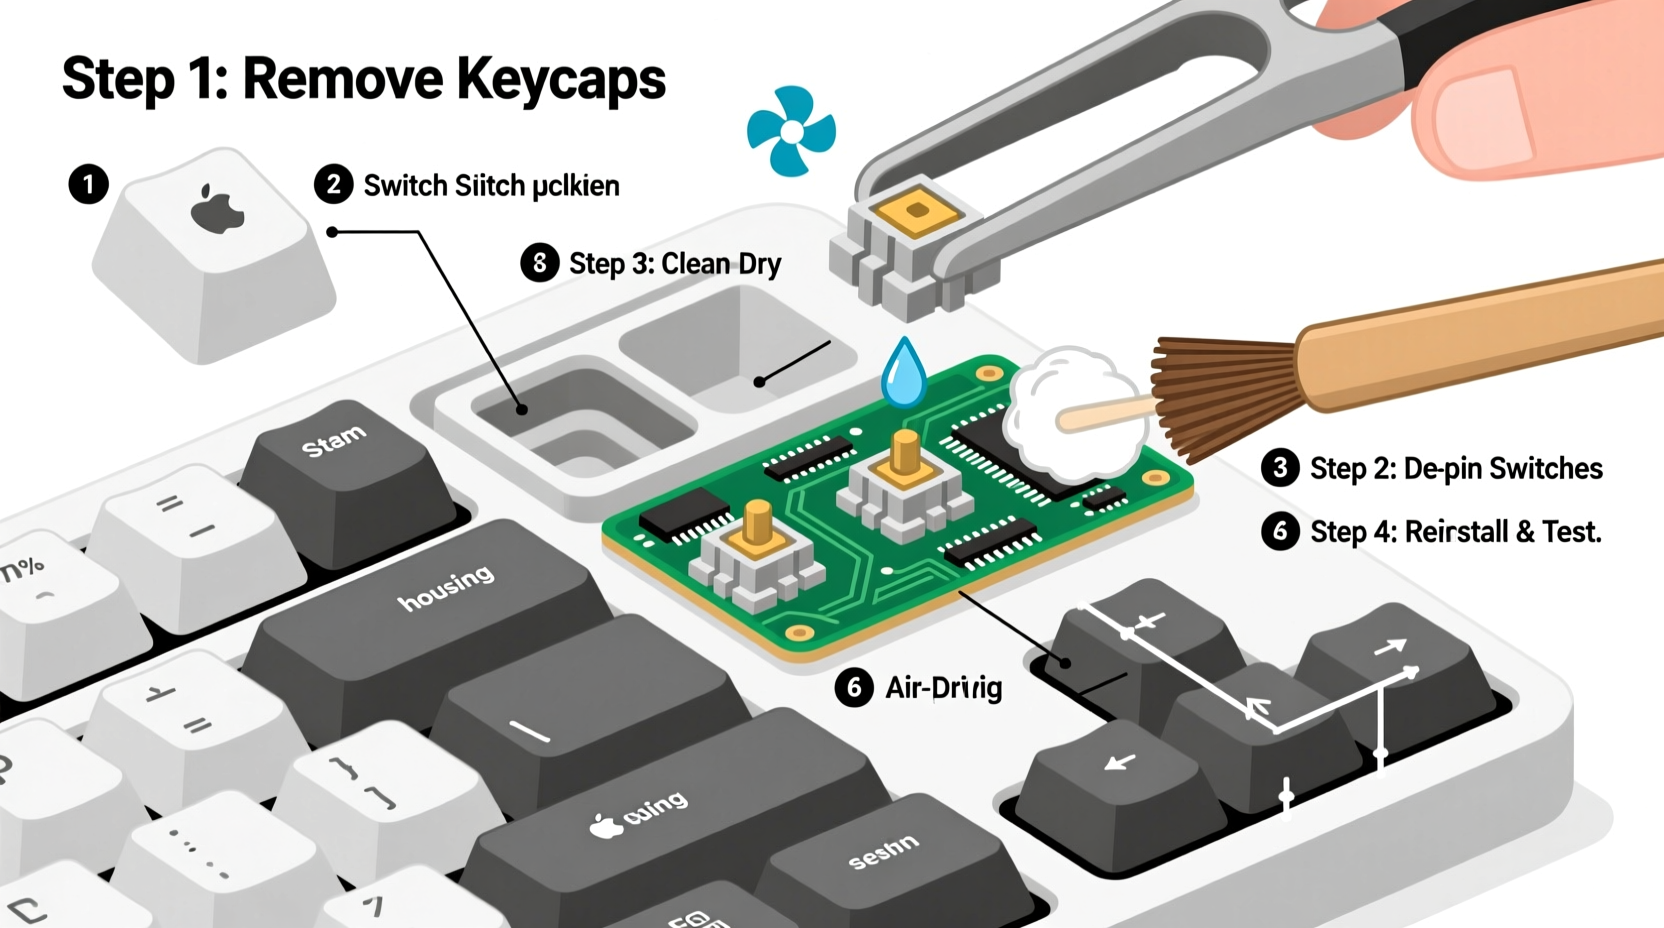
Step-by-Step Guide to Cleaning Mechanical Keyboard Switches
This process assumes you’re working with a hot-swappable keyboard, which allows easy removal of switches without soldering. If your board is not hot-swappable, skip switch removal and follow the non-invasive method outlined later in this guide.
- Power down and disconnect: Unplug the keyboard from your computer or turn off wireless mode. Never work on a powered device.
- Remove keycaps: Use a keycap puller to gently lift all keycaps. Place them in a labeled container with a mild soapy water solution if you plan to clean them simultaneously.
- Use compressed air: Blow out visible debris from switch housings and PCB surface. Hold the can upright and use short bursts to avoid moisture spray.
- Remove switches (hot-swap only): With tweezers or a switch puller, extract switches starting from one corner. Work row by row and store each switch in a labeled bag if they vary by type (e.g., different switches for spacebar vs. alphas).
- Inspect each switch: Look for discoloration, cracks, or foreign objects lodged inside. Discard any visibly damaged switches.
- Clean with IPA and brush: Dip the bristles of a soft brush into 90%+ IPA. Gently scrub around the top housing, stem, and bottom shell. Avoid submerging the switch unless you plan to fully disassemble and dry thoroughly.
- Dry completely: Place cleaned switches on a microfiber cloth in a well-ventilated area. Allow at least 30 minutes for evaporation. Do not reinstall until completely dry.
- Reinstall switches: Press each switch firmly back into its socket until it clicks. Ensure alignment with the PCB pins.
- Reattach keycaps: Once all switches are secure, snap keycaps back on.
- Test functionality: Open a text editor or use a keyboard tester tool online to verify all keys register correctly.
If your keyboard isn’t hot-swappable, focus on external cleaning: remove keycaps, use compressed air, apply IPA sparingly with a cotton swab around the switch stem, and let sit for 15 minutes before testing. Avoid soaking or forcing liquid into the switch body.
Do’s and Don’ts of Switch Maintenance
To prevent accidental damage during cleaning, follow these best practices:
| Do | Don't |
|---|---|
| Use 90%+ isopropyl alcohol for cleaning | Use water or household cleaners |
| Let switches air-dry fully before reinstallation | Reinstall damp switches |
| Label and organize removed switches | Mix up switch types (e.g., tactile vs. linear) |
| Clean every 6–12 months under normal use | Ignore signs of stickiness or inconsistency |
| Use anti-static tools when handling PCB | Touch exposed circuitry with bare hands |
Real-World Example: Reviving a Sticky Spacebar
Mark, a freelance writer based in Chicago, noticed his spacebar began registering double inputs after six months of heavy typing. He initially assumed software issues and rebooted his system multiple times. When the problem persisted, he inspected the switch and found dark specks trapped under the stem—likely a mix of fabric fibers from his wrist rest and dried skin cells.
Using a switch puller, he removed the MX Brown switch under the spacebar. After brushing it gently with IPA-dipped bristles and letting it dry overnight, he reinstalled it. The sticky sensation disappeared, and actuation became consistent. Mark now cleans his entire keyboard every eight months as part of his seasonal workspace refresh routine.
This case highlights how minor contamination can significantly impact usability—and how simple intervention restores function without needing replacement parts.
When to Consider Lubrication
Cleaning alone improves performance, but adding lubricant takes it further. Over time, factory-applied grease degrades, increasing friction between the stem and housing. Re-lubing reduces scratchiness and noise, especially in tactile and clicky switches.
For most users, light lubrication every 2–3 years is sufficient. Apply a pea-sized amount of dielectric grease (such as Krytox 205g0 or Tribosys 3204) to the stem rails using a toothpick. Rotate the stem manually to distribute evenly before reinserting. Avoid over-application, which attracts dust and creates drag.
“Properly lubed switches not only feel better but also wear more evenly, extending their operational life by thousands of cycles.” — Lena Park, Custom Keyboard Builder and Modder
Frequently Asked Questions
Can I wash mechanical switches in water?
No. While some people report success with rinsing switches in distilled water followed by extended drying, water poses a high risk of corrosion on metal contacts and wicking into the switch housing. Always use isopropyl alcohol instead, which evaporates cleanly and disinfects effectively.
How often should I clean my switches?
Under typical indoor conditions, deep switch cleaning every 6 to 12 months is ideal. Users in dusty environments, those with pets, or individuals who eat near their desk may benefit from cleaning every 4–6 months. Signs like inconsistent keystrokes, audible crunch, or resistance during press are clear indicators it’s time to clean.
What if I don’t have a hot-swap keyboard?
You can still maintain cleanliness without desoldering. Remove keycaps, use compressed air liberally, then carefully apply IPA with a cotton swab around the switch stem. Let it sit for 10 minutes to dissolve oils, then dry thoroughly. Avoid pressing liquid directly into the switch. For severe issues, consult a technician for professional servicing or consider upgrading to a hot-swap model for easier maintenance.
Checklist: Safe Switch Cleaning Process
- ✅ Power off and unplug the keyboard
- ✅ Remove all keycaps using a proper puller
- ✅ Blow out debris with compressed air
- ✅ Remove switches (only if hot-swappable)
- ✅ Inspect each switch for damage
- ✅ Clean with 90%+ isopropyl alcohol and soft brush
- ✅ Allow full drying (minimum 30 minutes)
- ✅ Reinstall switches securely
- ✅ Replace keycaps and test all keys
- Optional: Apply lubricant to stem rails for enhanced smoothness
Conclusion: Make Maintenance Part of Your Routine
Your mechanical keyboard is an investment in comfort, efficiency, and personal expression. Just like any precision tool, it performs best when maintained with care. Cleaning switches isn’t a one-time fix—it’s a habit that preserves responsiveness and prevents avoidable failures. By following this methodical approach, you protect both the tactile experience and the hardware’s lifespan.


 浙公网安备
33010002000092号
浙公网安备
33010002000092号 浙B2-20120091-4
Comments
No comments yet. Why don't you start the discussion?