
Installing an over-the-range (OTR) microwave is one of the most common kitchen upgrades homeowners tackle. When done correctly, it saves counter space, adds ventilation, and enhances cooking convenience. But when installed improperly, it can become a safety hazard—loose units risk falling, poor wiring can cause electrical issues, and incorrect venting reduces efficiency. This comprehensive guide walks you through every phase of installation with precision, safety, and professional insight.
Why Proper Installation Matters
An over-the-range microwave combines three functions: cooking, exhaust ventilation, and sometimes even lighting. It’s mounted above a gas or electric cooktop, placing it in a high-heat, high-moisture environment. A poorly secured unit endangers everyone below, especially children. The National Fire Protection Association (NFPA) reports that improper appliance installation contributes to hundreds of household incidents annually. Ensuring your microwave is securely anchored, correctly wired, and properly vented isn’t just about performance—it’s about safety.
“Microwaves over stoves must be installed to manufacturer specifications and local building codes. One loose screw can lead to catastrophic failure.” — James Langley, Master Electrician & Appliance Safety Consultant
Pre-Installation Checklist: Gather What You Need
Before lifting a tool, verify compatibility and collect all necessary components. Rushing into installation without preparation leads to delays, damage, or unsafe setups.
- Over-the-range microwave unit – Confirm it's designed for overhead mounting.
- Mounting hardware kit – Usually included; check for wall bracket, screws, and anchors.
- Stud finder – Critical for locating wall studs behind cabinetry.
- Level – Ensures even alignment.
- Drill and drill bits – For pilot holes and mounting.
- Socket wrench or ratchet set – Helps secure top-mounting bolts.
- Voltage tester – Confirms power is off.
- Ductwork materials – If venting externally, ensure you have rigid metal ducts (not flexible foil).
- Helping hand – These units are heavy; never install alone.
Compatibility Check: Will It Fit?
Measure twice. Most OTR microwaves range from 24 to 30 inches wide. Your upper cabinet opening should match. Also confirm clearance:
| Metric | Minimum Clearance | Purpose |
|---|---|---|
| Bottom of microwave to cooktop | 30 inches (76 cm) | Safety and code compliance |
| Top of microwave to cabinet bottom | 1 inch (2.5 cm) | Allowance for airflow and mounting |
| Back of microwave to wall | 0.5 inch (1.3 cm) | Venting and fit |
If your existing cabinet doesn’t meet these dimensions, modifications may be needed—or consider a different model.
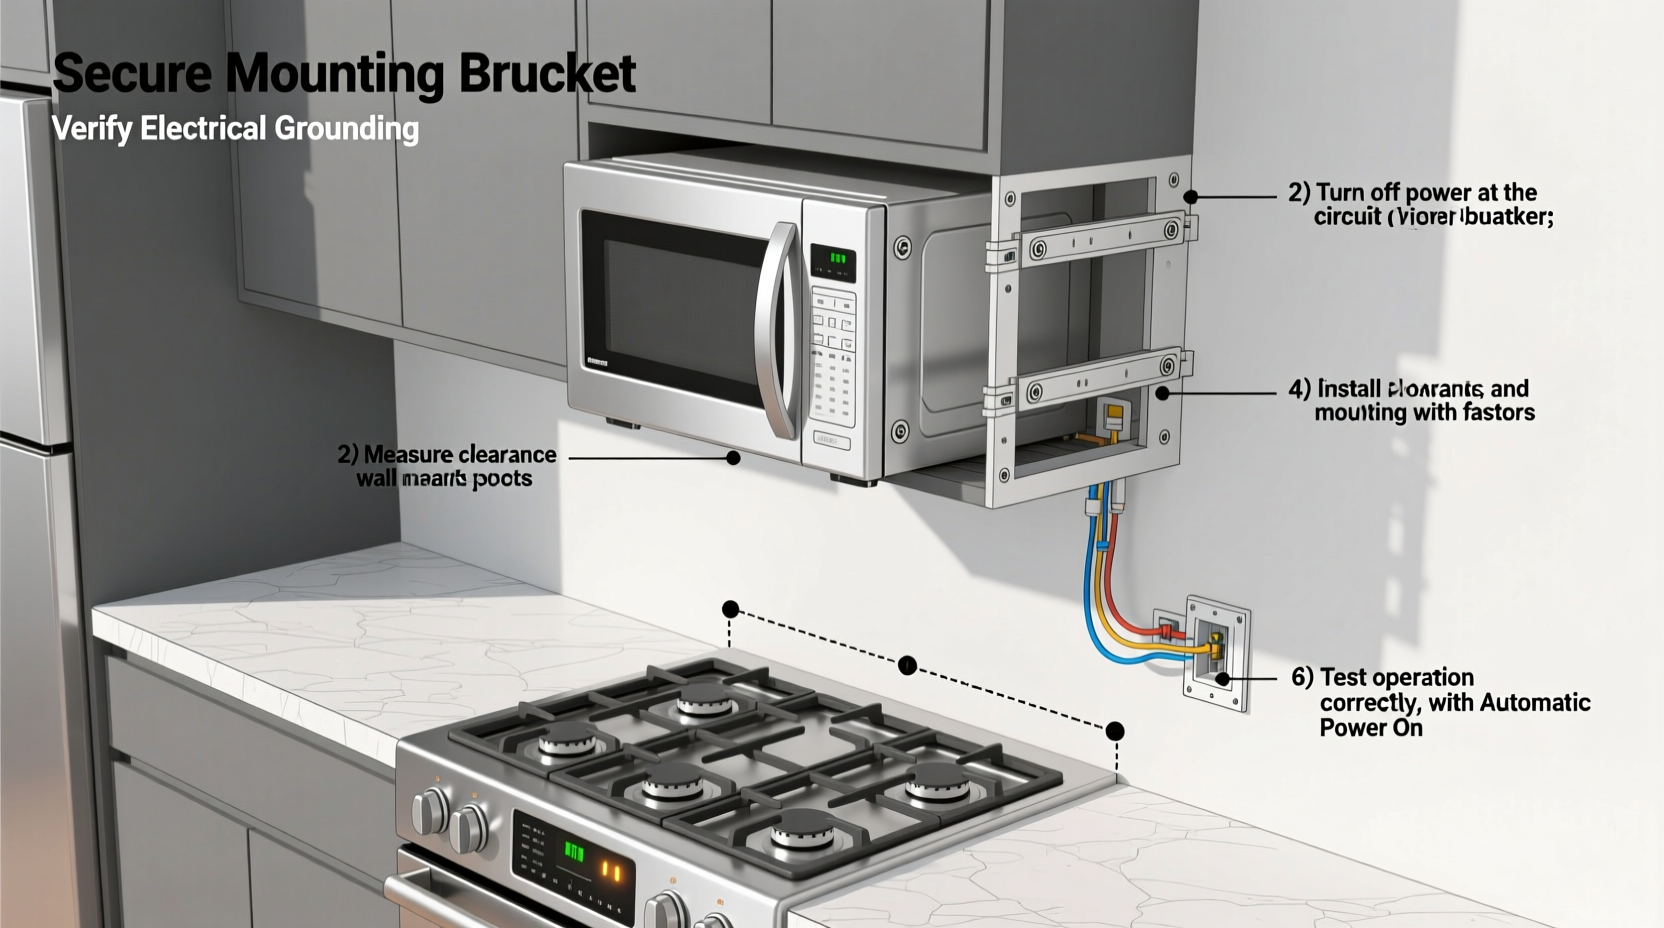
Step-by-Step Installation Process
Follow this sequence carefully. Skipping steps compromises safety and function.
- Turn Off Power: Shut off the circuit at the breaker panel. Use a voltage tester to confirm no current is present at the outlet.
- Remove Old Unit (if applicable): Disconnect power, unscrew mounting bolts, and carefully lower the old microwave. Cap wires temporarily if not immediately replacing.
- Locate Wall Studs: Use a stud finder to identify at least two wall studs behind the upper cabinet. Mark their centers. These will support the mounting bracket.
- Install Mounting Bracket: Attach the provided bracket to the wall using lag screws driven into the studs. Ensure it’s perfectly level—use a bubble level. This bracket bears the entire weight.
- Prepare Electrical Connection: Feed the power cord from the new microwave through the back of the upper cabinet. Plug into the junction box or hardwire as per manufacturer instructions. If hardwiring, connect black to black (hot), white to white (neutral), and green/bare to ground. Secure with wire nuts.
- Set Venting Configuration: Choose between recirculating (filters air and returns it) or external venting (expels air outside). External is preferred for grease and moisture removal. Adjust the internal duct flap accordingly and attach rigid metal duct to the rear port. Seal joints with foil tape—never duct tape.
- Lift and Hang the Microwave: With a helper, lift the microwave and hook the rear slots onto the wall bracket. This supports the weight. Then, insert and tighten the top mounting screws through the cabinet floor into the microwave chassis. These prevent forward tipping.
- Secure and Test: Double-check all screws. Restore power. Test lights, fan speeds, and microwave operation. Run the exhaust fan to ensure proper airflow and listen for rattling.
Avoid These Common Installation Mistakes
| Mistake | Why It’s Risky | How to Avoid |
|---|---|---|
| Mounting only into drywall or particleboard | Insufficient support; unit may fall | Always anchor into wall studs |
| Using flexible aluminum ducting | Restricts airflow, collects grease, fire hazard | Use rigid 3.25” x 10” metal duct |
| Skipping the top screws | Unit can tip forward under load | Install all manufacturer-required fasteners |
| Ignoring local building codes | May fail inspection or insurance claims | Check with municipal authority before starting |
Real-World Example: A DIYer’s Near-Miss
Mark T., a homeowner in Portland, attempted to install a new OTR microwave after his old one failed. He skipped using a stud finder, assuming the cabinet base would support the 60-pound unit. He used short screws into particleboard. Two weeks later, while heating popcorn, the microwave shifted forward and crashed onto the stove. Fortunately, no one was hurt, but the unit was destroyed and the glass cooktop cracked. After consulting an electrician, he learned that anchoring into studs and using top-mounting screws was non-negotiable. He reinstalled with proper hardware and now checks the unit quarterly for tightness.
“Weight + heat + vibration = danger if not secured properly. I underestimated the forces at play.” — Mark T., DIY Enthusiast
Frequently Asked Questions
Can I install an over-the-range microwave myself?
Yes, if you’re comfortable with basic electrical work, drilling, and lifting heavy objects safely. However, if your home has older wiring, complex venting, or plaster walls, hiring a licensed electrician or appliance installer is strongly recommended.
Do I need external venting?
Not required, but highly recommended. Recirculating vents reuse air, which means grease and odors stay in the kitchen. External venting removes contaminants completely. Check local codes—some jurisdictions require external venting for gas stoves.
How often should I inspect the installation?
Inspect annually. Check for loose screws, rattling during fan use, and signs of wear on mounting points. Clean grease filters monthly to maintain airflow and reduce strain on the motor.
Final Tips for Long-Term Safety and Performance
Once installed, maintenance ensures longevity. Replace charcoal filters every 6–12 months if using recirculation mode. Clean the exterior with a damp cloth—avoid abrasive cleaners. Never store items inside the microwave when not in use; added weight stresses hinges and mounting points.
Conclusion: Take Pride in a Job Done Right
Installing a microwave over your stove isn’t just about following instructions—it’s about respecting the engineering, electricity, and physics involved. A well-installed unit operates quietly, vents effectively, and remains secure for years. Whether you're upgrading for convenience or renovating your kitchen, taking the time to do it right protects your home and loved ones. Now that you know the professional standards, approach your project with confidence, caution, and care.


 浙公网安备
33010002000092号
浙公网安备
33010002000092号 浙B2-20120091-4
Comments
No comments yet. Why don't you start the discussion?