
Removing the battery from a Dell laptop may be necessary for several reasons—whether you're replacing an aging unit, troubleshooting power issues, upgrading hardware, or preparing the device for long-term storage. However, doing so incorrectly can lead to damage to internal components, voided warranties, or even personal injury. Unlike older models with easily accessible external batteries, many modern Dell laptops have internal, non-removable batteries that require careful disassembly.
This guide walks through the entire process in a structured, safe manner. It covers preparation, tools needed, step-by-step removal, and post-removal best practices. Whether you own a Latitude, Inspiron, XPS, or Precision model, these instructions apply broadly across Dell’s current lineup—with specific considerations for sealed designs.
Why Remove Your Dell Laptop Battery?
There are practical and technical reasons to remove a laptop battery:
- Battery replacement: Lithium-ion batteries degrade over time. After 2–4 years of regular use, capacity drops significantly.
- Hardware upgrades: Accessing RAM or SSD often requires removing the bottom panel—and sometimes the battery—to avoid short circuits.
- Safety during repair: Disconnecting the battery eliminates risk of electrical shock or component damage while working inside the chassis.
- Storage or shipping: Airlines and logistics companies recommend removing batteries for extended storage or air transport due to fire hazards.
“Always disconnect the power source before servicing internal components. The battery is part of that system—even when unplugged.” — David Lin, Senior Hardware Technician at Dell Support Services
Tools and Preparation Checklist
Before opening your laptop, gather the right tools and prepare your workspace. Rushing this phase increases the risk of stripped screws, electrostatic discharge (ESD), or lost parts.
📋 **Checklist: What You’ll Need**- Small Phillips-head screwdriver (usually #0 or #00)
- Plastic pry tool or spudger (metal tools can damage connectors)
- Anti-static wrist strap (or work on a hard, non-carpeted surface)
- Clean microfiber cloth and soft workspace mat
- Small container for screws (magnetic tray ideal)
- Replacement battery (if applicable, ensure compatibility)
Dell Model Compatibility Notes
Not all Dell laptops allow user-accessible battery removal. Confirm your model type first:
| Laptop Series | Battery Type | User-Removable? | Notes |
|---|---|---|---|
| Dell XPS 13/15 (2018+) | Internal Sealed | No (requires disassembly) | Glued in some models; fragile ribbon cables |
| Dell Latitude 5xxx/7xxx | Internal Modular | Yes (with tools) | Standard screw access; common in business lines |
| Dell Inspiron 15 3000/5000 | Mixed (older models removable) | Sometimes | Check service manual; newer versions sealed |
| Dell Precision Mobile Workstations | Internal High-Capacity | Yes (but complex) | Multiple screws and brackets; professional help advised |
Step-by-Step Guide to Removing the Battery
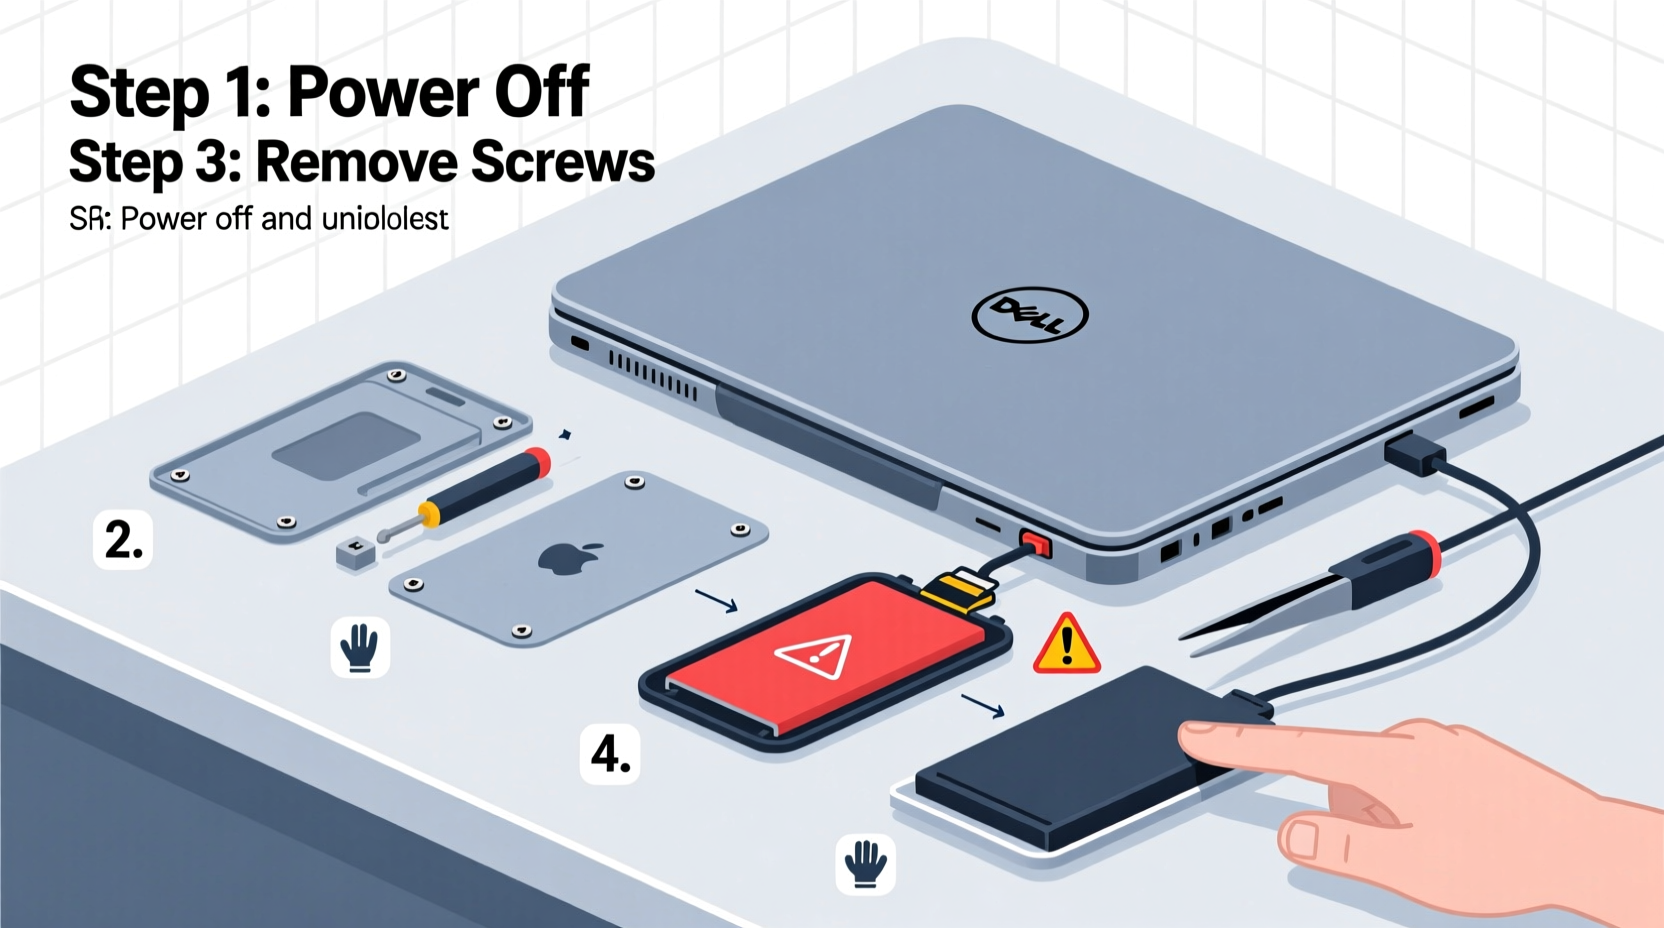
🕒 **Estimated Time:** 20–40 minutes 🔧 **Difficulty Level:** Moderate (some technical familiarity recommended)- Power Down Completely
Shut down the laptop via the operating system. Do not hibernate or sleep. Once off, unplug the AC adapter. - Disconnect All Peripherals
Remove USB drives, HDMI cables, SD cards, and any connected devices. This prevents resistance during disassembly. - Ground Yourself
Put on an anti-static wrist strap connected to a grounded metal object, or frequently touch a metal faucet or unpainted appliance frame to discharge static electricity. - Flip the Laptop Over
Place it on a clean, flat surface with the bottom facing up. Avoid soft surfaces like beds or couches where screws can get lost. - Remove Bottom Panel Screws
Use the correct Phillips driver to unscrew all visible screws. Some models hide screws under rubber feet or warranty stickers—check carefully. Keep screws organized by location. - Open the Base Cover
Gently insert a plastic pry tool along the seam between the top and bottom casing. Work slowly around the edges, releasing clips one by one. Never force it—if resistance occurs, check for missed screws. - Locate the Battery
In most Dells, the battery is a large rectangular block near the rear or side. It’s usually labeled “Battery” or has a model number matching your system (e.g., Dell FW04X). - Disconnect the Battery Connector
Find the thin white or black cable connecting the battery to the motherboard. This is the main power feed. Use the plastic tool to gently lift the connector straight up—do not pull the wire. On some models, a small retaining flap must be flipped open first. - Unscrew Battery Retention Screws
Most batteries are secured with 2–4 screws. Remove them and set aside. If adhesive strips are present (common in XPS models), proceed to the next step with care. - Remove the Battery
If held by screws only, lift it out gently. If glued, use a plastic card or guitar pick to slowly slide under the edge and separate the adhesive. Apply minimal pressure to avoid puncturing the cell pack.
Real Example: Removing a Battery from a Dell XPS 13 9310
Jamal, an IT consultant in Austin, needed to upgrade his Dell XPS 13’s SSD but found the battery blocking access to the drive bay. Despite being technically skilled, he hesitated—knowing the XPS line uses strong adhesive to secure the battery.
He followed the steps above: powered off, removed 8 tiny screws, opened the case with a nylon spudger, disconnected the battery cable, then used dental floss threaded under the battery edge to slice through the adhesive strip slowly. It took patience, but he avoided damaging the sensitive trackpad flex cable running beneath. After installing the new SSD, he reconnected the battery and reassembled the unit successfully—all without triggering a warranty flag or damaging components.
His takeaway: “The floss trick saved me. And labeling each screw position with tape prevented mix-ups during reassembly.”
After Removal: What to Do Next
Once the battery is out, consider these actions:
- Inspect for swelling: A bulging battery indicates degradation and potential hazard. Dispose of it properly at an e-waste facility—do not throw in household trash.
- Test without battery: You can run the laptop on AC power alone (if the charger supports it) to diagnose whether issues persist.
- Replace promptly: If reinstalling a new battery, do so within a few days. Leaving the laptop without power protection risks data loss during outages.
- Recycle responsibly: Dell offers free recycling through its Global Recycling Program. Visit dell.com/recycling for details.
Frequently Asked Questions
Can I remove the battery and still use my Dell laptop?
Yes, as long as the AC adapter is connected. Many enterprise users run their Latitude or Precision models on wall power only to extend battery lifespan. However, sudden power loss could result in data corruption, so use a surge protector or UPS.
Will removing the battery void my warranty?
Opening the laptop may void parts of your warranty if done improperly or if tamper-evident seals are broken. However, Dell allows user-replaceable parts like memory and storage in many models. Check your service manual first at support.dell.com.
How do I know which battery model I need for replacement?
Look at the label on the old battery—it will show the Dell part number (e.g., 5YRJF, YH426). Alternatively, enter your laptop’s Service Tag on Dell’s website to find compatible replacements.
Final Tips for Safety and Success
Working inside a laptop demands precision and caution. Always double-check connections before powering on after reassembly. Ensure no tools or screws are left inside the chassis. If the battery feels hot, smells odd, or shows signs of leakage, stop immediately and contact Dell support.
For those uncomfortable with DIY repairs, Dell Authorized Service Providers offer professional battery replacement with genuine parts and labor coverage.
🚀 **Conclusion** Now that you understand how to safely remove the battery from your Dell laptop, you’re equipped to handle upgrades, repairs, or maintenance with confidence. Remember: patience, the right tools, and attention to detail make all the difference. Share your experience or ask questions in the comments below—your insights might help another user avoid a costly mistake.


 浙公网安备
33010002000092号
浙公网安备
33010002000092号 浙B2-20120091-4
Comments
No comments yet. Why don't you start the discussion?