
Keeping your iPhone updated is one of the most effective ways to ensure peak performance, enhanced security, and access to new features. However, many users delay updates due to concerns about data loss, failed installations, or compatibility issues. The truth is that with proper preparation and a methodical approach, updating your iPhone can be seamless and beneficial. This guide walks you through every phase—before, during, and after the update—to help you maintain your device’s longevity and responsiveness.
Why Updating Your iPhone Matters
iOS updates are more than just flashy new emojis or interface tweaks. Apple releases regular system updates to patch security vulnerabilities, fix software bugs, improve battery efficiency, and optimize app performance. Over time, outdated software can make your phone sluggish, less secure, and incompatible with newer apps. Ignoring updates may also void certain support options if you need assistance from Apple.
According to Apple’s engineering team, devices running the latest iOS version experience up to 30% faster app launch times and significantly reduced crash rates compared to those on older versions.
“Regular iOS updates are essential not only for performance but for protecting user privacy and maintaining ecosystem integrity.” — Craig Federighi, Senior Vice President of Software Engineering, Apple
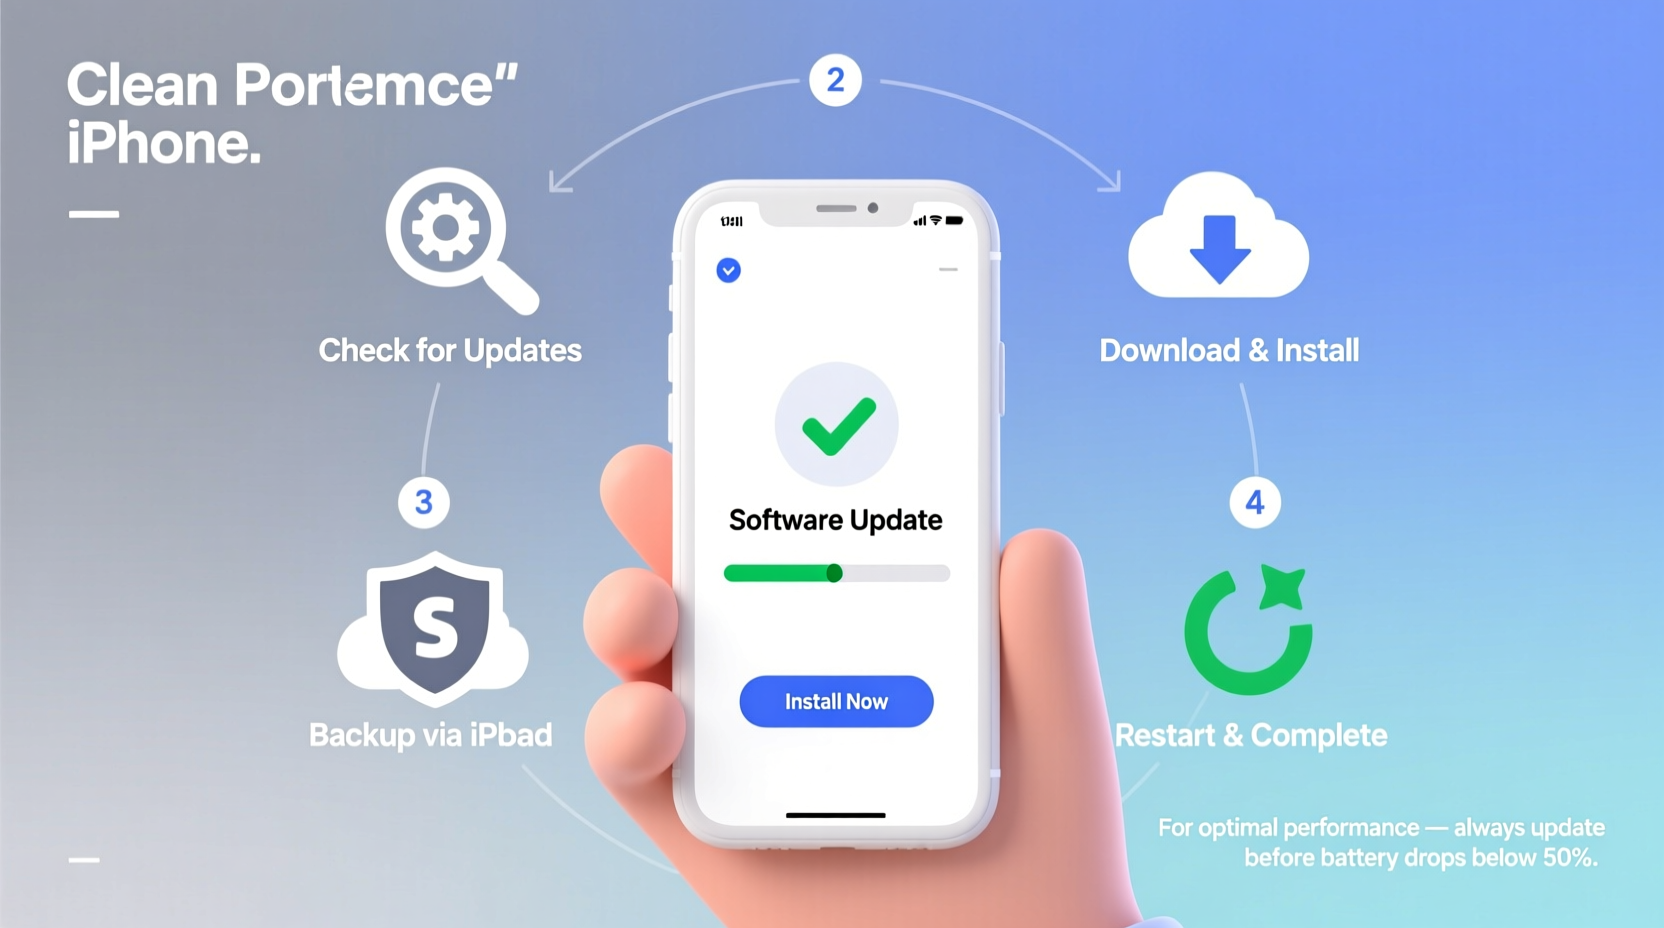
Step-by-Step Guide to Safely Update Your iPhone
A successful update begins long before you tap “Download and Install.” Follow this structured timeline to minimize risks and maximize results.
Phase 1: Preparation (1–2 Days Before Update)
- Check Compatibility: Not all iPhones support the latest iOS version. Visit Settings > General > About to confirm your model, then cross-reference it with Apple’s official compatibility list.
- Free Up Storage Space: iOS updates require at least 5–8 GB of free space. Delete unused apps, offload old media, or move files to cloud storage like iCloud or Google Drive.
- Charge Your Device: Ensure your iPhone has at least 50% battery or connect it to a power source. Never attempt an update on low battery.
- Connect to Stable Wi-Fi: Cellular data isn’t reliable for large downloads. Use a strong, uninterrupted Wi-Fi connection.
- Back Up Your Data: Use iCloud or a computer via Finder (macOS) or iTunes (Windows) to create a full backup. This ensures no data is lost if something goes wrong.
Phase 2: Download and Install (During Update)
- Navigate to Settings > General > Software Update.
- If an update is available, tap “Download and Install.”
- Review the update details and agree to the terms.
- Your iPhone will download the update in the background. This may take 10–30 minutes depending on internet speed.
- Once downloaded, tap “Install” when prompted. The device will restart automatically.
- Wait patiently during installation—it can take 10–20 minutes. Do not force restart or disconnect during this phase.
Phase 3: Post-Update Verification (After Restart)
- Confirm the update succeeded by checking Settings > General > About > Software Version.
- Reopen frequently used apps to ensure they function properly.
- Verify Face ID/Touch ID, camera, Bluetooth, and Wi-Fi are working.
- Restore from backup only if necessary (e.g., missing data).
- Clear temporary cache by restarting your iPhone once after the update.
Do’s and Don’ts When Updating Your iPhone
| Do’s | Don’ts |
|---|---|
| ✅ Back up to iCloud or computer | ❌ Skip backups to save time |
| ✅ Use original Apple charger | ❌ Use third-party chargers during update |
| ✅ Wait for full installation completion | ❌ Force restart mid-update |
| ✅ Free up sufficient storage | ❌ Ignore storage warnings |
| ✅ Test core functions post-update | ❌ Assume everything works without checking |
Real-World Example: Sarah’s Smooth iOS 17 Upgrade
Sarah, a freelance photographer, relied heavily on her iPhone 13 for client shoots and editing. She avoided iOS 16 updates due to a previous failed attempt that caused app crashes. When iOS 17 launched, she decided to follow a careful process. Two days before the update, she backed up over 100GB of photos to iCloud+ and deleted duplicate screenshots. She ensured her Wi-Fi was stable and charged her phone overnight using her original Apple adapter.
The download took 18 minutes, and installation completed without interruption. After rebooting, she tested her camera, Lightroom Mobile, and messaging apps—all worked flawlessly. More importantly, she noticed improved photo rendering speed and longer battery life during outdoor sessions. By preparing thoroughly, Sarah turned a feared task into a performance upgrade.
Frequently Asked Questions
What should I do if my iPhone gets stuck during the update?
If your iPhone freezes on the Apple logo or progress bar for more than 20 minutes, try a forced restart: press and release Volume Up, then Volume Down, then hold the Side button until the Apple logo appears. If the issue persists, connect to a computer and use Finder/iTunes to restore in recovery mode.
Can I use my iPhone while the update downloads?
Yes, you can use your phone normally during the download phase. However, once installation begins, the device will restart and become unusable for several minutes. Avoid starting installation during critical tasks.
Will updating delete my photos or messages?
No—iOS updates are designed to preserve your data. However, hardware failures or interrupted installations can lead to data loss. That’s why backing up beforehand is non-negotiable. Always verify your backup status before proceeding.
Essential Checklist for a Safe iPhone Update
- ☐ Confirm device compatibility with the latest iOS
- ☐ Free up at least 6 GB of storage space
- ☐ Connect to a trusted Wi-Fi network
- ☐ Charge battery to 50% or higher (preferably 80%)
- ☐ Back up to iCloud or computer
- ☐ Disable Low Power Mode (Settings > Battery)
- ☐ Close unnecessary apps before starting
- ☐ Allow 30–60 minutes of uninterrupted time
- ☐ Test key functions after update completes
- ☐ Report any persistent bugs via Feedback Assistant
Maximizing Performance After the Update
An iOS update can temporarily slow down your iPhone as it reindexes data and optimizes settings. To accelerate stabilization:
- Restart your device 24 hours after the update to clear residual processes.
- Update all apps via the App Store to ensure compatibility.
- Reset settings if experiencing glitches: Settings > General > Transfer or Reset iPhone > Reset All Settings (this won’t erase data).
- Enable Optimized Battery Charging to extend long-term battery health.
Over time, consistent updates contribute to smoother multitasking, better app responsiveness, and fewer crashes. Think of each update as routine maintenance—like an oil change for your digital life.
Conclusion
Updating your iPhone doesn’t have to be stressful. With the right preparation and awareness, it becomes a powerful tool for enhancing speed, security, and usability. Whether you're upgrading to access new features or simply keeping pace with evolving digital demands, following this step-by-step process ensures your device remains reliable and efficient for years to come.


 浙公网安备
33010002000092号
浙公网安备
33010002000092号 浙B2-20120091-4
Comments
No comments yet. Why don't you start the discussion?