
Condenser fan motors play a critical role in the efficiency and longevity of air conditioning systems. Properly wired, they ensure consistent airflow across the condenser coil, helping dissipate heat effectively. However, incorrect wiring can lead to motor failure, overheating, or even electrical hazards. This guide walks you through each stage of safely wiring your condenser fan motor—emphasizing safety, precision, and performance optimization.
Understanding the Role of the Condenser Fan Motor
The condenser fan motor is responsible for drawing ambient air through the condenser coil, enabling the refrigerant to release heat before cycling back into the indoor unit. When this motor isn’t wired correctly, it may run inefficiently, overheat, or fail to start altogether. A poorly connected wire can cause voltage drops, phase imbalances (in three-phase units), or short circuits—all of which compromise system integrity.
Before touching any wires, understand that most residential condenser fan motors operate on single-phase 230V AC power and typically come with color-coded leads: black (common), yellow (start winding), and brown or red (run capacitor connection). Always refer to the manufacturer’s wiring diagram specific to your model.
Safety First: Pre-Wiring Precautions
Electrical work involving HVAC components demands strict adherence to safety protocols. The condenser unit connects directly to high-voltage lines, making accidental contact potentially fatal. Follow these essential steps before beginning any wiring task:
- Turn off power at the disconnect switch located near the outdoor unit.
- Switch off the circuit breaker labeled for the AC system inside your main electrical panel.
- Verify no voltage is present using a multimeter or non-contact voltage tester at the terminal block.
- Lockout/tagout (LOTO) procedures should be used in commercial settings to prevent accidental re-energizing.
- Wear insulated gloves and use tools with rubber grips when handling connections.
“HVAC technicians must treat every condenser as live until proven otherwise. One missed breaker can result in severe injury.” — James Rutherford, Master Electrician & HVAC Safety Trainer
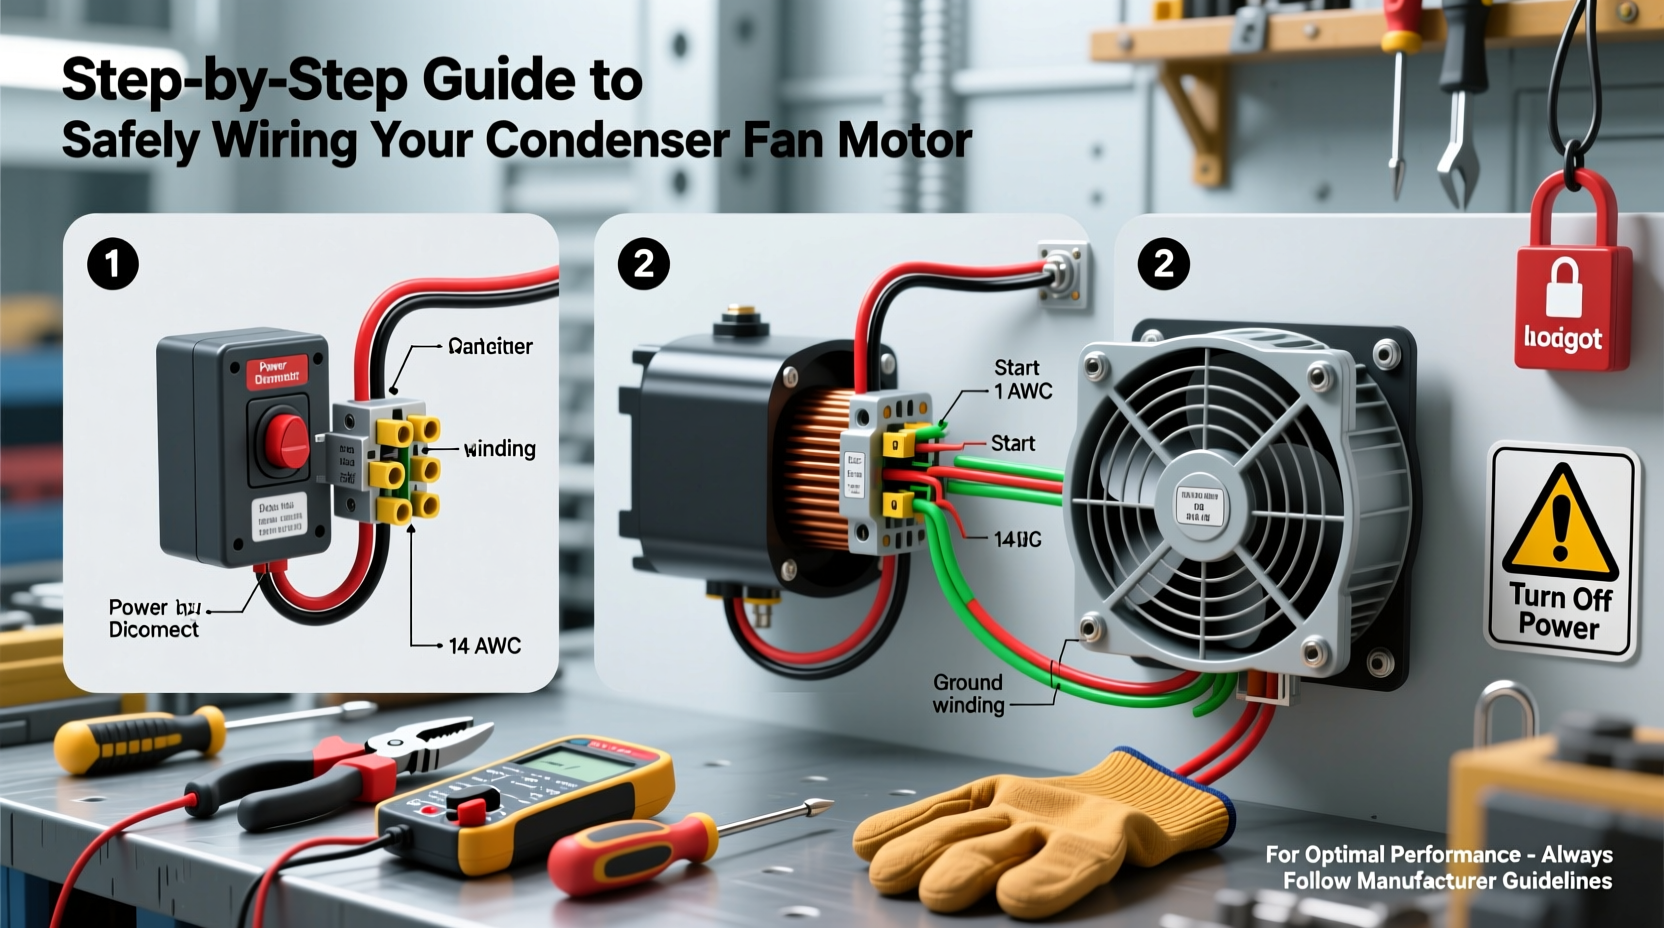
Step-by-Step Guide to Wiring the Condenser Fan Motor
Follow this detailed sequence to wire your condenser fan motor correctly and safely:
- Identify Components: Locate the fan motor, capacitor, contactor, and terminal board. Confirm the motor type (PSC, shaded pole, etc.) and check its voltage rating matches your system.
- Disconnect Old Wires: If replacing an existing motor, carefully remove the wires from the terminals. Label them if necessary to avoid confusion later.
- Connect the Run Capacitor: Attach the brown wire from the motor to one terminal of the dual-run capacitor (usually labeled “FAN”). Connect the other side of that terminal to the “HERM” or “C” terminal on the contactor using a jumper wire.
- Wire the Common Lead: Connect the black (common) motor lead to the neutral leg of the 230V supply—typically tied into the L2 line at the terminal block.
- Link Power Supply via Contactor: Run a wire from the “FAN” terminal on the contactor to the yellow (start) lead on the motor. This ensures the fan only operates when the compressor contactor is energized.
- Ground the Motor: Secure the green or bare copper grounding wire from the motor frame to the unit’s grounding lug or chassis. This prevents shock hazards due to insulation breakdown.
- Double-Check Connections: Ensure all terminals are tight, no stray strands are exposed, and wire nuts (if used) are fully secured.
- Restore Power and Test: Turn the breaker and disconnect switch back on. Set the thermostat to cooling mode and listen for smooth motor startup. Observe rotation direction—fan blades should pull air upward and out of the unit.
| Wire Color | Function | Connection Point |
|---|---|---|
| Black | Common (Run Winding) | L2 / Neutral Leg at Terminal Block |
| Brown | Run Capacitor Return | Fan Terminal on Dual Capacitor |
| Yellow | Start Winding | FAN Terminal on Contactor |
| Green/Bare | Ground | Chassis Grounding Lug |
Real-World Example: Incorrect Wiring Causes Premature Failure
In a suburban home in Phoenix, a DIY homeowner replaced a failed condenser fan motor without consulting the wiring schematic. Believing that matching colors was sufficient, he connected the yellow wire directly to power instead of routing it through the contactor. The motor ran continuously, regardless of thermostat demand.
Within two weeks, the motor overheated and seized. Further inspection revealed melted insulation on the start winding and a blown capacitor. The root cause? Bypassing the control circuit caused constant operation and inadequate cooling. After rewiring according to the correct sequence and installing a new motor and capacitor, the system resumed normal function. This case underscores the importance of following technical diagrams—not assumptions.
Common Mistakes and How to Avoid Them
- Mixing up start and run wires: Connecting the wrong lead to the capacitor can prevent the motor from starting or cause immediate burnout.
- Ignoring rotation direction: Most axial fans are designed to move air upward. Reversed polarity can reduce airflow by up to 40%, increasing head pressure.
- Using undersized wire: Typically, 18 AWG stranded wire is acceptable for control circuits, but always match gauge to amperage load per NEC standards.
- Skipping the capacitor test: A weak or open capacitor won't provide enough phase shift to start the motor. Test capacitance with a multimeter before final assembly.
Expert Checklist for Successful Installation
- Pre-Wiring Preparation
- ☑ Power disconnected and verified dead
- ☑ Correct replacement motor confirmed (RPM, HP, voltage)
- ☑ Capacitance value matched to specifications
- During Wiring
- ☑ All wire functions cross-checked with diagram
- ☑ Terminals tightened securely, no frayed ends
- ☑ Grounding wire attached to clean metal surface
- Post-Installation Verification
- ☑ Motor spins freely by hand before powering
- ☑ Correct rotation observed (upward airflow)
- ☑ No unusual noise or vibration after startup
- ☑ System maintains proper superheat and subcooling
Frequently Asked Questions
Can I wire a condenser fan motor without a capacitor?
No. Single-phase induction motors require a start capacitor to create the phase shift needed for initial torque. Running without one will prevent the motor from starting and may damage the windings.
Why does my fan motor hum but not turn?
A humming sound usually indicates power is reaching the motor, but the rotor isn’t turning. Common causes include a failed start capacitor, seized bearings, or reversed polarity. Check the capacitor first—it’s the most frequent culprit.
Is it safe to upgrade to a higher RPM fan motor?
Not without system evaluation. A faster motor increases airflow, which can lower head pressure too much and affect refrigerant metering. It may also overload the motor or damage the fan shroud due to imbalance. Stick to OEM-specified replacements unless advised otherwise by an HVAC engineer.
Final Steps for Long-Term Performance
Once wired, monitor the system for at least 30 minutes under load. Measure current draw with an ammeter and compare it to the motor’s rated full-load amps (FLA). Slight variance is acceptable, but anything above 10% suggests mechanical binding or electrical issues.
Regular maintenance extends motor life. Clean debris from around the fan blade quarterly, lubricate oil ports (if applicable) annually, and inspect wiring connections during seasonal tune-ups. A well-maintained motor can last 10–15 years.
“The difference between a repair that lasts and one that fails quickly often comes down to attention to detail during installation.” — Lisa Tran, NATE-Certified HVAC Technician
Conclusion
Properly wiring a condenser fan motor isn’t just about connecting wires—it’s about ensuring system harmony, electrical safety, and peak cooling efficiency. By following manufacturer guidelines, respecting electrical hazards, and verifying every connection, you protect both equipment and occupants. Whether you're a seasoned technician or a knowledgeable homeowner, precision and patience yield reliable results.


 浙公网安备
33010002000092号
浙公网安备
33010002000092号 浙B2-20120091-4
Comments
No comments yet. Why don't you start the discussion?