
Adding a pendant to your keychain is more than just a fashion statement—it’s a way to carry personal meaning, elevate everyday utility, or express individuality. However, a poorly attached pendant can easily break loose, get damaged, or even become a safety hazard. A secure attachment ensures both aesthetic appeal and long-term durability. Whether you’re customizing a gift or upgrading your own keys, the method matters as much as the design. This guide walks through the essential steps, materials, and techniques to attach a pendant properly—so it stays put, looks polished, and withstands daily wear.
Why Secure Attachment Matters
A keychain endures constant movement, friction, and impact—from being jostled in pockets to dropped on pavement. When a pendant isn’t affixed correctly, it risks detachment, scratching, or warping. Beyond losing a sentimental piece, a loose charm can snag on fabric or cause injury if sharp edges are exposed. Proper installation protects both the pendant and user while maintaining visual cohesion with your keys.
Experts emphasize that longevity in accessories comes not from material alone, but from construction integrity. “The weakest point of any keychain isn’t the metal—it’s the connection,” says Jordan Lee, a jewelry designer specializing in functional wearables. “A strong join means the pendant enhances the keychain, rather than becoming dead weight.”
“Secure connections aren’t just about hardware—they reflect intention. Every detail should serve both form and function.” — Jordan Lee, Jewelry Designer & Accessory Engineer
Essential Tools and Materials
Before beginning, gather the right tools. Using improper equipment can damage delicate pendants or create weak links. Below is a checklist of recommended supplies:
- Pendant with an open loop or jump ring – Ensure the loop at the top is sturdy and wide enough to accommodate your chosen connector.
- Keychain ring (split ring or lobster clasp) – Choose one made of stainless steel or brass for durability.
- Jump rings (3–5mm diameter) – Use solid, soldered rings instead of pre-opened ones for better strength.
- Double-sided pliers (chain-nose and flat-nose) – Essential for opening and closing jump rings without distortion.
- Micro file or emery board (optional) – For smoothing rough edges on metal loops.
- Clear nail polish or threadlocker (for screw-on types) – Adds grip and prevents loosening over time.
Step-by-Step Guide to Attaching Your Pendant
- Inspect the pendant and keychain. Check for structural weaknesses, especially around the bail (the loop atop the pendant). If the loop feels flimsy, consider adding a reinforcing jump ring or opting for adhesive-backed options only if permanent bonding is acceptable.
- Select the appropriate jump ring. Match the ring size to the thickness of your keychain and pendant loop. Too small, and it won’t fit; too large, and it may wobble or catch on objects.
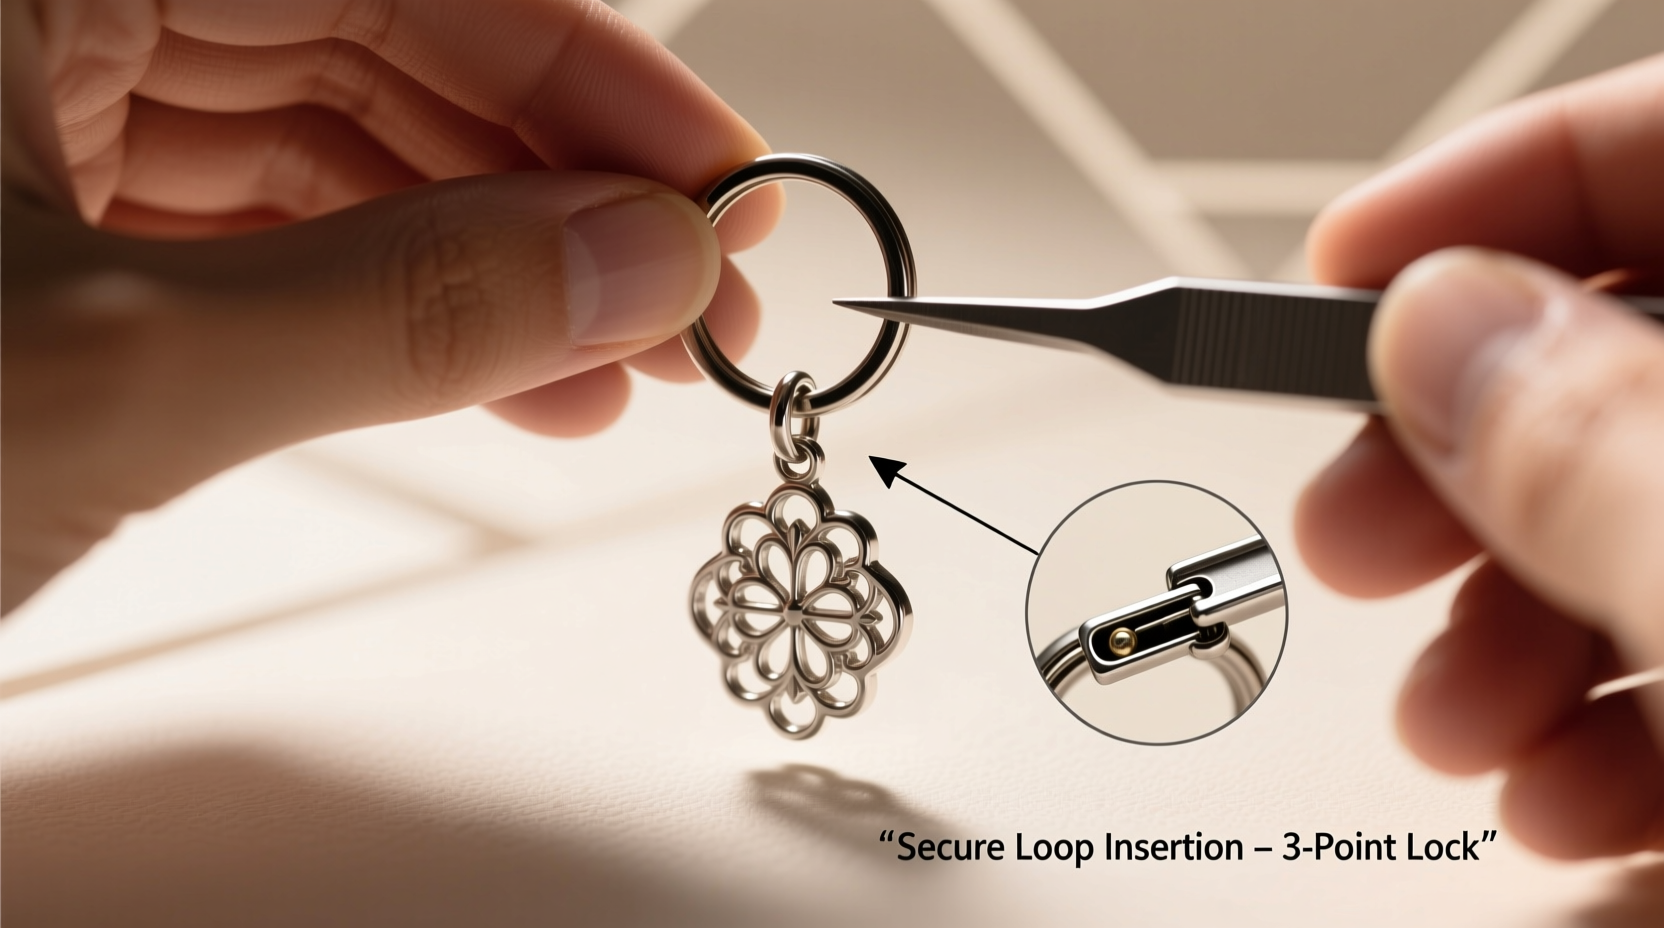
- Open the jump ring safely. Hold it with two pairs of pliers—one on each side. Twist the ring sideways (like turning a doorknob), never pulling apart, which distorts the shape and weakens the closure.
- Slide on the pendant first. Pass one end of the opened jump ring through the pendant’s bail. Then, add the keychain ring onto the same jump ring.
- Close the jump ring completely. Gently twist the ends back into alignment until they meet flush. Do not leave gaps. A misaligned ring will eventually snap under stress.
- Test mobility and security. Shake the keychain gently. The pendant should move freely but remain firmly attached. Tug lightly on the pendant to confirm it doesn’t slip off.
- Optional reinforcement. For high-use keychains, apply a tiny drop of clear, removable adhesive (such as jeweler’s cement) where the jump ring closes. Avoid super glue unless you intend permanence.
Do’s and Don’ts: Keychain Attachment Table
| Do’s | Don’ts |
|---|---|
| Use soldered jump rings for heavy pendants | Use split rings meant for keys as direct connectors—they bind and wear out fast |
| Twist jump rings open laterally with pliers | Pull jump rings apart like a staple—this weakens them permanently |
| Choose pendants with bails rated for daily wear | Attach fragile glass or resin pieces without protective casing |
| Reinforce closures with removable adhesives | Glue everything shut—you may need future access |
| Match metal finishes (e.g., silver with silver) | Mix reactive metals (like copper and steel) without coating—they corrode faster |
Real Example: Custom Commemorative Keychain
Sophia, a teacher in Portland, wanted to honor her late grandmother by carrying her engraved locket on her work keys. She initially tried clipping it directly using a carabiner, but within days, the locket spun awkwardly and scratched her phone screen. After researching secure methods, she purchased a 4mm gold-filled jump ring and used proper pliers to connect the locket to her split ring. She also added a small rubber fob between the locket and keys to reduce noise and friction. Two years later, the locket remains intact, unscratched, and emotionally significant—proof that thoughtful assembly makes all the difference.
Frequently Asked Questions
Can I attach a pendant without tools?
While possible with clip-on charms or magnetic attachments, these are less secure and prone to accidental release. For lasting results, investing in basic pliers and quality jump rings is strongly advised. Temporary solutions work for decorative use only.
How do I clean a pendant still attached to my keychain?
Use a soft cloth dampened with mild soapy water. Wipe gently, avoiding prolonged moisture exposure near the connection point. Dry immediately. For deeper cleaning, remove the pendant by carefully reopening the jump ring using pliers, then reattach after drying.
What if my pendant doesn’t have a loop?
If the pendant lacks a bail, consider professional help to solder a loop or use a bezel-style holder. Alternatively, some adhesive-backed findings exist, but they’re best suited for lightweight, non-critical items. Mechanical attachment is always preferable for daily carry.
Final Tips for Lasting Style and Function
- Rotate pendants seasonally to reduce wear on any single piece.
- Avoid oversized or heavy pendants on slim keyrings—they strain connections and make pockets bulky.
- Check connections monthly, especially after drops or impacts.
- Store spare pendants in a soft pouch to prevent tarnishing or scratches.
Conclusion: Make It Yours, Make It Last
Attaching a pendant to your keychain might seem simple, but doing it right transforms a minor accessory into a meaningful, enduring piece. With the correct tools, attention to detail, and respect for mechanical integrity, your pendant won’t just look good—it will stand the test of time. Whether it’s a symbol of memory, achievement, or identity, its value grows when it stays with you, day after day. Take a few extra minutes now to ensure your connection is flawless. Your future self will appreciate the care.


 浙公网安备
33010002000092号
浙公网安备
33010002000092号 浙B2-20120091-4
Comments
No comments yet. Why don't you start the discussion?