
Sewing doll clothes is a rewarding introduction to garment construction, especially for those new to sewing. It allows beginners to practice essential skills—measuring, cutting, pinning, stitching, and finishing—in a manageable format. Creating a matching skirt and top set not only builds confidence but also results in a charming handmade gift or play accessory. With basic tools and a bit of patience, you can craft a polished outfit that fits perfectly and reflects your personal style.
Gathering Your Tools and Materials
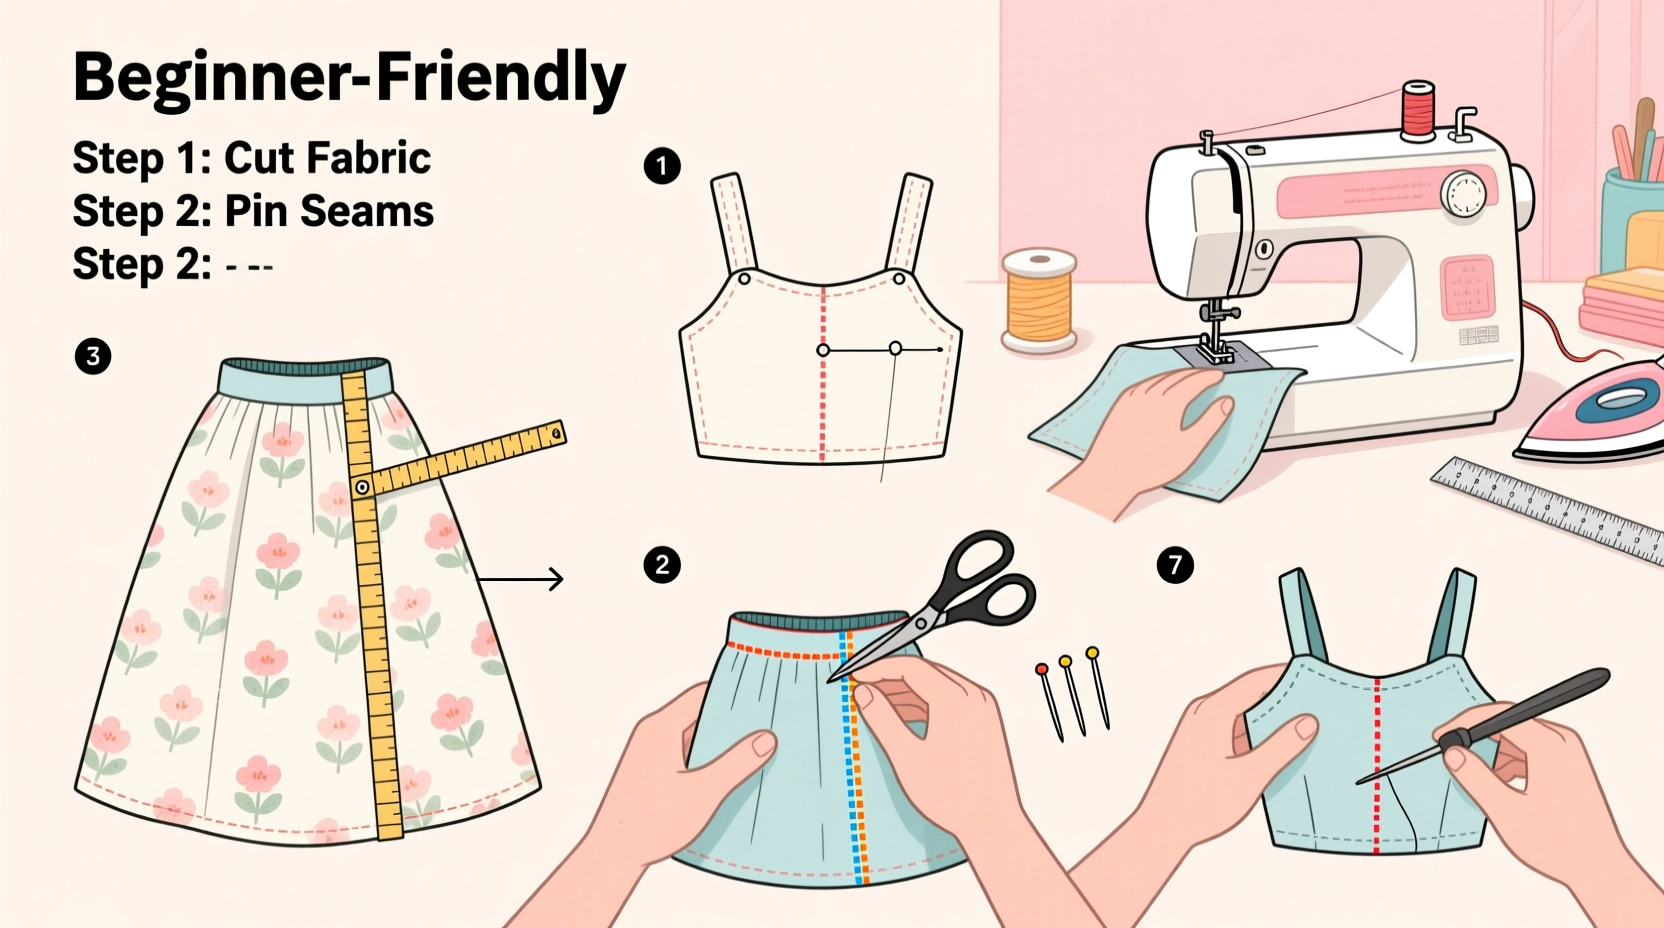
Before starting any sewing project, preparation is key. Doll clothing requires precision due to small scale, so having the right tools makes a significant difference. Most items are likely already in your home or easily accessible at craft stores.
- Measuring tape (flexible, in inches or centimeters)
- Fabric scissors (dedicated to fabric only)
- Pins or fabric clips
- Hand-sewing needles or a sewing machine
- Thread (cotton or polyester, matching your fabric)
- Lightweight fabric (cotton, cotton blend, or felt for beginners)
- Elastic (3–5 mm wide, for waistband)
- Tailor’s chalk or washable fabric marker
- Ruler and paper for drafting patterns
- Doll (to take measurements from)
Taking Measurements and Drafting Simple Patterns
The first step in creating a well-fitting outfit is accurate measurement. Use a soft measuring tape around the doll’s chest, waist, and hips. Also measure from shoulder to waist (for top length) and waist to desired skirt hem.
For this guide, we’ll assume an 18-inch doll (like American Girl or similar). Adjust proportions if your doll differs.
Top Pattern (Simple Bodice)
- Draw a rectangle: 7 inches wide (chest circumference + 1 inch ease) by 5 inches long (shoulder to waist).
- Mark the center top edge and measure 1 inch down on each side for armhole depth.
- Curve gently from shoulder edge to marked point to form armholes.
- Add ½ inch seam allowance around all edges except neckline (which will be finished with fold or binding).
Skirt Pattern (A-Line with Elastic Waist)
- Draw a rectangle: 12 inches wide (waist measurement × 1.5 for gathering) by 6 inches long (desired skirt length).
- Widen slightly at the bottom to create an A-line flare—add 1–2 inches total width at hem.
- Add ½ inch seam allowance on sides and top; 1 inch at bottom for hem.
- Cut two identical pieces: one for front, one for back.
Sewing the Top: Construction Steps
With your pattern ready, cut two bodice pieces from fabric (mirror them if using directional print). Place right sides together and pin along sides and shoulders.
Step-by-Step Assembly
- Sew side seams and shoulder seams using a ½ inch seam allowance. Backstitch at start and end.
- Press seams open with a cool iron (use pressing cloth on delicate fabrics).
- Fold neckline edge ¼ inch to the inside and hand-stitch or topstitch for a clean finish.
- Optional: Add short sleeves by cutting small rectangles (3” x 4”) and attaching at armholes with right sides together.
- Try the top on the doll. Adjust fit if needed before finalizing.
If using a sewing machine, set stitch length to 2.0–2.5 mm for better control on small seams. For hand sewing, use a backstitch for durability.
| Step | Tool/Technique | Common Pitfall |
|---|---|---|
| Cutting fabric | Sharp scissors, pinned pattern | Shifting fabric causes misshapen pieces |
| Sewing seams | Backstitch, consistent seam allowance | Uneven stitches lead to puckering |
| Finishing edges | Fold-and-stitch or zigzag | Raw edges fraying over time |
“Doll garments teach proportion and precision—skills that translate directly to full-size clothing.” — Lila Montgomery, Textile Arts Instructor
Sewing the Skirt: Elastic Waist and Hemming
The skirt uses a gathered elastic waistband for comfort and adjustability—a practical design for growing dolls or varying body shapes.
Construction Process
- With right sides together, sew the two skirt pieces along the side seams using ½ inch allowance. Press open.
- At the top edge, fold down ½ inch toward the wrong side and press. Then fold again ¾ inch to create a casing for the elastic.
- Stitch close to the inner folded edge, leaving a 1.5-inch gap to insert elastic.
- Cut a piece of elastic to fit snugly around the doll’s waist (measure tightly and subtract ½ inch for stretch).
- Attach a safety pin to one end of the elastic and thread it through the casing. Sew ends together securely with a zigzag or square stitch.
- Close the gap in the casing with hand stitching.
- Hem the bottom edge: fold up ½ inch twice and stitch all around.
Once complete, gather the top slightly by tugging on loose threads—it should sit evenly under the elastic.
Checklist: Final Touches
- ✅ Try outfit on doll to check fit and comfort
- ✅ Trim all loose threads
- ✅ Reinforce stress points (waistband, shoulder seams)
- ✅ Wash test fabric scraps to ensure colorfastness
- ✅ Label handmade tag (optional but sweet for gifts)
A Real Example: Maya’s First Doll Outfit
Maya, a 10-year-old beginner, wanted to make a summer set for her favorite doll. She chose bright floral cotton for the top and a coordinating solid yellow for the skirt. Using a T-shirt as a base pattern, she traced and adjusted the bodice. Her first attempt had uneven armholes, but after re-cutting with more care, the second version fit perfectly. For the skirt, she struggled threading the elastic until her grandmother showed her how to use a large needle as a guide. The finished set included tiny buttons drawn with fabric pen—a creative touch that made it uniquely hers. Two hours of focused work resulted in a cherished handmade piece she proudly displayed at school.
FAQ: Common Questions from Beginners
Can I make this without a sewing machine?
Yes. Hand sewing works well for doll clothes. Use a backstitch for seams and a running stitch for hems. It takes longer but offers excellent control and portability.
What if my fabric frays too much?
Choose tightly woven cotton or pre-wash fabric to minimize fraying. Alternatively, use pinking shears to cut edges or apply a thin line of fabric sealant (like Fray Check) sparingly on seam allowances.
How do I resize the pattern for different dolls?
Measure your doll’s key dimensions and scale the pattern accordingly. For example, if the original waist is 10 inches and your doll’s is 8 inches, multiply all measurements by 0.8. Always test with a muslin (practice fabric) first.
Final Tips for Success
Start simple. Your first set doesn’t need ruffles or zippers—focus on clean seams and proper fit. Keep a small notebook to record measurements, fabric choices, and adjustments for future projects. Store leftover fabric in labeled envelopes by doll size for quick access.
Don’t rush pressing. Ironing seams flat before stitching the next step creates a professional look, even in miniature.
Conclusion
Sewing a doll skirt and top set introduces foundational techniques in a fun, low-pressure way. Each stitch builds skill and creativity. Whether you're sewing with a child or rediscovering your own love for crafting, this project delivers tangible results and lasting satisfaction. The joy isn’t just in the finished outfit, but in the process—measuring, designing, and bringing a tiny vision to life.


 浙公网安备
33010002000092号
浙公网安备
33010002000092号 浙B2-20120091-4
Comments
No comments yet. Why don't you start the discussion?