
Garage door remotes make daily life more convenient, but when they stop working, it can be frustrating. Whether you've replaced batteries, moved into a new home, or just acquired a spare remote, syncing it properly is essential for seamless access. The good news? Most modern garage door openers are designed for straightforward setup. With the right approach, you can get your remote working in minutes—no technician required.
This comprehensive guide walks you through every stage of syncing your garage door remote, covering major brands like Chamberlain, LiftMaster, Genie, and Craftsman. You’ll also learn troubleshooting tips, safety precautions, and best practices to keep your system running smoothly for years.
Understanding Your Garage Door Opener System
Before diving into the syncing process, it helps to understand how your garage door opener communicates with the remote. Most systems use radio frequency (RF) signals—typically 300–400 MHz—to transmit commands from the remote to the motor unit mounted on your ceiling.
Modern openers use rolling code technology (also known as Security+ by Chamberlain), which changes the access code each time the remote is used. This prevents code grabbing and enhances security. Older models may use dip switches, which require manual alignment of physical switches inside both the remote and the motor unit.
Knowing your opener’s model and technology is crucial. Check the label on the back or side of the motor unit for the brand, model number, and manufacturing date. If it was made after 1993, it likely uses wireless programming via a \"Learn\" button.
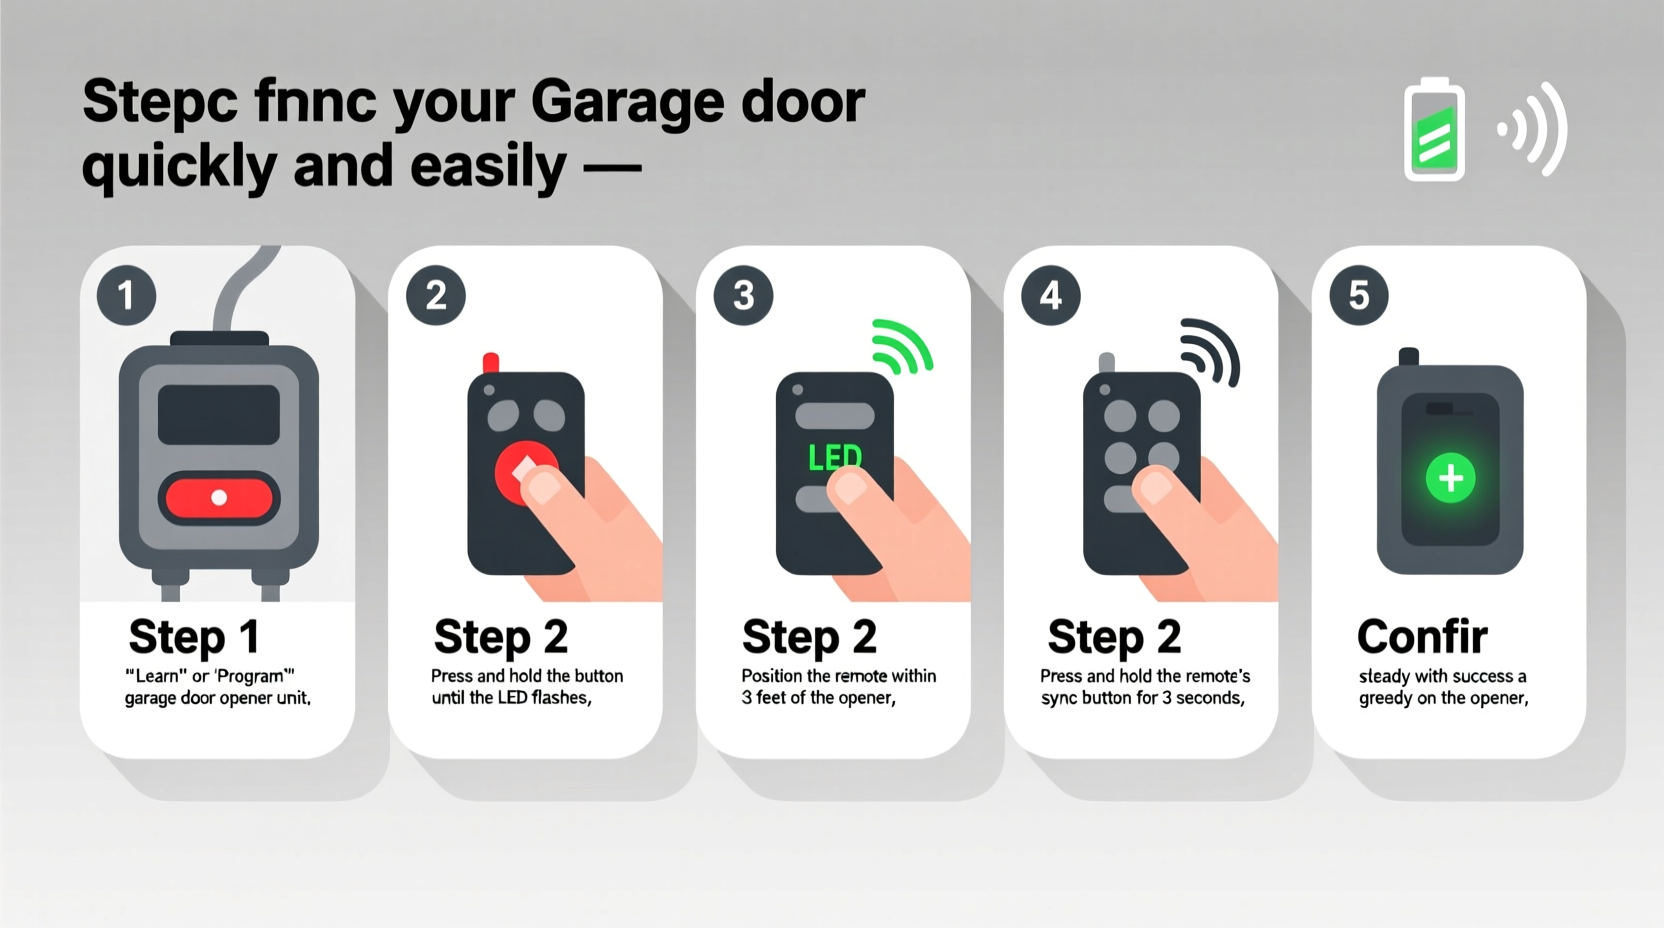
Step-by-Step Guide to Syncing Your Remote
The exact steps vary slightly depending on your brand, but the general process is consistent across most modern systems. Follow this universal timeline to sync your remote successfully.
- Replace the battery – Start with a fresh battery in the remote. Weak power can prevent signal transmission even if the remote appears to work.
- Locate the “Learn” button – On the motor unit, usually near the antenna wire. It may be labeled “Learn,” “Smart,” or have a colored LED next to it.
- Press and release the Learn button – The LED will light up or flash, indicating the system is in programming mode. You typically have 30 seconds to complete the next step.
- Press the remote button – Hold the remote 1–2 feet from the motor unit and press the desired button firmly. Hold for 2–3 seconds.
- Confirm successful sync – The LED on the motor unit will either stop flashing, double-flash, or emit a beep, depending on the brand.
- Test the remote – Step outside the garage and test the remote from various distances to ensure reliable operation.
If the door doesn’t respond, repeat the process. Some systems allow multiple remotes to be programmed—just repeat steps 3–5 for each additional remote.
Brand-Specific Syncing Instructions
Different manufacturers use slightly different protocols. Use the table below to identify your brand and follow the correct procedure.
| Brand | Learn Button Color | Sync Signal | Notes |
|---|---|---|---|
| Chamberlain / LiftMaster | Purple, orange, or green | LED stops flashing | Security+ 2.0 models support MyQ app integration |
| Genie | Red or green | Two quick flashes | Some older Intellicode models require dip switch matching |
| Craftsman | Orange or red | Blink stops after 2 seconds | Made by Chamberlain; instructions often interchangeable |
| Sears | Red | Single flash then off | Discontinued line; refer to manual if available |
For older systems using dip switches, match the pattern of on/off switches inside the remote to those inside the motor unit. These are less secure and increasingly rare, but still functional if set correctly.
“Proper synchronization isn’t just about convenience—it’s a critical part of home security. A misaligned remote can leave your garage vulnerable.” — Daniel Reyes, Residential Automation Technician with 15+ years of experience
Troubleshooting Common Syncing Issues
Even with careful steps, problems can occur. Here are the most frequent issues and how to resolve them:
- Remote won’t program: Ensure the Learn LED responds when pressed. If not, check power supply and circuit breaker. Reset the opener by unplugging for 30 seconds, then try again.
- Only one remote works: Programming may have overwritten previous remotes. Re-sync all remotes in sequence.
- Intermittent response: Interference from nearby electronics (Wi-Fi routers, baby monitors) can disrupt signals. Relocate interfering devices or reprogram during low-usage hours.
- Remote works only up close: Replace the battery first. If that fails, the remote may be damaged or out of range due to wall materials (e.g., metal studs).
- Opener clicks but door doesn’t move: This indicates a mechanical issue, not a sync problem. Inspect the trolley, chain, and safety sensors.
Mini Case Study: Restoring Access After a Power Surge
When Sarah moved into her new home, she discovered none of the three provided remotes worked. The previous owners hadn’t left instructions, and the garage opener—a Chamberlain B976LM—had no visible damage. She assumed the remotes were faulty.
After replacing the batteries with no success, she searched the model number online and learned about the Learn button. Following the standard sync process, she pressed the purple button on the motor unit, waited for the LED to blink steadily, then pressed the remote button. The LED stopped flashing immediately.
To her relief, the garage door opened smoothly. She repeated the process for the other two remotes and even programmed her car’s Homelink system. Within 15 minutes, full access was restored—without a service call.
Sarah’s experience highlights how understanding basic syncing procedures can save time, money, and stress.
Essential Checklist for Successful Remote Syncing
Use this checklist before starting to ensure a smooth process:
- ✅ Confirm the garage door opener is receiving power
- ✅ Replace the remote battery with a new one
- ✅ Locate the Learn button on the motor unit
- ✅ Clear the area around the garage door path
- ✅ Have all remotes ready for programming
- ✅ Note the model number and brand for reference
- ✅ Test each remote after syncing
Frequently Asked Questions
How many remotes can I sync to one opener?
Most modern garage door openers support between 5 and 8 remotes. Check your owner’s manual for the exact limit. Exceeding this number may cause older remotes to stop working as the system overwrites stored codes.
Can I sync my car’s Homelink system instead of using a handheld remote?
Yes. Homelink systems are compatible with most major brands. The process involves holding the Homelink button in your car while pressing the Learn button on the opener, similar to a standard remote. Refer to your vehicle’s manual for specific timing.
Why did my remote stop working suddenly?
Sudden failure is usually due to a dead battery, signal interference, or accidental reset of the opener. Power surges, lightning strikes, or unplugging the unit can erase programmed remotes. Always re-sync after a power interruption.
Final Steps and Long-Term Maintenance
Once your remote is synced, take a moment to optimize long-term performance. Label each remote for easy identification, especially if you have multiple vehicles or family members. Store spares in a dry, accessible location—such as a kitchen drawer or entryway shelf.
Test your remotes monthly. Clean the buttons periodically with a cotton swab and isopropyl alcohol to prevent grime buildup. Avoid exposing remotes to extreme temperatures or moisture, which can damage internal circuits.
If you plan to sell your home, consider erasing all remotes for security. Press and hold the Learn button for 6 seconds (on most models) to clear the memory. New owners can then program their own devices safely.
Take Control of Your Garage Access Today
Synching your garage door remote doesn’t require technical expertise—just attention to detail and a few minutes of your time. By following these proven steps, you can restore access, enhance home security, and avoid unnecessary service fees. Whether you’re setting up a new remote or troubleshooting an old one, the solution is almost always within reach.


 浙公网安备
33010002000092号
浙公网安备
33010002000092号 浙B2-20120091-4
Comments
No comments yet. Why don't you start the discussion?