
Mechanical keyboards are precision instruments built for performance, comfort, and durability. Over time, dust, crumbs, oils from fingertips, and environmental debris accumulate between the keys, affecting both responsiveness and hygiene. While cleaning may seem straightforward, improper techniques—especially around sensitive components like switches—can lead to permanent damage. This comprehensive guide walks you through a safe, effective process to deep-clean your mechanical keyboard while preserving switch integrity and extending its lifespan.
Why Cleaning Matters: More Than Just Aesthetics
A dirty keyboard isn’t just unsightly—it can degrade typing performance. Debris trapped under keycaps alters actuation points, increases friction on stems, and accelerates wear on internal mechanisms. Oily residue attracts more dust, creating a cycle of grime buildup. In extreme cases, moisture or conductive particles can cause electrical shorts, especially in humid environments.
Regular maintenance doesn't only improve tactile feel; it protects your investment. Most high-end mechanical keyboards use Cherry MX, Gateron, Kailh, or custom switches designed for 50 million keystrokes or more. But that longevity assumes proper care. Skipping cleaning or using aggressive methods risks voiding warranties and shortening functional life.
“Switches are engineered for durability, but they’re not immune to contamination. Preventative cleaning is the single most impactful habit users can adopt.” — Daniel Reyes, Senior Hardware Engineer at KeyMech Labs
Essential Tools and Supplies
Before beginning, gather the right tools. Using inappropriate items (like paper towels or household cleaners) increases the risk of scratches or chemical damage. Here’s what you’ll need:
- Keycap puller – Preferably a nylon or silicone-coated model to avoid chipping ABS or PBT plastics.
- Compressed air – Canned air with a narrow nozzle for precise cleaning. Avoid high-pressure industrial systems.
- Soft-bristle brush – A clean makeup or electronics brush works well for dislodging fine particles.
- Isopropyl alcohol (IPA), 70% minimum – Ideal concentration for cleaning without excessive evaporation or residue.
- Lint-free cloths or microfiber wipes – Never use paper towels, which can scratch surfaces.
- Small container – For soaking keycaps (glass or plastic, non-metallic).
- Tweezers or anti-static pick – To remove stubborn debris near switches.
- Cotton swabs (optional) – Use sparingly and only with dry or slightly damp tips.
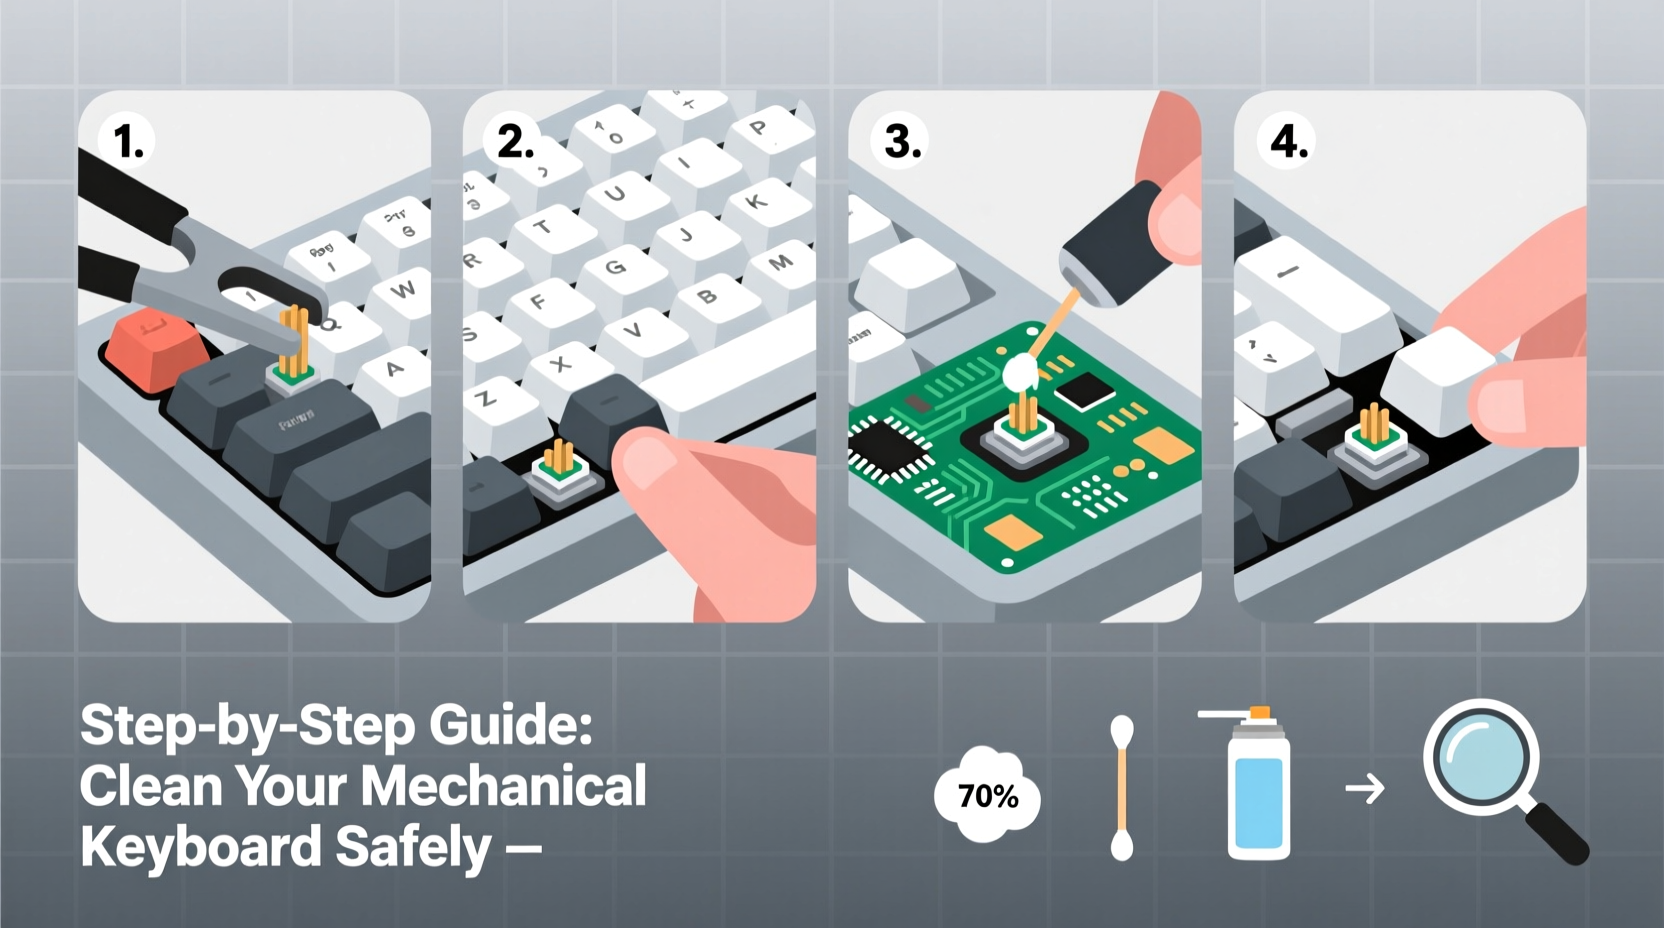
Step-by-Step Cleaning Process
Follow this sequence to ensure thorough cleaning without compromising switch function. The entire process takes 45–90 minutes depending on keyboard size and condition.
- Power down and unplug – Disconnect from computer or turn off Bluetooth. This prevents accidental input or electrical issues during cleaning.
- Flip and shake gently – Turn the keyboard upside down over a trash can and tap lightly to dislodge loose debris. Do not shake aggressively—this can loosen stabilizers.
- Use compressed air – Hold cans upright and spray in short bursts between keycaps at a 45-degree angle. Focus on gaps where dust collects. Keep the nozzle moving to avoid moisture condensation.
- Remove keycaps with a puller – Start from the top row and work downward. Grip each keycap evenly and lift straight up to avoid bending switch stems. For larger keys (spacebar, shift), note stabilizer orientation for reinstallation.
- Clean keycaps – Soak in warm water with mild dish soap for 15–30 minutes. For deeper stains, add a splash of IPA (no more than 1:4 ratio). Scrub gently with a soft brush, rinse thoroughly, and lay flat on a towel to dry completely (minimum 4 hours).
- Clean the plate and switch housing – With keycaps removed, use compressed air again across the exposed board. Then, lightly dampen a corner of a microfiber cloth with IPA and wipe the plate surface. Avoid pooling liquid near switches.
- Targeted spot cleaning – Dip a cotton swab in IPA, squeeze out excess, and carefully clean around individual switches. Never pour liquid directly onto the PCB.
- Inspect for debris – Use tweezers or an anti-static pick to remove fibers or hardened gunk lodged beneath switches. Work slowly to avoid snagging pins.
- Reinstall keycaps – Once fully dry, align each keycap squarely over its switch and press down until it clicks. Test stability by wiggling lightly.
- Final test – Reconnect the keyboard and open a text editor. Press every key to verify registration and smooth travel.
| Action | Recommended Tool/Method | Avoid |
|---|---|---|
| Removing keycaps | Nylon keycap puller | Fingers, metal tools, pliers |
| Dusting between keys | Compressed air, soft brush | Vacuum cleaners (static risk) |
| Cleaning keycaps | Soapy water + IPA rinse | Bleach, dishwasher, boiling water |
| Wiping plate | Microfiber cloth + IPA | Paper towels, Windex, wet sponges |
| Drying time | Air dry 4+ hours | Hair dryer (heat warps plastic) |
Common Mistakes That Damage Switches
Even with good intentions, users often make errors that compromise switch integrity. Awareness of these pitfalls prevents costly mistakes:
- Using excessive liquid: Pouring or spraying IPA directly onto the PCB can seep into switch housings, dissolve lubricants, or corrode contacts.
- Improper drying: Installing keycaps on damp components invites mold growth and conductivity issues.
- Forcing keycaps back on: Misaligned installation stresses switch stems and can crack housings, especially on low-profile or optical switches.
- Skipping stabilizer care: Large keys rely on stabilizers for smooth motion. Dirt inside stabilizer wires causes grinding and eventual failure.
- Using abrasive materials: Steel wool, rough sponges, or stiff brushes scratch legends and damage switch exteriors.
Mini Case Study: Recovering a Neglected Keyboard
Ryan, a freelance writer, used his mechanical keyboard daily for over two years without cleaning. He noticed increasing missed keystrokes and a gritty texture under his fingers. After researching risks, he attempted a quick fix with canned air—but saw minimal improvement.
Following this guide, he removed all keycaps and discovered thick layers of skin flakes, pencil shavings, and dried coffee residue beneath. He soaked the keycaps overnight in soapy water with a capful of IPA, then cleaned the plate using a microfiber cloth dampened with 70% alcohol. Using tweezers, he extracted a small rubber band fragment stuck under the Enter key stabilizer.
After reassembly and testing, Ryan reported restored tactile feedback and zero ghosting. “It feels like a brand-new keyboard,” he said. “I didn’t realize how much buildup was affecting performance.” He now cleans every three months and keeps a mini maintenance kit at his desk.
When to Remove Switches (And When Not To)
For most users, switch removal is unnecessary and risky. Desoldering requires skill, proper tools, and introduces ESD (electrostatic discharge) hazards. However, there are exceptions:
- If a switch fails repeatedly after cleaning, it may be defective or internally contaminated.
- Custom modders replacing stock springs or installing foam dampeners may need access.
- Water-damaged keyboards sometimes require full disassembly and component drying.
If you proceed, document each step. Take photos before desoldering, organize switches by position, and use a soldering iron with temperature control. Hot-air stations reduce the chance of pad damage. Replacing switches also voids warranties on most prebuilt boards.
“Unless you’re experienced with PCB work, leave switches intact. Over 95% of issues are resolved with keycap and plate cleaning alone.” — Lena Park, Community Lead at BuildYourBoard.io
Preventative Maintenance Checklist
To minimize future cleaning frequency and protect your keyboard, follow this monthly routine:
- ✅ Wash hands before typing to reduce oil transfer.
- ✅ Use compressed air every 2–4 weeks to clear surface dust.
- ✅ Wipe the case and plate with a dry microfiber cloth weekly.
- ✅ Keep food and drinks away from the workspace.
- ✅ Store under a keyboard cover when not in use.
- ✅ Perform full keycap cleaning every 3–6 months.
FAQ: Common Questions About Keyboard Cleaning
Can I wash my keycaps in the dishwasher?
No. Dishwashers expose plastics to high heat and strong detergents, which can warp keycaps, fade legends, and leave residues. Hand washing with lukewarm water and mild soap is safer and more controlled.
Is 99% isopropyl alcohol better than 70%?
Not necessarily. While 99% IPA evaporates faster and leaves less moisture, it’s more volatile and flammable. 70% is effective at breaking down oils and has a slower evaporation rate, allowing better contact time without risking rapid drying that could spread contaminants.
My keyboard still feels sticky after cleaning. What should I do?
Ensure all keycaps are completely dry before reattaching. Residual moisture or soap film can create a tacky sensation. If the issue persists, check for leftover adhesive residue—common in aftermarket keycaps—and gently wipe with IPA on a cotton swab.
Conclusion: Make Cleaning Part of Your Routine
A clean mechanical keyboard performs better, lasts longer, and provides a more enjoyable typing experience. By following this methodical approach, you protect delicate switches while eliminating performance-hindering debris. The process is simple once you have the right tools and knowledge—there’s no need for guesswork or risky shortcuts.
Start with regular light maintenance and schedule deep cleans quarterly. Share your results, tag your favorite keyboard communities, or leave a comment below with your own cleaning hacks. Your keyboard deserves care as much as any other precision tool—treat it well, and it will serve you flawlessly for years.


 浙公网安备
33010002000092号
浙公网安备
33010002000092号 浙B2-20120091-4
Comments
No comments yet. Why don't you start the discussion?