
Thyme is more than just a fragrant herb—it’s a resilient, versatile perennial that brings both flavor and function to any kitchen garden. Whether grown on a sunny windowsill or in an outdoor herb bed, thyme thrives with minimal care and delivers year-round rewards. For home cooks, having fresh thyme within arm’s reach transforms everyday meals into aromatic, restaurant-quality dishes. Beyond its culinary value, thyme possesses natural antiseptic properties and attracts beneficial pollinators when grown outdoors. With rising interest in sustainable living and homegrown ingredients, cultivating thyme has become a practical pursuit for urban dwellers and rural gardeners alike. This guide outlines the precise, science-backed steps to grow healthy, productive thyme plants at home—ensuring robust growth, long-term vitality, and superior flavor.
Definition & Overview
Thyme (Thymus vulgaris) is a small-leaved, woody-stemmed perennial herb belonging to the Lamiaceae (mint) family. Native to the Mediterranean region, it has been cultivated for over 2,000 years for culinary, medicinal, and ornamental purposes. The plant typically grows 6 to 12 inches tall, forming dense mats or low mounds of tiny, gray-green leaves. Its flowers—usually lilac, pink, or white—are attractive to bees and other pollinators. In cooking, thyme imparts a warm, earthy aroma with subtle notes of mint, camphor, and lemon, depending on the variety. It is widely used in French, Italian, Middle Eastern, and North African cuisines, often as part of bouquet garni, rubs, stews, soups, roasted vegetables, and marinades. As a hardy, drought-tolerant plant, thyme adapts well to container gardening and indoor environments, making it ideal for novice and experienced growers alike.
Key Characteristics
| Attribute | Description |
|---|---|
| Flavor Profile | Earthy, slightly peppery, with hints of mint and citrus; intensifies when dried |
| Aroma | Pungent, herbal, balsamic; released when leaves are crushed |
| Color/Form | Small oval leaves, gray-green to dark green; woody stems develop with age |
| Heat Level | None – purely aromatic, not spicy |
| Culinary Function | Seasoning agent, flavor enhancer, bouquet garni component, garnish |
| Shelf Life (Fresh) | 7–10 days refrigerated; up to 1 year dried |
| Growth Habit | Perennial in USDA zones 5–9; annual in colder climates unless overwintered indoors |
Practical Usage: How to Use Freshly Grown Thyme
Harvesting your own thyme elevates the sensory impact of dishes. Fresh leaves contain higher concentrations of volatile oils—particularly thymol and carvacrol—than store-bought dried versions, resulting in brighter, more complex flavors. To use fresh thyme, strip the leaves by running your fingers down the stem or chop whole sprigs finely. Because the leaves are small and adhere tightly to the stem, they integrate seamlessly into cooked dishes but can be left whole in slow-cooked recipes and removed before serving.
In home kitchens, thyme enhances a wide range of preparations:
- Add whole sprigs to simmering stocks, broths, and braises; remove before serving.
- Finely chop and mix into compound butter with garlic and lemon zest for grilled meats or vegetables.
- Infuse olive oil by steeping sprigs in warm oil for 30 minutes (cool before bottling).
- Sprinkle chopped leaves over roasted root vegetables, potatoes, or mushrooms during the last 10 minutes of cooking.
- Use as a key ingredient in herbes de Provence blends or homemade poultry seasoning.
Professional chefs often use thyme in dual forms: tender young tips for garnish and raw applications, and mature stems for infusions and long-cooking dishes. When substituting fresh for dried thyme, use a 3:1 ratio—three parts fresh equal one part dried—due to moisture content differences.
Pro Tip: For maximum flavor extraction, bruise thyme sprigs lightly with the back of a knife before adding them to liquids. This ruptures the oil glands in the leaves, releasing more aroma into the dish.
Variants & Types of Thyme
While common garden thyme (Thymus vulgaris) is the standard culinary variety, numerous cultivars offer distinct characteristics suited to different growing conditions and culinary uses. Selecting the right type ensures better yields and expanded flavor options.
Common Culinary Varieties
- English Thyme (Thymus vulgaris) – The most widely used culinary type. Offers strong, classic thyme flavor with moderate growth vigor. Best for general cooking.
- French Thyme – Slightly more robust and floral than English thyme. Prefers warmer climates and full sun. Ideal for sauces and meat dishes.
- Lemon Thyme (Thymus × citriodorus) – Features bright citrus notes due to high citral content. Excellent in seafood, dressings, teas, and desserts. Requires similar care to common thyme.
- Caraway Thyme – Rare but prized for its caraway-like aroma. Use sparingly in rye breads or cabbage dishes.
Ornamental & Groundcover Varieties
- Creeping Thyme (Thymus serpyllum) – Low-growing, spreads rapidly. Often used between stepping stones or in hanging baskets. Some varieties are edible but milder in flavor.
- Woolly Thyme – Fuzzy foliage, non-flowering. Primarily ornamental; not recommended for culinary use.
For home cultivation focused on cooking, stick to Thymus vulgaris or lemon thyme. These are reliably flavorful, easy to maintain, and respond well to regular harvesting.
| Variety | Best For | Light Needs | Culinary Use? |
|---|---|---|---|
| English Thyme | General cooking, drying | Full sun | Yes |
| Lemon Thyme | Fish, poultry, beverages | Full sun | Yes |
| French Thyme | Robust stews, roasts | Full sun, warm temps | Yes |
| Creeping Thyme | Ground cover, landscaping | Partial to full sun | Limited (mild flavor) |
| Woolly Thyme | Ornamental only | Full sun | No |
Comparison with Similar Herbs
Thyme is often confused with oregano, marjoram, and savory—herbs that share a botanical family and overlapping culinary roles. Understanding their distinctions ensures accurate usage and proper substitution.
| Herb | Flavor Profile | Texture | Substitution Ratio | Best Used In |
|---|---|---|---|---|
| Thyme | Earthy, minty, slightly medicinal | Small, stiff leaves on woody stems | N/A | Bouquet garni, roasts, beans, eggs |
| Oregano | Bolder, spicier, more pungent | Softer, broader leaves | 1:1 (but stronger) | Pizza, tomato sauces, Greek dishes |
| Marjoram | Sweeter, milder cousin of oregano | Similar to oregano | 1:1 (delicate) | Vegetable dishes, light meats |
| Summer Savory | Peppery, bean-friendly | Slender stems, narrow leaves | 1:1 | Bean soups, lentil dishes |
“Thyme is the backbone of so many foundational dishes—not because it shouts, but because it supports. It doesn’t dominate a stew; it rounds it out.”
— Chef Elena Martinez, James Beard-nominated, Modern Herbs Kitchen
Step-by-Step Guide to Growing Thyme at Home
Success with thyme begins with understanding its natural preferences: excellent drainage, abundant light, and minimal moisture. Follow these detailed steps to cultivate thriving plants.
Step 1: Choose Your Propagation Method
Thyme can be grown from seeds, cuttings, or nursery transplants. While seeds are cost-effective, they germinate slowly (14–28 days) and require consistent warmth (70°F/21°C). For faster results, take 4-inch stem cuttings from a healthy parent plant in spring or early summer. Remove lower leaves, dip the cut end in rooting hormone (optional), and place in moist potting mix or water. Roots form within 2–3 weeks.
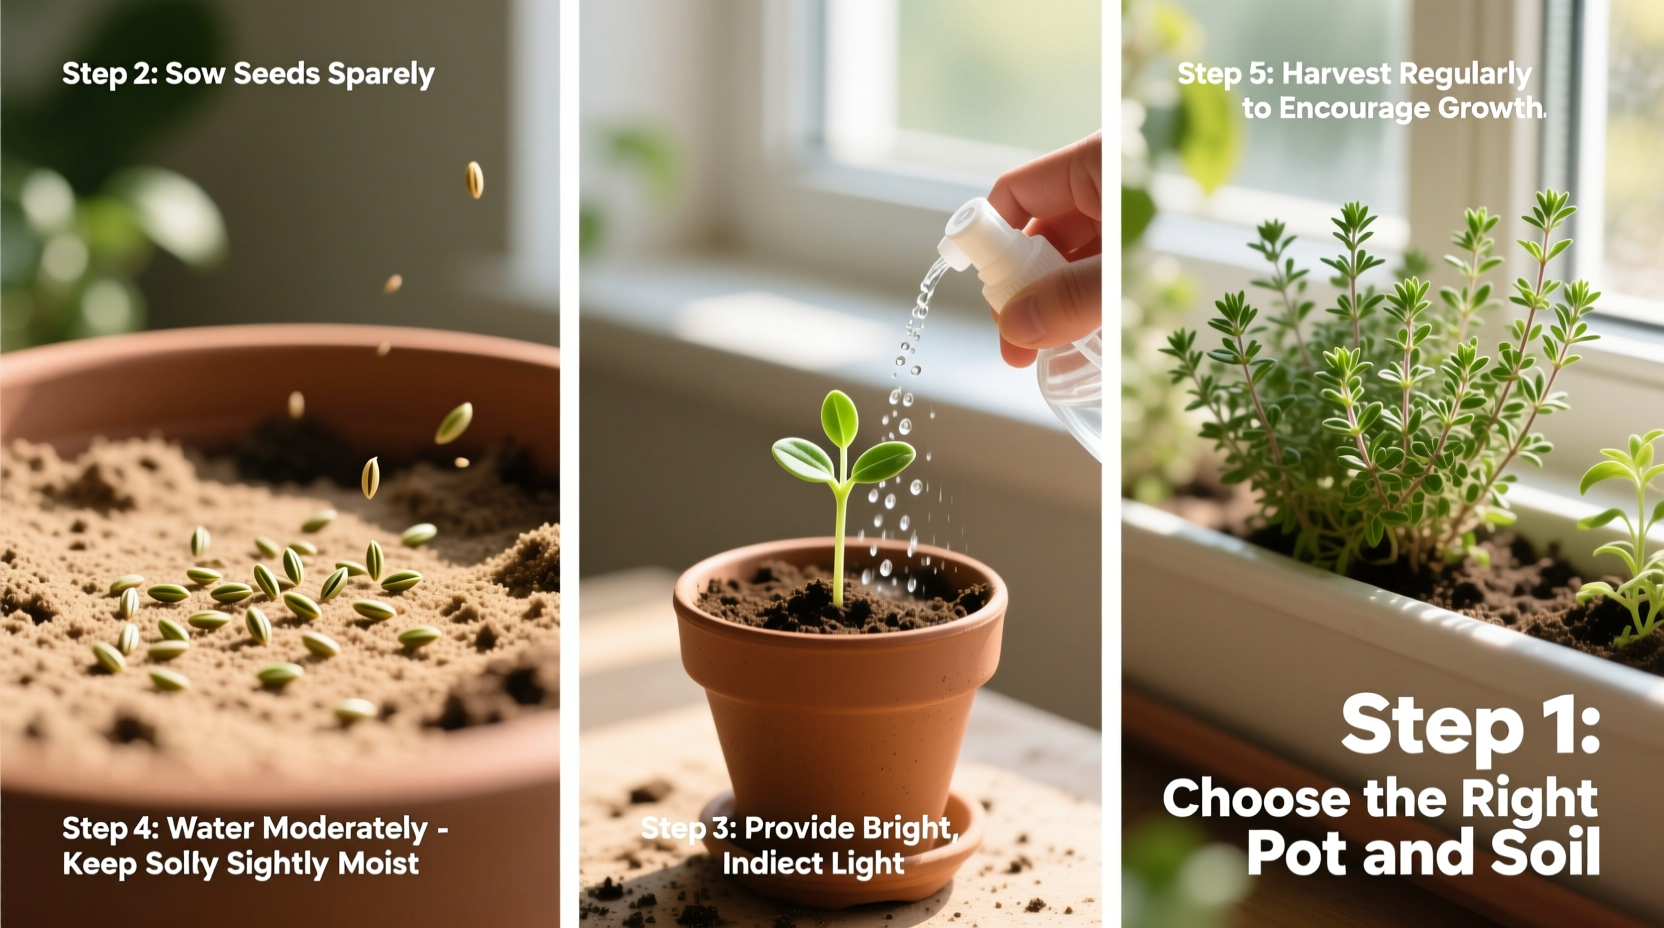
Step 2: Select the Right Container and Soil
Use a pot with drainage holes—terracotta is ideal due to its breathability. Fill with a lean, well-draining mix: combine two parts potting soil with one part perlite or coarse sand. Avoid rich compost-heavy blends, which encourage leggy growth and root rot. A pH between 6.0 and 8.0 is acceptable, though neutral to slightly alkaline (7.0–7.5) is optimal.
Step 3: Provide Adequate Light
Thyme requires at least 6–8 hours of direct sunlight daily. South-facing windowsills are best indoors. If natural light is insufficient, supplement with full-spectrum LED grow lights placed 6–12 inches above the plant for 12–14 hours per day.
Step 4: Water Wisely
Overwatering is the leading cause of thyme failure. Allow the top inch of soil to dry completely between waterings. Water deeply but infrequently—about once every 10–14 days indoors, more often in hot, dry climates. Always empty saucers after watering to prevent soggy roots.
Step 5: Maintain Proper Temperature and Airflow
Thyme prefers daytime temperatures between 60°F and 75°F (15°C–24°C) and cooler nights. Ensure good air circulation to deter fungal diseases like powdery mildew. Outdoors, space plants 12 inches apart. Indoors, avoid crowding near other houseplants.
Step 6: Prune and Harvest Regularly
Regular pruning encourages bushiness and prevents woodiness. Begin pinching tips when the plant reaches 6 inches tall. Harvest no more than one-third of the plant at a time. Cut just above a leaf node to stimulate branching. Frequent harvesting delays flowering, preserving leaf quality.
Step 7: Fertilize Sparingly
Thyme thrives in low-fertility conditions. Excessive nitrogen promotes weak, watery growth with diminished flavor. Apply a diluted balanced liquid fertilizer (e.g., 5-5-5) once in early spring and again midsummer if growing outdoors. Indoor plants may not need fertilization at all.
Step 8: Overwinter or Rotate Plants
In cold climates, bring potted thyme indoors before frost. Place in a sunny window and reduce watering. Older plants (over 3 years) become woody and less productive. Replace them every 3–4 years by propagating new cuttings to maintain vigor.
Expert Insight: “The secret to flavorful thyme isn’t feeding it more—it’s stressing it just enough. Lean soil, limited water, and full sun concentrate the essential oils that make thyme taste exceptional.”
Practical Tips & FAQs
How do I know when thyme is ready to harvest?
Begin harvesting once the plant has at least six sets of leaves and measures 6 inches tall. Morning is the best time to pick, after dew dries but before peak sun, when essential oil concentration is highest.
Can I grow thyme from grocery store sprigs?
Possibly. Trim the lower leaves and place the stem in water. If roots develop within three weeks, transplant into soil. Success depends on freshness and whether preservatives were applied. Organic sprigs have a higher success rate.
Why are my thyme leaves turning yellow?
Yellowing usually indicates overwatering or poor drainage. Check soil moisture and ensure the pot drains freely. Trim affected areas and reduce watering frequency.
How should I store fresh thyme?
Wrap sprigs in a slightly damp paper towel and place in a loosely sealed plastic bag in the refrigerator crisper drawer. Lasts 7–10 days. Alternatively, freeze whole sprigs in olive oil using ice cube trays for future cooking.
Can I dry thyme at home?
Yes. Bundle 5–6 sprigs together and hang upside-down in a warm, dark, well-ventilated area for 1–2 weeks. Once brittle, strip leaves and store in an airtight jar away from light. Dried thyme retains potency for up to one year.
What pests affect thyme?
Spider mites and aphids occasionally appear, especially indoors. Treat early infestations with a strong spray of water or insecticidal soap. Prevent issues by ensuring airflow and avoiding overcrowding.
Is thyme safe for pets?
In moderation, yes—but concentrated essential oils are toxic. Keep growing plants out of reach of curious cats and dogs. Do not allow animals to consume large quantities.
Summary & Key Takeaways
Successfully growing thyme at home hinges on mimicking its native Mediterranean environment: plenty of sun, sharply drained soil, and restrained watering. By selecting the right variety—preferably English or lemon thyme—and following structured propagation and maintenance practices, even beginners can sustain healthy plants for years. Regular harvesting not only supplies fresh flavor but also promotes bushy, productive growth. Unlike many herbs, thyme improves with neglect rather than coddling, making it one of the most forgiving and rewarding plants for culinary gardeners. Whether snipped into scrambled eggs, infused into vinegar, or dried for winter stews, homegrown thyme offers unmatched freshness and satisfaction. Start with a single pot, apply these proven steps, and enjoy the lasting benefits of this timeless herb.


 浙公网安备
33010002000092号
浙公网安备
33010002000092号 浙B2-20120091-4
Comments
No comments yet. Why don't you start the discussion?