
Spaying is a common surgical procedure that offers long-term health benefits for female dogs, including reduced risk of mammary tumors and prevention of unwanted litters. However, the days following surgery are critical. One of the most overlooked aspects of post-operative care is how you lift and carry your dog. Improper handling can strain the incision site, delay healing, or even cause internal damage. Understanding the right techniques ensures your dog recovers comfortably and safely.
Why Proper Lifting Technique Matters After Spaying
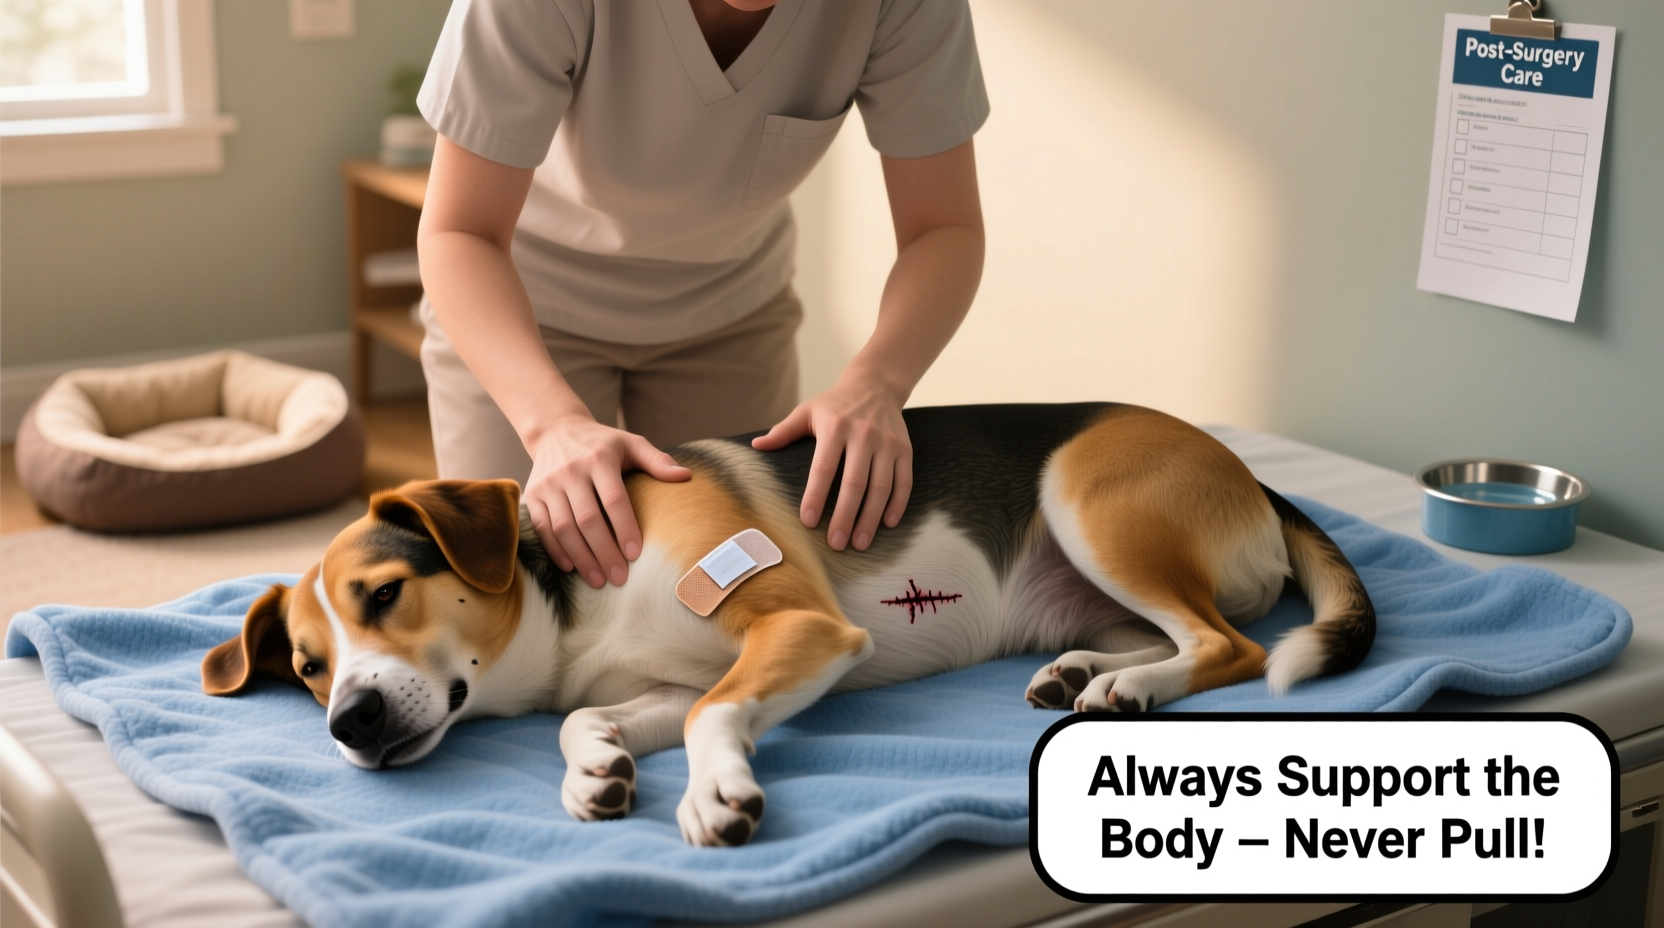
After being spayed, your dog’s abdominal muscles and surrounding tissues are healing from a surgical incision. The area is vulnerable, and any pressure or sudden movement can compromise the sutures. Dogs instinctively try to twist, jump, or wriggle when picked up—actions that increase intra-abdominal pressure and may lead to complications like dehiscence (wound reopening) or herniation.
Veterinarians emphasize that how you carry your dog during the first 7–10 days post-surgery plays a significant role in preventing such issues. It's not just about lifting; it's about full-body support, minimizing movement, and reducing stress on the abdomen.
“Even a small jump off the couch can undo weeks of healing. Support the entire torso when moving your dog—never lift by the front legs alone.” — Dr. Lena Torres, DVM, Small Animal Surgeon
Step-by-Step Guide: How to Safely Carry Your Dog Post-Spay
Follow this timeline-based approach to ensure safe mobility support during recovery:
- Days 1–3: Minimize Movement
Keep your dog confined to a quiet, padded area. Only move her when absolutely necessary—for vet checkups, bathroom breaks, or repositioning. Avoid picking her up unless required. - When Lifting Is Necessary: Use Two-Hand Support
Place one arm under her chest, just behind the front legs. Slide your other arm under her hindquarters, supporting the lower back and pelvis. Lift slowly, keeping her body level and close to your chest. - Use a Towel Sling (Optional but Recommended)
For larger dogs or those with mobility issues, use a folded towel as a sling. Position it under the belly, just in front of the hind legs. Hold both ends while lifting to distribute weight evenly across the abdomen without direct pressure on the incision. - Lowering Your Dog: Control the Descent
Bend your knees and lower her gently, ensuring all four paws touch the ground simultaneously. Never let her drop or jump down. - Days 4–10: Continue Support, Gradually Reduce Assistance
As healing progresses, you may reduce frequency of lifting—but always maintain proper form if needed. Monitor for signs of discomfort like whining, flinching, or reluctance to stand.
Do’s and Don’ts of Post-Spay Handling
| Do’s | Don’ts |
|---|---|
| Support both front and rear limbs when lifting | Never lift by the front legs only |
| Keep movements slow and controlled | Avoid sudden jerks or twisting motions |
| Use a harness instead of a collar for short walks | Pull or tug on the leash |
| Carry your dog over thresholds or stairs | Allow jumping onto furniture or into vehicles |
| Monitor the incision daily for redness or swelling | Let children or other pets handle the dog unsupervised |
Essential Recovery Checklist
- ✅ Confine your dog to a small, quiet room with non-slip flooring
- ✅ Use a crate or pen if she tends to be active
- ✅ Fit an Elizabethan collar (cone) to prevent licking
- ✅ Check the incision twice daily for discharge, swelling, or gaps
- ✅ Administer prescribed pain medication on schedule
- ✅ Use a belly band or surgical shirt if recommended
- ✅ Schedule follow-up vet visit for suture removal (if non-dissolvable)
- ✅ Avoid baths and swimming for at least 10–14 days
- ✅ Restrict play, running, and stair climbing
- ✅ Weigh food portions to prevent constipation from reduced activity
Real-Life Example: Bella’s Smooth Recovery
Bella, a 2-year-old Beagle, was spayed at a local clinic. Her owner, Mark, was diligent about post-op care but didn’t realize how dangerous improper lifting could be. On day two, he picked Bella up by her front legs to bring her outside briefly. She twisted mid-air, cried out, and later developed swelling at the incision site.
He called the vet immediately. The surgeon explained that the motion had likely caused minor internal strain. Bella was put on strict cage rest for three additional days and wore a supportive wrap. Fortunately, no rupture occurred, but the incident delayed her full recovery by nearly a week.
After learning the correct two-handed technique and using a towel sling for support, Mark successfully managed Bella’s mobility without further issues. Her incision healed cleanly by day 14.
Frequently Asked Questions
Can I carry my dog in a carrier after spaying?
Yes, but only if the carrier has a flat, padded base and allows your dog to lie down comfortably without bending or arching her back. Ensure the carrier is large enough for her to rest naturally but not so big that she slides around during transport.
How long should I carry my dog instead of letting her walk?
You don’t need to carry her constantly, but assist her over obstacles like stairs, curbs, or into the car for at least 7–10 days. Short, leashed bathroom breaks are allowed, but avoid prolonged walking or off-leash activity until cleared by your vet.
What if my dog jumps despite precautions?
If a jump occurs, monitor closely for signs of pain, bloating, or incision changes. Contact your veterinarian immediately if you notice lethargy, vomiting, or visible sutures protruding. Even a small leap can cause internal complications that aren’t immediately obvious.
Final Thoughts: Prioritize Safety Over Convenience
The few seconds it takes to lift your dog correctly can make the difference between a seamless recovery and a trip back to the vet. While it may feel inconvenient to carry a 50-pound dog to the backyard, remember that her long-term comfort and health depend on your attention to detail now.
Recovery isn’t just about medicine and rest—it’s about mindful interaction. By applying these techniques consistently, you create a safer, calmer environment that supports healing from the inside out.


 浙公网安备
33010002000092号
浙公网安备
33010002000092号 浙B2-20120091-4
Comments
No comments yet. Why don't you start the discussion?