
Electric motors power countless devices—from HVAC systems to refrigerators and industrial machinery. When a motor fails to start or runs weakly, the culprit is often a faulty capacitor. These small components store and release electrical energy to provide the necessary starting torque or maintain efficient operation. However, testing them incorrectly can lead to inaccurate diagnoses, equipment damage, or personal injury. This guide provides a comprehensive, safety-first approach to testing capacitors on electric motors, ensuring reliable results every time.
Understanding Motor Capacitors: Types and Functions
Before testing, it's essential to understand the two primary types of capacitors used in single-phase electric motors:
- Start Capacitors: Provide a high-torque boost during motor startup. They disconnect from the circuit once the motor reaches operating speed via a centrifugal switch or relay.
- Run Capacitors: Remain energized during motor operation to improve efficiency and power factor. They are typically smaller in capacitance but designed for continuous use.
Some motors use both—a dual-run capacitor combines functions for fan and compressor circuits in HVAC units. Capacitance is measured in microfarads (µF), and voltage ratings must match or exceed the motor’s requirements. Using an incorrect capacitor can cause overheating or premature failure.
Safety First: Preparing for Capacitor Testing
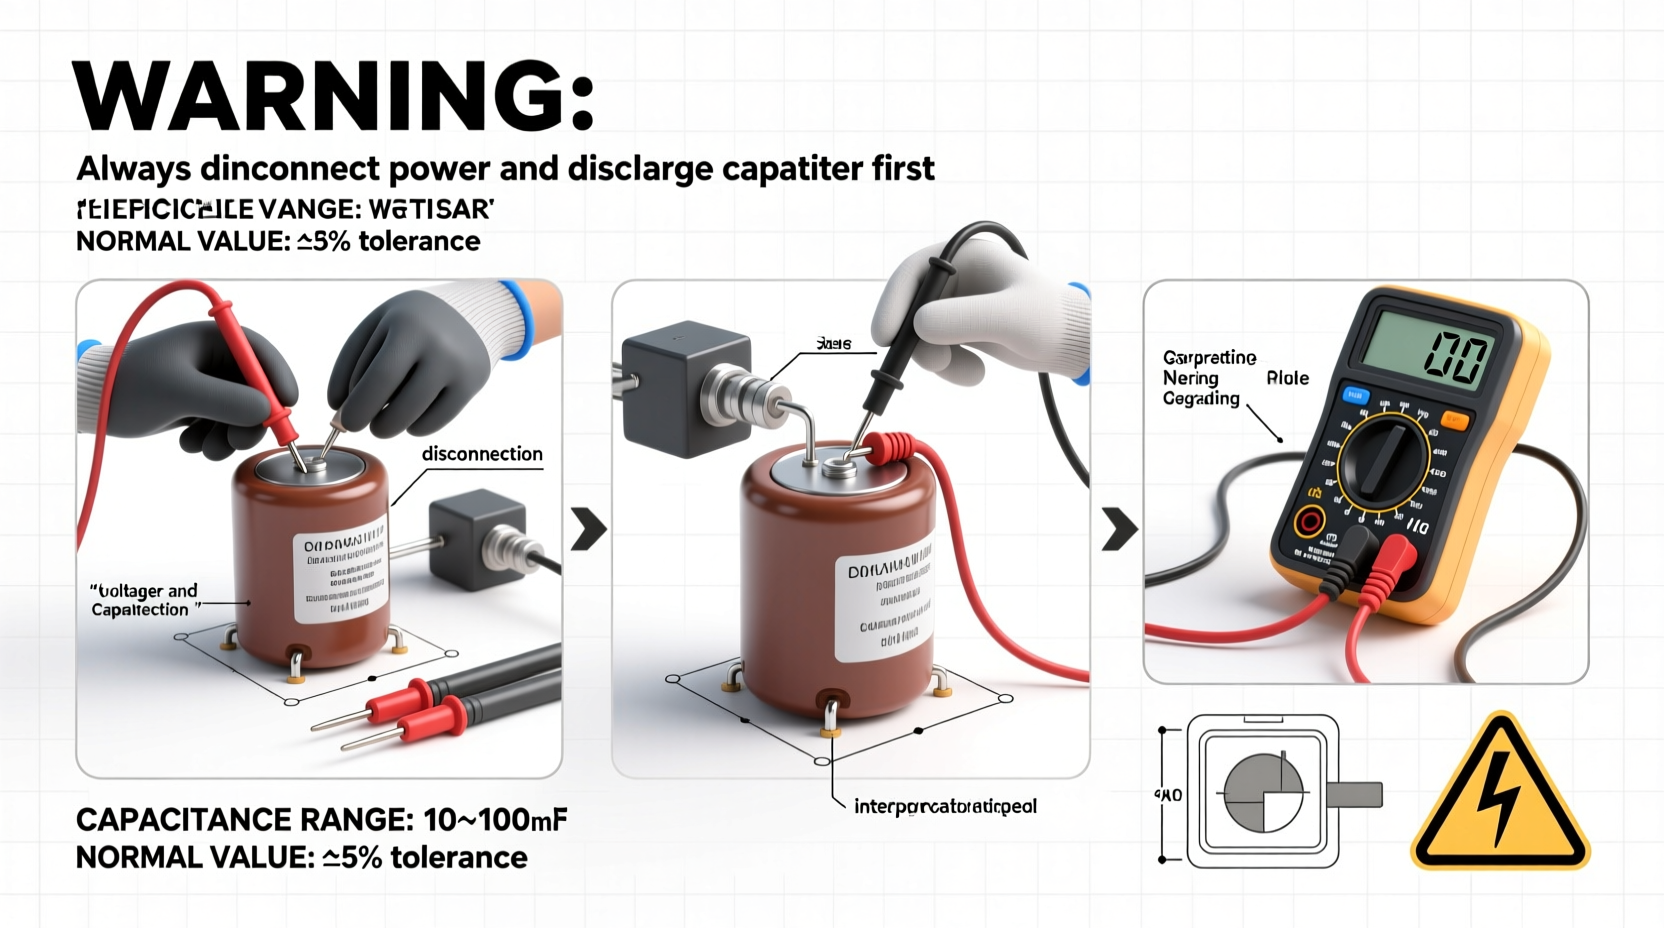
Capacitors store electrical charge even after power is disconnected. An improperly discharged unit can deliver a dangerous shock. Follow these critical safety steps before handling any capacitor:
- Disconnect Power: Turn off the motor at the breaker or unplug it entirely. Verify no voltage is present using a multimeter.
- Discharge the Capacitor: Use an insulated screwdriver with a grounded wire attached to short the terminals. For higher-voltage capacitors, use a resistor (e.g., 5kΩ–20kΩ, 5W) across terminals to avoid sparking.
- Wear Protective Gear: Safety glasses and insulated gloves reduce risk of injury.
- Inspect Visually: Look for bulging, leaking oil, or burn marks—clear signs of failure.
“Never assume a capacitor is dead. Even small ones can hold a lethal charge.” — James R. Holloway, Electrical Maintenance Supervisor, Industrial Systems Inc.
Step-by-Step Guide to Testing a Motor Capacitor
Accurate testing requires the right tools and methodical execution. Follow this sequence for consistent results:
- Remove the Capacitor: Disconnect wires and take the unit out of the housing for better access.
- Discharge Again: Reconfirm discharge, especially if the capacitor was recently powered.
- Set Your Multimeter: Use a digital multimeter with capacitance measurement (labeled “–|(–”). If unavailable, use resistance (ohms) mode as a secondary check.
- Connect Test Leads: Touch the meter probes to the capacitor terminals. For dual-run capacitors, test each pair (C-Herm, C-Fan, Herm-Fan) separately.
- Read the Value: Compare the displayed capacitance to the rated value on the label. Acceptable tolerance is typically ±6% for run capacitors and ±10% for start types.
- Check for Continuity (Ohmmeter Method): In absence of capacitance mode:
- Set meter to highest ohms range.
- Touch probes to terminals. Needle should swing toward zero then slowly return to infinity.
- No movement = open capacitor; immediate continuity = shorted.
| Test Result | Interpretation | Action Required |
|---|---|---|
| Within ±6–10% of rated µF | Good | No replacement needed |
| Below 80% of rated value | Weakened/Failed | Replace immediately |
| No reading / OL | Open circuit | Replace |
| Steady low resistance | Shorted | Replace and inspect motor windings |
| Visible damage (bulge, leak) | Physical failure | Replace regardless of readings |
Common Mistakes and How to Avoid Them
Even experienced technicians can make errors when testing capacitors. Awareness of common pitfalls improves accuracy:
- Skipping Discharge: Risk of shock or damaging the multimeter.
- Testing In-Circuit: Parallel paths can distort readings. Always remove the capacitor.
- Ignoring Voltage Rating: Installing a lower-voltage capacitor leads to rapid failure.
- Misreading Dual Capacitors: Confusing terminals on dual-run units leads to incorrect diagnosis.
- Using Analog Meters Incorrectly: Failing to interpret the needle sweep properly results in false conclusions.
Real-World Example: Diagnosing an HVAC Compressor Failure
A technician responded to a call about an air conditioner that wouldn’t cool. The outdoor unit clicked but didn’t start. Initial inspection showed no tripped breakers or frozen coils. The technician shut off power, discharged the dual-run capacitor, and removed it for testing.
The labeled values were 45+5 µF / 370V. Using a multimeter with capacitance function:
- C to Herm: 38 µF (below 45 ±10% = 40.5 min)
- C to Fan: 4.2 µF (within 5 ±10%)
The hermetic side was under-capacitive. Despite no visible damage, the capacitor was replaced. The system started immediately and operated normally. Post-repair measurements confirmed proper amperage draw. This case highlights how internal degradation may not be visible—only testing reveals true condition.
Essential Tools and Equipment Checklist
To perform safe and accurate capacitor testing, ensure you have the following:
- ✅ Digital multimeter with capacitance measurement
- ✅ Insulated screwdriver or dedicated discharging tool
- ✅ Alligator clip leads (for stable connections)
- ✅ Safety glasses and insulated gloves
- ✅ Resistor (5kΩ–20kΩ, 5W) for controlled discharge
- ✅ Notepad or app to record readings
- ✅ Replacement capacitors (correct µF and voltage)
Frequently Asked Questions
Can I test a capacitor without removing it?
No. In-circuit testing can yield false readings due to parallel paths through motor windings. Always remove the capacitor for accurate results.
Is it safe to use a start capacitor as a run capacitor?
No. Start capacitors are designed for short bursts and will overheat if left in the circuit continuously. They lack the internal design for sustained operation.
How often should motor capacitors be tested?
In preventive maintenance programs, test annually for critical systems (HVAC, pumps). In harsh environments (high heat, humidity), semi-annual checks are recommended.
Final Thoughts and Call to Action
Testing motor capacitors is a straightforward task when approached with care, the right tools, and a commitment to safety. Accurate diagnosis prevents unnecessary motor replacements and downtime. Whether you're a homeowner troubleshooting a fan or a technician maintaining industrial equipment, mastering capacitor testing empowers you to make informed decisions.


 浙公网安备
33010002000092号
浙公网安备
33010002000092号 浙B2-20120091-4
Comments
No comments yet. Why don't you start the discussion?