
Custom cabinet mats enhance both the functionality and appearance of kitchen or bathroom storage. Whether you're installing non-slip liners, felt pads, or decorative inserts, a precise fit is essential. A poorly measured mat can bunch up, slide out, or leave exposed surfaces vulnerable to scratches and moisture. Achieving a seamless fit starts not with the product, but with accurate measurement. This guide walks through every critical step, tool, and technique needed to measure your cabinets correctly—ensuring your custom mats perform as intended and last longer.
Why Accurate Cabinet Measurements Matter
Cabinet interiors vary widely—even within the same kitchen. Factory-built cabinets may have slight inconsistencies, and older models often show warping or settling over time. Relying on manufacturer dimensions or “standard” sizes leads to ill-fitting mats that compromise protection and aesthetics.
A custom-fit mat should lie flat without lifting at the edges, cover high-wear zones completely, and allow drawers or doors to close smoothly. Precision ensures longevity by preventing shifting, bunching, or creasing. More than just convenience, accurate measurements protect your investment in both cabinetry and accessories.
“Even a 1/8-inch discrepancy can cause a mat to bind in a drawer or fail to adhere properly. Measure twice, order once.” — Daniel Reeves, Cabinet Design Consultant, 15+ years in kitchen remodeling
Tools You’ll Need for Reliable Measurements
Professional results begin with the right tools. Avoid using flexible tape measures or rulers with worn edges. Instead, gather the following:
- Stainless steel retractable tape measure – Offers rigidity and clear markings for precision.
- Digital caliper (optional) – Useful for measuring small gaps or thicknesses near hinges.
- Notepad and pen – Record each dimension immediately to avoid confusion.
- Level (small bubble level) – Helps confirm if shelves or bases are uneven.
- Flashlight – Illuminates shadowed corners for better visibility.
Step-by-Step Guide to Measuring Cabinet Interiors
Follow this sequence to capture accurate interior dimensions for any type of cabinet mat—drawer liners, shelf mats, or base inserts.
- Empty the cabinet completely. Remove all items, including existing liners or adhesive residues. Clean the surface to reveal true edges.
- Identify the mounting plane. Determine whether the mat will sit on the floor of the cabinet, rest on a shelf, or line a drawer interior. Each has unique considerations.
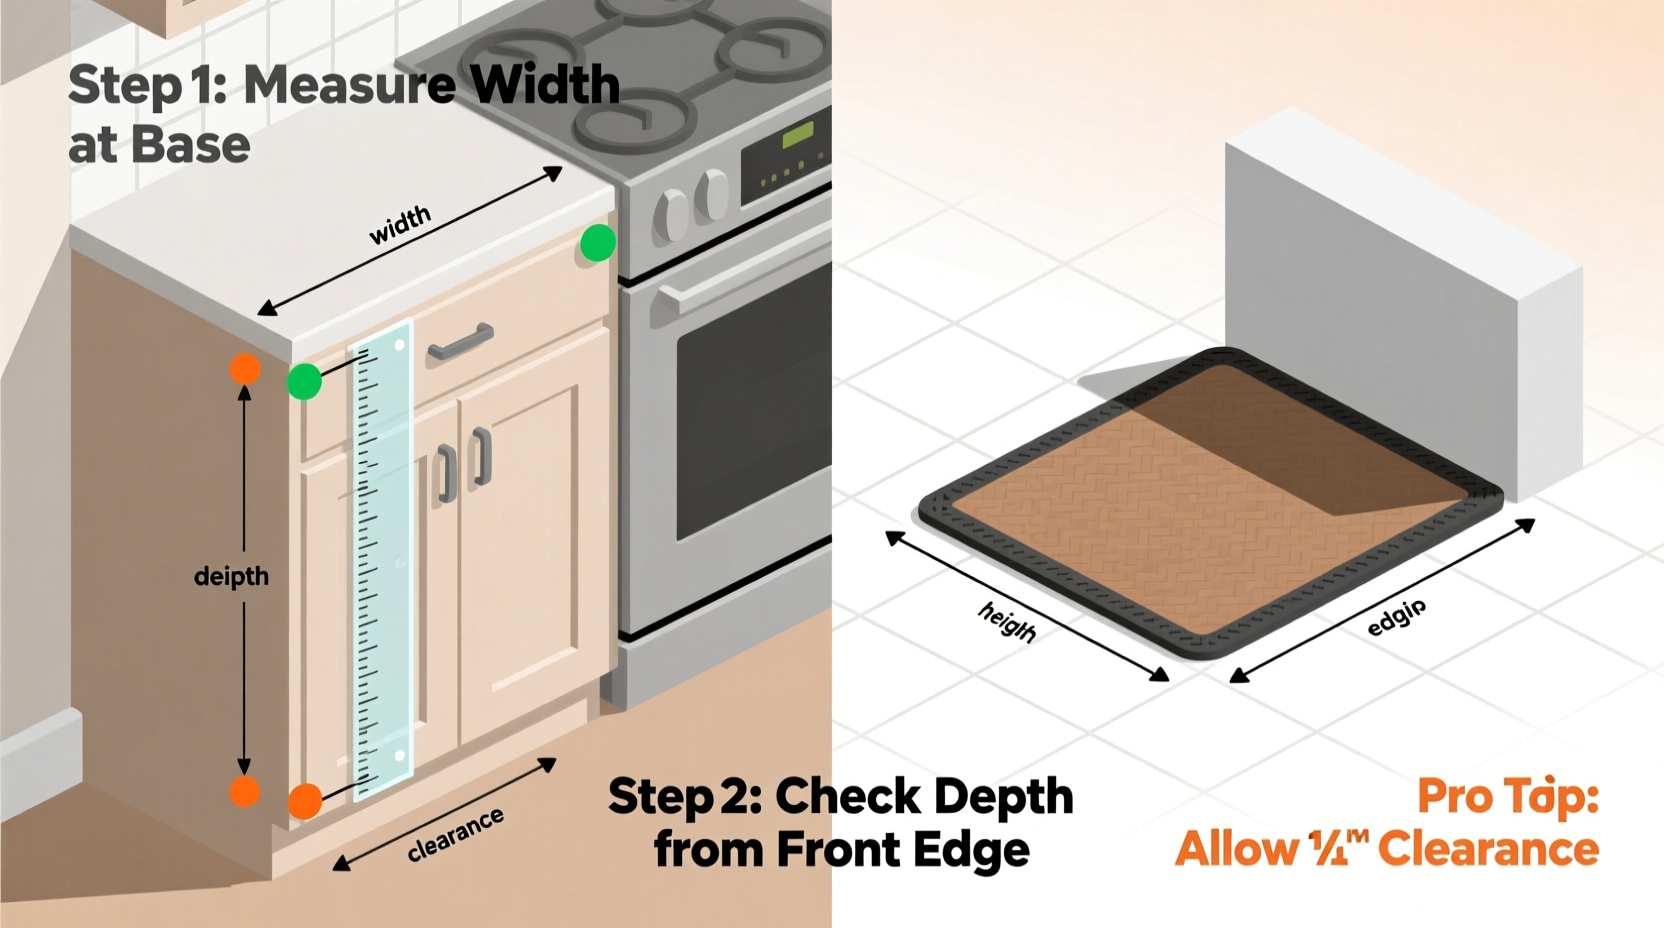
- Measure width. Place the tape measure across the widest point from left to right wall, inside the cabinet. Take three readings: top, middle, and bottom. Use the smallest value to account for irregularities.
- Measure depth. From the back wall to the front edge, measure front center, left, and right. Again, use the shortest measurement. For drawers, pull them out fully and measure from the back stop to the front lip.
- Check height (if applicable). For full-height inserts or vertical liners, measure from floor to ceiling of the interior. Note any obstructions like brackets or plumbing.
- Account for obstructions. Mark locations of screws, hinges, drawer slides, or cutouts. These may require trimming or special shaping in the final mat.
- Double-check all numbers. Re-measure each dimension after recording to ensure consistency.
Do’s and Don’ts When Measuring for Custom Mats
| Do’s | Don’ts |
|---|---|
| Use the smallest of multiple measurements to ensure fit | Assume symmetry—corners are rarely perfectly square |
| Label each cabinet (e.g., “Upper Right Pantry”) when taking multiple measurements | Measure over old liners or debris |
| Round down to the nearest 1/16 inch for safety | Trust printed cabinet size labels—they reflect exterior, not interior, dimensions |
| Take photos of tricky spaces with notes on dimensions | Measure while the door or drawer is closed—this distorts alignment |
Real Example: Fixing a Persistent Drawer Liner Problem
Sarah from Portland ordered custom-cut silicone mats for her spice drawer. Despite entering “18 x 12 inches” based on her cabinet label, the mats arrived too wide and jammed when closing. She re-measured using the method above and discovered the actual interior width was 17 7⁄8 inches due to thick side rails. The depth also varied by 3/8 inch from left to right because of an off-square installation. After submitting corrected dimensions—17 3⁄4″ W × 11 1⁄2″ D—the replacement mats slid in perfectly, stayed flat, and eliminated sliding bottles. Her experience underscores why real-world measurement trumps assumed sizing.
Special Considerations for Different Cabinet Types
Not all cabinets are created equal. Adjust your approach based on cabinet style:
- Pull-out pantries: Measure the basket interior, not the frame. Include roller mechanisms in width checks.
- Lazy Susans: Focus on the rotating shelf surface. Measure diameter for round units or diagonal corners for octagonal ones.
- Toekick drawers: These low-profile units require precise height clearance. Measure vertical space between floor and drawer bottom.
- Corner cabinets: Use template paper or cardboard to trace irregular shapes before measuring straight segments.
FAQ: Common Questions About Measuring for Custom Mats
Should I subtract space for edges or borders?
No. Reputable custom mat suppliers design for exact fits. Provide the true interior measurement. If you want a gap (e.g., for ventilation), specify it in your order notes.
What if my cabinet isn’t square?
Most older cabinets have slight angles. Take multiple width and depth readings and report the smallest. For extreme cases, consider sending a cardboard cutout or photo with overlaid measurements.
Can I use the same mat size for identical-looking cabinets?
Not necessarily. Even cabinets from the same batch can differ by 1/4 inch due to installation shifts. Always measure each unit individually.
Final Checklist Before Ordering
Before submitting your dimensions to a vendor, verify the following:
- ✅ All cabinets are empty and clean
- ✅ Width, depth, and height recorded for each unit
- ✅ Multiple measurements taken per dimension; smallest used
- ✅ Obstructions like screws or rails noted
- ✅ Each measurement labeled clearly (e.g., “Lower Center Cabinet – Bottom Shelf”)
- ✅ Numbers double-checked against physical space
- ✅ Special shapes or cutouts documented with sketches if needed
Conclusion: Precision Leads to Perfection
Measuring cabinets for custom mats isn’t complicated—but it demands attention to detail. Skipping steps or guessing dimensions leads to frustration, wasted money, and compromised protection. By following a disciplined process, using reliable tools, and respecting the uniqueness of each cabinet space, you ensure a flawless fit every time. Whether upgrading a single drawer or lining an entire kitchen, accurate measurement is the foundation of quality results. Take the time now to get it right, and enjoy cleaner, quieter, and better-protected storage for years to come.


 浙公网安备
33010002000092号
浙公网安备
33010002000092号 浙B2-20120091-4
Comments
No comments yet. Why don't you start the discussion?