
Night photography with a smartphone presents unique challenges. Low light leads to motion blur, grainy images, and poor detail—especially when you don’t have a tripod. Yet some of the most compelling moments happen after dark: cityscapes glowing under streetlights, intimate dinners, fireworks, or quiet moonlit walks. With the right techniques, you can capture stunning, sharp nighttime photos using only your phone and a few smart strategies.
Modern smartphones come equipped with advanced computational photography, night modes, and stabilization features. But hardware alone isn’t enough. The difference between a blurry snapshot and a crisp, well-exposed image often comes down to technique. Whether you're documenting travel, capturing memories, or exploring mobile photography as a hobby, mastering handheld night shooting is essential.
Understand How Your Phone Handles Low Light
Smartphone cameras rely on small sensors that struggle in darkness. To compensate, they use longer exposure times and higher ISO settings. While this increases brightness, it also introduces noise and blur from hand movement. Understanding this balance helps you work with—not against—your device’s limitations.
Most phones today include a \"Night Mode\" that automatically extends exposure time, sometimes up to several seconds. During this period, even slight hand tremors can ruin the shot. However, Night Mode also uses software stacking—capturing multiple frames and combining them—to reduce noise and enhance clarity. The key is keeping the phone still long enough for the process to complete successfully.
Some devices display a timer during Night Mode (e.g., 2s, 3s, 5s). The longer the exposure, the more critical stability becomes. Newer models offer AI-assisted stabilization and faster processing, but user input remains vital. You’re not just pressing a button—you’re part of the imaging system.
Stabilize Your Hands Like a Pro
Without a tripod, your body becomes the support structure. Proper hand positioning dramatically improves stability. Hold your phone with both hands, elbows tucked into your ribs, creating a closed-loop frame. This stance minimizes micro-movements and dampens natural hand shake.
Lean against a wall, lamppost, or bench if available. Even light contact with a solid surface reduces wobble. When standing freely, brace one foot slightly forward and distribute weight evenly. Avoid holding your breath—it may seem helpful, but it tenses muscles and increases shake. Instead, breathe slowly and press the shutter gently, ideally using volume buttons or voice commands to avoid jerking the phone.
“Even a fraction of a second of movement can blur a long-exposure night photo. Physical anchoring is as important as focus.” — Lena Tran, Mobile Photography Instructor at Urban Lens Workshop
Another effective trick: rest your phone on a flat surface like a windowsill, ledge, or even a backpack placed on the ground. Angle the phone upward slightly if needed. Many phones now detect when they’re on a stable base and optimize exposure accordingly.
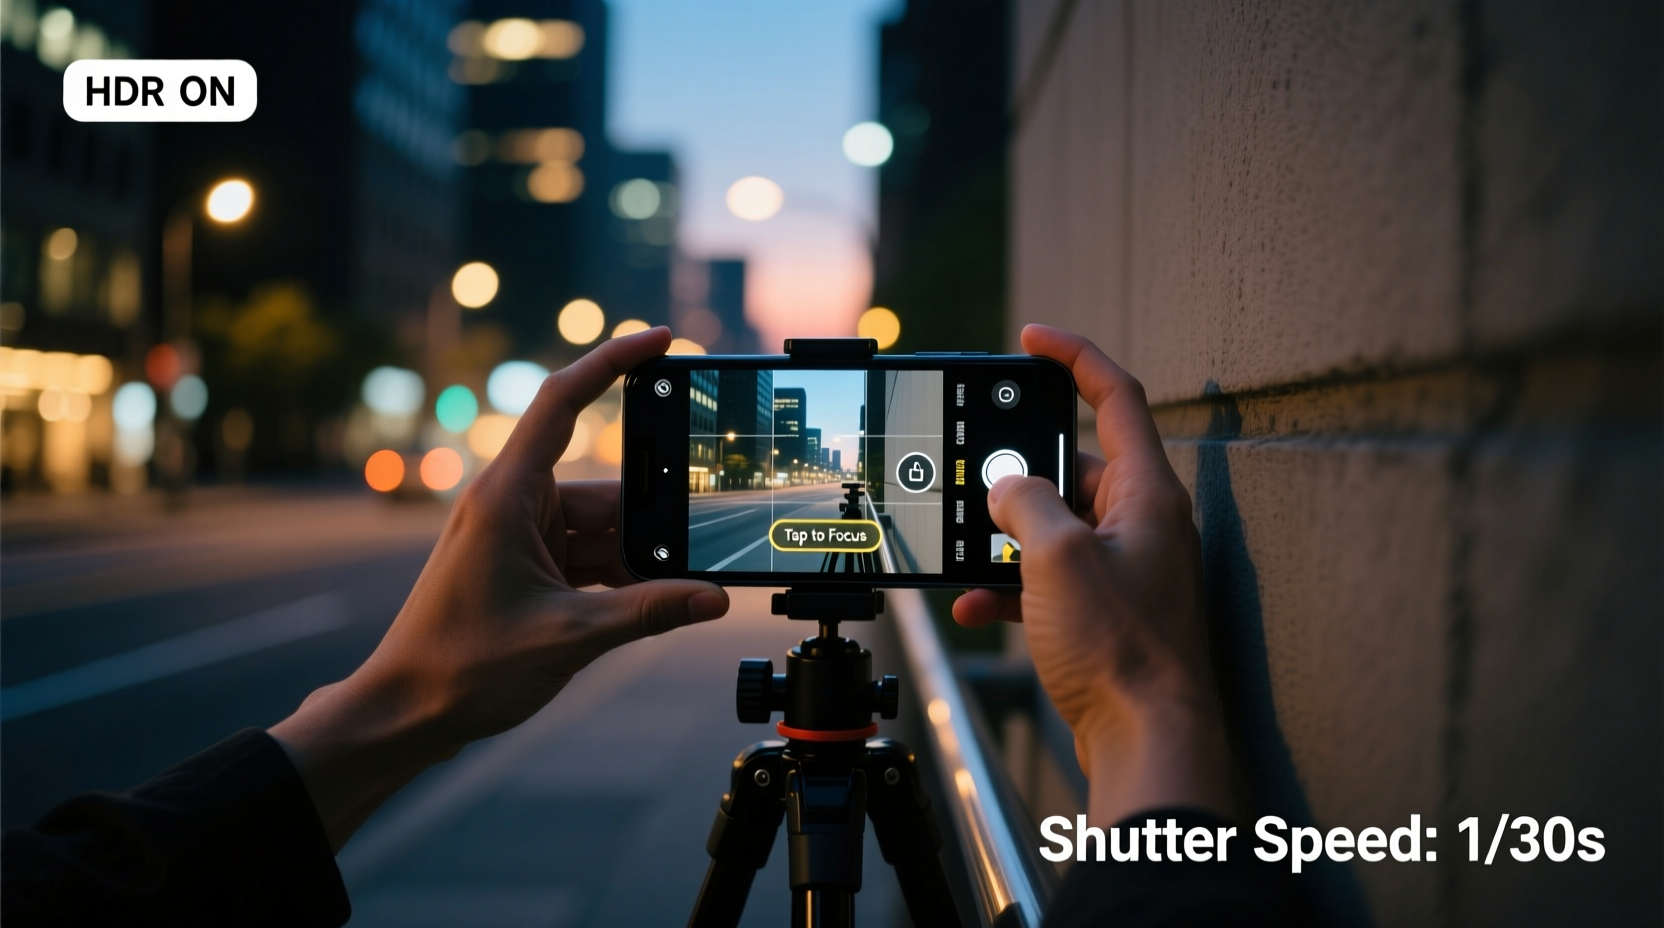
Optimize Camera Settings for Darkness
Default auto mode often fails at night. It either underexposes the scene or creates excessive blur. Switching to manual control—or pro mode, if your phone supports it—gives you authority over ISO, shutter speed, and focus.
- Lower ISO when possible: High ISO brightens images but adds digital noise. Aim for ISO 100–400 if ambient light allows.
- Use shorter exposures: If you can’t stabilize for 5 seconds, try 2-second bursts. Some clarity beats total blur.
- Lock focus and exposure: Tap and hold on your subject until “AE/AF Lock” appears. This prevents the camera from readjusting mid-shot.
- Shoot in RAW (if available): RAW files retain more data, allowing better post-processing correction for exposure and noise.
| Setting | Ideal for Night | Avoid |
|---|---|---|
| ISO | 100–400 | Over 800 unless necessary |
| Shutter Speed | 1–3 seconds (with stabilization) | Faster than 1/15s in dark scenes |
| White Balance | Auto or Tungsten (for streetlights) | Fluorescent in warm-lit areas |
| Focus | Manually locked on subject | Constantly shifting |
If your phone lacks pro mode, third-party apps like ProCamera (iOS) or Open Camera (Android) offer manual controls. These tools unlock precision that stock apps often hide behind automation.
Step-by-Step Guide to Shooting Sharp Night Photos Handheld
Follow this sequence to maximize success when no tripod is available:
- Find a stable position: Lean against a wall, sit on steps, or place your elbows on a railing. Anchor your body before touching the phone.
- Clean your lens: Wipe the camera glass with a microfiber cloth. Smudges scatter light and reduce sharpness.
- Enable Night Mode: Let the phone detect low light and activate long exposure. Wait for the countdown to finish.
- Set focus manually: Tap your main subject and lock AE/AF. For distant lights, focus on a mid-ground object.
- Use a remote trigger: Press the volume up button or say “Cheese” to activate voice shutter. Prevents jolt from screen touch.
- Hold perfectly still: Keep arms tight, breathe naturally, and remain motionless until the capture completes.
- Take multiple shots: Capture 3–5 versions. One will likely be sharper due to subtle differences in stability.
- Review immediately: Zoom in on preview thumbnails to check for blur or focus errors. Adjust and reshoot if needed.
Leverage Environmental Light and Composition
Light is your ally. Seek out sources like streetlamps, neon signs, car headlights, or illuminated building facades. Position yourself so light falls on your subject from the front or side. Backlighting without fill light usually results in silhouettes or noise-heavy corrections.
Urban environments are ideal for night photography because of abundant artificial lighting. Reflections on wet pavement after rain double the effective illumination and add visual interest. Use these reflective surfaces to your advantage by crouching slightly to include mirror-like details in your frame.
Composition matters even more at night. A cluttered, dark background distracts from the subject. Simplify your scene: zoom in (digitally or by moving closer), eliminate busy edges, and emphasize strong shapes and contrasts. Leading lines—like rows of lights along a bridge or road—guide the viewer’s eye through the image.
Consider shooting in black and white mode if colors appear muddy. Monochrome can enhance contrast and make textures stand out, especially in high-noise conditions.
Mini Case Study: Capturing a Night Market Solo
Jamal, a travel blogger in Bangkok, wanted to photograph the bustling Chatuchak night market. He had no tripod, only his mid-range Android phone. Street stalls glowed with warm LEDs, but crowds made steady positioning difficult.
He applied several techniques: first, he leaned against a food cart while composing shots. He enabled Night Mode and used the volume key to shoot. For portraits of vendors, he asked them to pause briefly while he stabilized his arms on his knees. He took five shots per scene, later selecting the sharpest.
The result? Crisp images of sizzling skewers, detailed facial expressions, and vibrant signage—all handheld. His blog post went viral, praised for its authenticity and quality. Jamal credited his success not to gear, but to patience and deliberate technique.
Common Mistakes That Blur Night Photos
Avoid these frequent errors that compromise image sharpness:
- Pressing the screen to shoot: Tapping the display causes immediate shake. Use volume buttons or headphones as a shutter.
- Forgetting about lens smudges: Oils from fingers degrade clarity, especially around bright lights.
- Standing on unstable ground: Uneven pavement or moving platforms (like boats or balconies) introduce vibration.
- Letting the phone refocus mid-sequence: After locking focus, tapping elsewhere resets it. Stay consistent.
- Shooting too fast: Rushing leads to missed settings and shaky execution. Slow down.
Checklist: Ready for Night Shooting (No Tripod)
- ✅ Clean all lenses (main, ultra-wide, telephoto)
- ✅ Enable Night Mode or Pro Mode
- ✅ Turn on gridlines for composition
- ✅ Use volume buttons or voice command for shutter
- ✅ Find physical support (wall, bag, railing)
- ✅ Lock focus and exposure on subject
- ✅ Take 3–5 shots per scene
- ✅ Review thumbnails for sharpness before leaving location
FAQ
Can I take sharp night photos with an older smartphone?
Yes, though results depend on technique more than hardware. Older phones lack advanced Night Modes, so you must prioritize stability and external light. Get close to light sources, use every available support, and consider editing apps like Snapseed to enhance clarity afterward.
Why does my phone take several seconds to save a photo at night?
This delay occurs because your phone is processing multiple frames, aligning them, and reducing noise. It’s normal. Avoid moving or closing the app until processing finishes—otherwise, the final image may be corrupted or blurry.
Should I use flash for night photos?
Rarely. Built-in flashes create harsh, flat lighting that washes out subjects and darkens backgrounds. They’re ineffective beyond a few feet. Rely instead on ambient light or external solutions like a portable LED panel or even your flashlight held off-camera.
Final Thoughts
Sharp night photography without a tripod isn’t about luck—it’s about control. By understanding your phone’s behavior in low light, stabilizing your stance, optimizing settings, and using the environment wisely, you transform limitations into creative opportunities. The best camera is the one you have with you; the best results come from how you use it.
Every city block, backyard patio, or mountain trail at dusk holds photographic potential. Don’t wait for perfect gear. Master the art of stability, embrace the challenge of darkness, and start capturing nights worth remembering—with nothing but your smartphone in hand.


 浙公网安备
33010002000092号
浙公网安备
33010002000092号 浙B2-20120091-4
Comments
No comments yet. Why don't you start the discussion?