
Capturing what’s on your screen is a daily necessity for many—whether you're troubleshooting an error, creating tutorials, sharing ideas with colleagues, or preserving digital moments. Windows offers multiple built-in tools and keyboard shortcuts that make screen capturing fast and flexible. Yet, most users only scratch the surface of what's possible. This guide dives deep into practical techniques, lesser-known features, and expert strategies to help you master both screenshots and screen recordings on Windows.
Essential Keyboard Shortcuts for Instant Screenshots
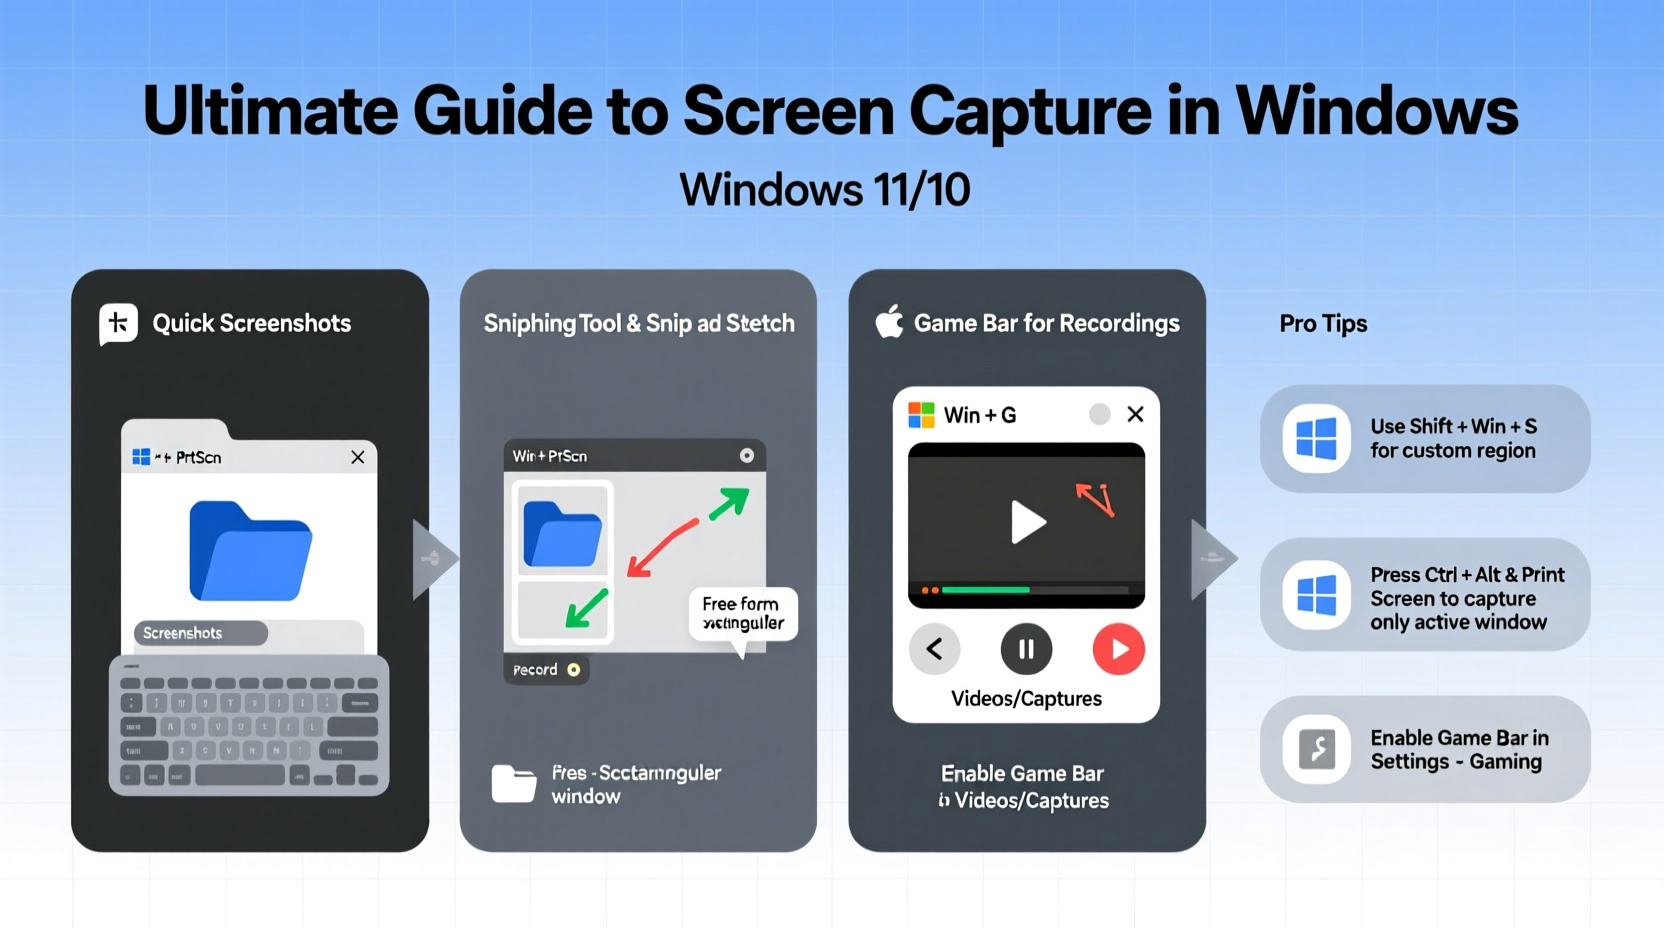
Windows includes several keyboard combinations that allow quick access to screenshot functions without installing additional software. Knowing these can save time and streamline your workflow.
- Print Screen (PrtScn): Captures the entire screen and copies it to the clipboard. Paste it into any application (e.g., Word, Paint, or email) using Ctrl+V.
- Alt + PrtScn: Takes a screenshot of only the active window and copies it to the clipboard.
- Windows + PrtScn: Instantly captures the full screen and saves it automatically as a PNG file in the “Screenshots” folder inside Pictures.
- Windows + Shift + S: Activates Snip & Sketch, enabling selective capture of rectangular, freeform, or specific window areas. The captured image goes to the clipboard for easy pasting.
Using Snip & Sketch and Snipping Tool Effectively
Snip & Sketch has largely replaced the classic Snipping Tool in modern Windows versions, though both coexist in some builds. These tools offer more control than basic keyboard methods, including delayed captures and annotation options.
To use Snip & Sketch:
- Press Windows + Shift + S or open the app from the Start menu.
- Select the type of snip: Rectangular, Freeform, Window, or Full-screen.
- Capture your selection. A notification appears; click it to edit or copy.
- Annotate with pen, highlighter, or eraser if needed.
- Save, share, or paste directly into documents.
The Snipping Tool remains useful for setting delays (up to 5 seconds), which helps capture hover menus or context menus that disappear when you move the mouse.
“Delay settings in Snipping Tool are underused but invaluable for capturing transient UI elements.” — David Lin, Technical Trainer at Microsoft Learning Partner
Recording Your Screen with Xbox Game Bar
Many users don’t realize that Windows includes a built-in screen recorder via the Xbox Game Bar—originally designed for gamers but perfectly suited for everyday use.
To record your screen:
- Open the app or window you want to record.
- Press Windows + G to launch Game Bar.
- If prompted, confirm this is a game (you can check “Yes, this is a game” temporarily).
- Click the red record button or press Windows + Alt + R to start.
- Stop recording with the same shortcut or through the overlay.
Recordings are saved in MP4 format in Video > Captures within your user folder. Note that Game Bar records only one application window at a time—not the entire desktop or File Explorer.
Comparison of Built-In vs. Third-Party Tools
| Feature | Built-In (Snip & Sketch / Game Bar) | Third-Party (e.g., OBS, ShareX) |
|---|---|---|
| Cost | Free | Mixed (many free options) |
| Learning Curve | Low – intuitive interface | Medium to high (OBS requires setup) |
| Recording Quality | Good (720p–1080p) | Excellent (up to 4K, customizable bitrate) |
| Multi-Monitor Support | Limited (active window only) | Full support |
| Editing Features | Basic annotations | Advanced editing, watermarking, effects |
| Hotkey Customization | Minimal | Extensive |
For casual users, built-in tools are sufficient. Professionals creating training videos, developers documenting bugs, or educators building lessons may benefit from advanced tools like OBS Studio or ShareX.
Best Practices for Professional Results
Whether you’re sending a quick screenshot or producing polished video content, following best practices ensures clarity and professionalism.
- Minimize clutter: Close unnecessary apps and tidy your desktop before capturing.
- Use high contrast: Dark mode interfaces often provide better readability in screenshots.
- Add context: Include brief annotations or captions to explain what’s being shown.
- Standardize file naming: Save screenshots with descriptive names (e.g., “Error_LoginScreen_2024”) for easier retrieval.
- Respect privacy: Blur sensitive information like passwords, emails, or personal messages before sharing.
Mini Case Study: Resolving Software Bugs Faster
A mid-sized software company introduced standardized screen recording practices for their support team. Agents were trained to use Windows + Shift + S for error screenshots and Game Bar for short clips demonstrating issues. Within two months, bug resolution time dropped by 35%. Developers received clearer reports, reducing back-and-forth communication. One agent noted, “A five-second video shows more than three paragraphs of text ever could.”
Step-by-Step Guide: Setting Up Efficient Capture Workflow
Create a repeatable process to handle common screen capture needs:
- Choose your tool: Decide between built-in tools for simplicity or third-party apps for advanced features.
- Configure settings: Set default save locations, enable microphone if narrating, and adjust quality settings.
- Organize folders: Create a dedicated “Captures” folder with subfolders (e.g., “Tutorials,” “Bugs,” “Meetings”).
- Define naming convention: Adopt a consistent pattern such as YYYY-MM-DD_Description_Type.
- Train your team: If working collaboratively, ensure everyone follows the same standards.
- Review and archive: Periodically clean up old files and back up essential captures.
FAQ
Can I record audio along with my screen in Windows?
Yes. Xbox Game Bar supports system audio and microphone input during recording. Go to Settings > System > Sound > Input to manage microphone levels, and ensure audio recording is enabled in Game Bar settings.
Where does Windows save my screenshots?
Screenshots taken with Windows + PrtScn are saved in C:\\Users\\[YourName]\\Pictures\\Screenshots. Snips made with Snip & Sketch are copied to the clipboard unless manually saved. Recordings from Game Bar go to C:\\Users\\[YourName]\\Videos\\Captures.
Why doesn’t Game Bar work in some applications?
Game Bar only works with apps running in full-screen mode or recognized as UWP/desktop applications. It won’t capture File Explorer, certain secure websites (like banking portals), or background processes due to security restrictions.
Final Checklist for Mastering Screen Capture
- Before Capturing:
- ✅ Clean your desktop and close irrelevant tabs
- ✅ Check audio and mic settings if recording
- ✅ Confirm save location and permissions
- During Capture:
- ✅ Use precise snips instead of full-screen when possible
- ✅ Speak clearly if narrating a video
- After Capture:
- ✅ Annotate or crop to highlight key details
- ✅ Save with a meaningful name
- ✅ Delete temporary or sensitive captures securely
Conclusion
Screen capture in Windows is far more powerful than most users realize. From simple keyboard shortcuts to integrated recording tools, the operating system provides everything needed for effective visual communication. By mastering these tools and applying disciplined habits, you enhance productivity, improve collaboration, and deliver clearer messages—whether you're solving problems, teaching concepts, or sharing insights.


 浙公网安备
33010002000092号
浙公网安备
33010002000092号 浙B2-20120091-4
Comments
No comments yet. Why don't you start the discussion?