
As the holiday season approaches, stringing up Christmas lights is one of the most anticipated traditions. But nothing dampens the festive mood faster than turning on your display only to find that half the strand glows brightly while the other flickers weakly or appears noticeably dim. This inconsistency isn’t just unattractive—it can also signal underlying electrical issues, inefficient setups, or aging components. Understanding why some Christmas lights dim while others stay bright is key to maintaining a safe, energy-efficient, and visually stunning holiday light display.
The problem of uneven brightness in Christmas lights affects both indoor and outdoor setups and spans all types—incandescent, LED, and even smart lighting systems. While it may seem like a minor aesthetic flaw, it often points to deeper issues such as voltage drop, circuit overloading, poor connections, or incompatible bulb types. Addressing these problems not only improves visual appeal but also extends the lifespan of your lights and reduces fire risks associated with faulty wiring.
Understanding How Christmas Lights Work
Most traditional Christmas light strands operate on a series or parallel circuit design. In a **series circuit**, electricity flows through each bulb in sequence. If one bulb burns out or becomes loose, the entire strand may go dark—or worse, cause the remaining bulbs to draw more power, leading to overheating or premature failure. Modern mini-lights often use shunted sockets that bypass dead bulbs, but they’re still vulnerable to voltage inconsistencies.
In contrast, **parallel circuits** allow each bulb to receive full voltage independently. This design is common in higher-end LED strings and commercial-grade lighting. Parallel wiring prevents cascading failures and ensures consistent brightness across the strand. However, even parallel systems can suffer from dimming if there’s an issue with the power supply, wire gauge, or connection quality.
LED lights, now the standard for most households due to their energy efficiency and longevity, typically require less voltage than incandescent bulbs. But because they are sensitive to voltage fluctuations, improper power delivery can result in visible dimming, especially at the end of long runs.
“Voltage drop is the most common culprit behind inconsistent brightness in holiday lighting. The farther the bulb is from the power source, the weaker the current—and the dimmer the glow.” — Carlos Mendez, Electrical Systems Technician
Common Causes of Dim Christmas Lights
Several factors contribute to why certain sections of your Christmas lights appear dimmer than others. Identifying the root cause is essential before attempting repairs.
- Voltage Drop: Especially in long strands or daisy-chained setups, resistance in the wires causes a reduction in voltage by the time it reaches the last few bulbs. This results in progressively dimmer lights toward the end.
- Damaged or Loose Bulbs: A single corroded, bent, or improperly seated bulb can disrupt current flow in series circuits, affecting multiple downstream bulbs.
- Frayed or Damaged Wiring: Exposed or worn insulation compromises conductivity and increases resistance, leading to inconsistent performance.
- Overloaded Circuits: Connecting too many strands together exceeds the manufacturer’s recommended limit, reducing available voltage per strand.
- Mismatched Bulb Types: Mixing different wattages, voltages, or technologies (e.g., combining old incandescents with LEDs) creates imbalances in power draw and brightness.
- Low-Quality Power Adapters or Timers: Cheap extension cords or timers with high internal resistance can restrict current flow.
- Aging Components: Over time, solder joints degrade, contacts oxidize, and filaments weaken, particularly in older incandescent sets.
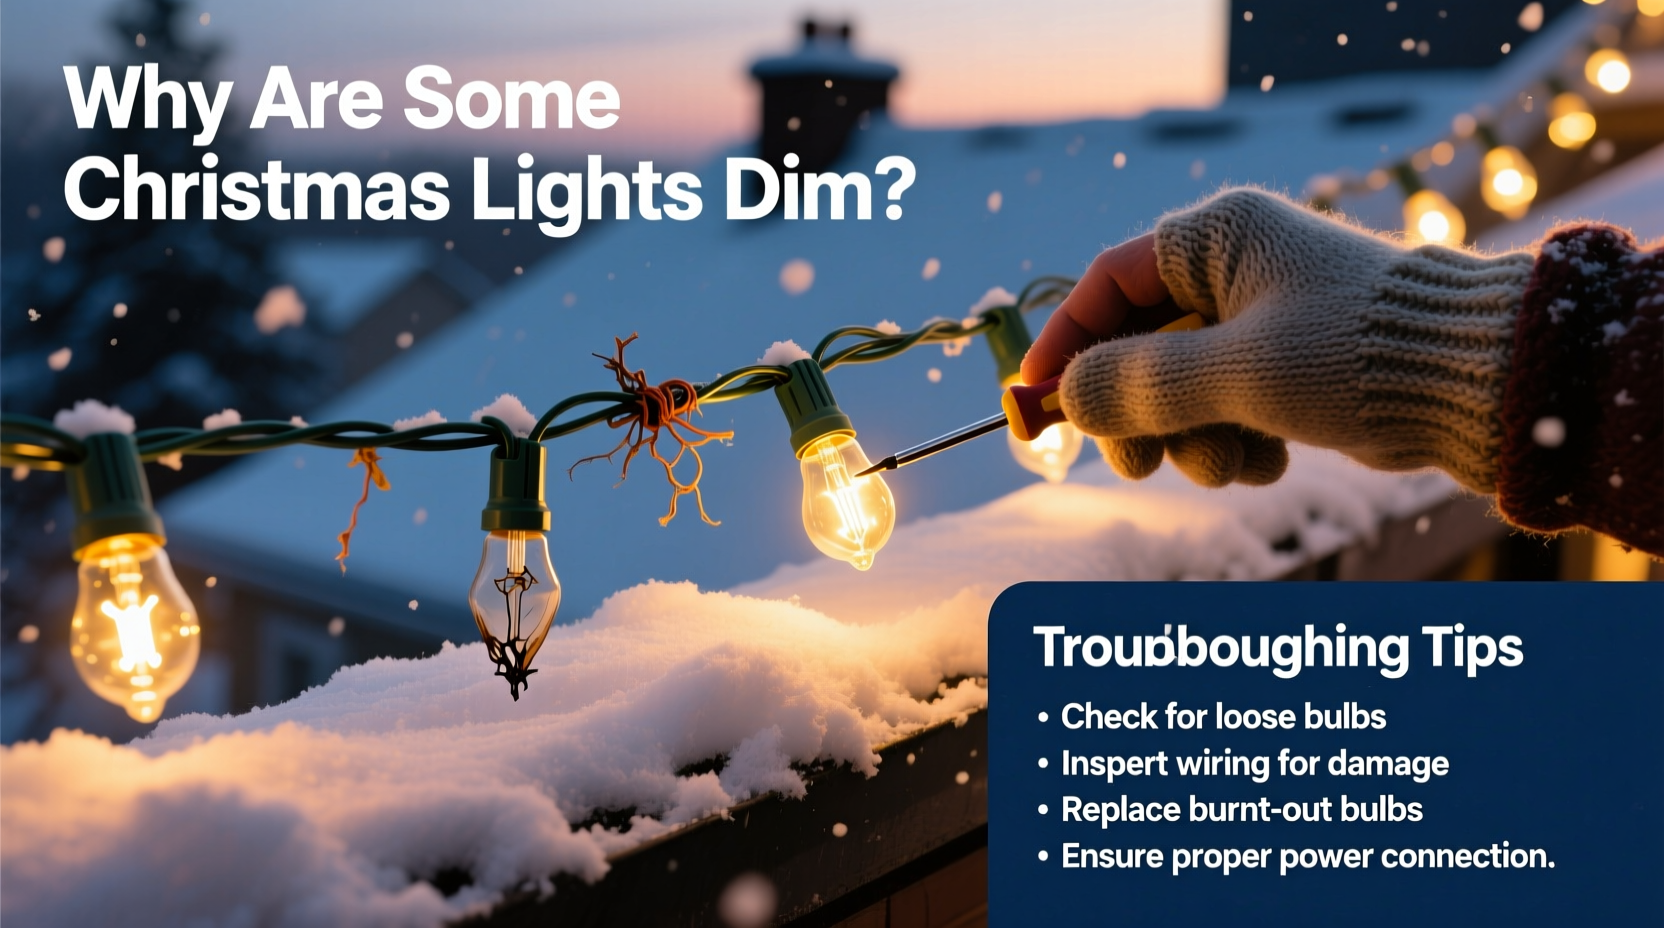
Troubleshooting Steps to Fix Uneven Brightness
Follow this systematic approach to diagnose and resolve dimming issues in your Christmas lights.
- Unplug the Strand: Safety first. Never inspect or handle electrical components while powered.
- Inspect Each Bulb Visually: Look for darkened glass, broken filaments, or loose fittings. Replace any suspect bulbs with exact replacements (same voltage and base type).
- Check Socket Contacts: Use a small screwdriver to gently bend upward the metal tab inside each socket. Oxidation or flattening can prevent proper contact.
- Test with a Known-Good Bulb: Insert a working bulb into dim sockets to determine if the issue is localized to the bulb or the fixture.
-
Verify Connections Between Strands: Ensure male and female plugs are fully seated and dry. Moisture or debris can inhibit conductivity. - Measure Voltage Output: Using a multimeter, test voltage at the beginning and end of the strand. A drop of more than 5–10% indicates significant resistance.
- Reduce Daisy-Chaining: Disconnect excess strands. For example, if the package says “max 3 sets,” don’t connect 6—even if they light up initially.
- Replace Extension Cords: Use heavy-duty, outdoor-rated cords no longer than 25 feet. Avoid coiled cords, which generate heat and increase resistance.
- Separate LED and Incandescent Strings: Do not mix technologies on the same circuit or power strip.
- Try a Different Outlet: Some household circuits experience voltage sag under load. Plug into a dedicated circuit if possible.
When to Consider Rewiring or Upgrading
If troubleshooting fails and the strand continues to underperform, consider upgrading to a newer LED system with built-in voltage regulation. Many modern LED strings include constant-current drivers that maintain uniform brightness regardless of position in the chain. Alternatively, professional-grade commercial lights use thicker-gauge wire and parallel circuitry to minimize voltage drop over distance.
Prevention Strategies for Long-Term Performance
Proactive maintenance goes a long way in preventing future dimming issues. Here are best practices to keep your lights consistently bright year after year.
| Do | Don’t |
|---|---|
| Store lights on reels or cardboard spools to prevent tangling and wire stress | Wrap lights tightly around sharp edges or pinch them in storage bins |
| Clean bulbs and sockets annually with a dry cloth before installation | Use water or chemical cleaners directly on electrical components |
| Label strands by location and type for easy setup next season | Mix different brands or models without verifying compatibility |
| Use surge protectors with indicator lights to monitor power stability | Plug high-draw displays into multi-outlet adapters without overload protection |
| Inspect all cords and plugs for wear before each use | Ignore fraying, discoloration, or melted plastic on connectors |
Real-World Example: A Homeowner’s Lighting Dilemma
Mark T., a homeowner in Portland, Oregon, installed 15 identical LED light strands along his roofline each December. One year, he noticed that the last five strands were significantly dimmer than the first ten, despite being the same model and purchased together. After checking individual bulbs and finding no obvious defects, he measured the voltage at the start and end of the chain using a digital multimeter.
The reading dropped from 120V at the outlet to just 108V at the final strand—an 11% loss, well beyond acceptable levels. He realized he had connected all 15 strands in series, exceeding the manufacturer’s recommendation of 8 connectable units. By splitting the display into two separate circuits powered by different outlets, he restored full brightness across all strands. Additionally, he replaced the original thin-gauge extension cord with a shorter, 12-gauge outdoor-rated version, further stabilizing voltage delivery.
This case highlights how easily technical limits can be overlooked, especially when aesthetics take priority over electrical safety. Simple adjustments made a dramatic difference—not just in appearance, but in system reliability.
Expert Recommendations for Optimal Lighting Setup
Professional installers and electricians emphasize planning and precision when designing holiday lighting layouts.
“Treat holiday lighting like any permanent electrical system. Calculate total load, match components correctly, and never exceed ratings. A beautiful display shouldn’t come at the cost of safety.” — Linda Ruiz, Certified Electrician & Holiday Lighting Contractor
Experts recommend the following:
- Use a power distribution box to feed multiple strands from a central point rather than daisy-chaining.
- Install GFCI (Ground Fault Circuit Interrupter) outlets or use GFCI-protected extension cords for outdoor setups.
- Consider low-voltage landscape lighting systems (12V) with transformers for large installations—they offer better control over brightness and safety.
- For programmable or smart lights, ensure firmware is updated and controllers are placed in weatherproof enclosures.
Frequently Asked Questions
Why do only the end bulbs on my string look dim?
This is typically caused by voltage drop in long chains. As electricity travels down the wire, resistance builds up, delivering less power to the farthest bulbs. To fix this, shorten the chain or power the strand from both ends (if designed for it).
Can I mix warm white and cool white LEDs on the same run?
You can physically connect them if they’re the same voltage and type, but mixing color temperatures may create a noticeable visual disparity in brightness—even if lumens are equal. For a cohesive look, stick to one color temperature per display area.
Are flickering or dimming lights dangerous?
Occasional flickering due to loose bulbs is usually harmless. However, persistent dimming combined with buzzing sounds, hot plugs, or discolored cords can indicate overloaded circuits or failing insulation—both fire hazards. Unplug immediately and inspect thoroughly.
Final Checklist Before Hanging Your Lights
- ✔️ Verify all bulbs are securely seated and undamaged
- ✔️ Confirm no more than the recommended number of strands are connected together
- ✔️ Use heavy-duty, outdoor-rated extension cords (16 AWG or lower)
- ✔️ Test voltage at the beginning and end of long runs
- ✔️ Plug into a GFCI-protected outlet for outdoor use
- ✔️ Inspect wires for cuts, abrasions, or exposed copper
- ✔️ Clean sockets and straighten contact tabs as needed
- ✔️ Store spare bulbs and fuses in labeled bag with the lights
Conclusion: Shine Bright and Stay Safe This Holiday Season
Uneven brightness in Christmas lights isn’t something you have to accept. With a clear understanding of electrical principles and a methodical approach to inspection and setup, you can achieve a uniformly radiant display that enhances your home’s holiday charm. More importantly, addressing dimming issues helps prevent potential hazards like overheating, short circuits, and fire risks.
Whether you’re illuminating a modest porch or orchestrating a neighborhood-favorite light show, attention to detail makes all the difference. Apply these troubleshooting tips, invest in quality components, and adopt preventive habits that ensure lasting performance. Your efforts will pay off in dazzling visuals, peace of mind, and seasons of reliable sparkle.


 浙公网安备
33010002000092号
浙公网安备
33010002000092号 浙B2-20120091-4
Comments
No comments yet. Why don't you start the discussion?