
Sourdough bread has earned a loyal following for its tangy flavor, chewy texture, and artisanal appeal. But behind every great loaf is a living culture—a sourdough starter—that requires patience, consistency, and understanding. Many home bakers begin with enthusiasm, only to find their starter sluggish, moldy, or dead within days. Why is it so difficult to keep a sourdough starter alive? The answer lies not in complexity, but in subtle missteps that undermine even the best intentions.
A sourdough starter is a symbiotic culture of wild yeast and lactic acid bacteria, cultivated from flour and water. Unlike commercial yeast, which is predictable and shelf-stable, sourdough relies on naturally occurring microbes. This makes it sensitive to environment, feeding schedules, and handling. When conditions aren’t right, the balance tips, and the culture suffers. Understanding the science—and the psychology—of maintaining a starter can mean the difference between success and frustration.
The Delicate Balance of Wild Fermentation
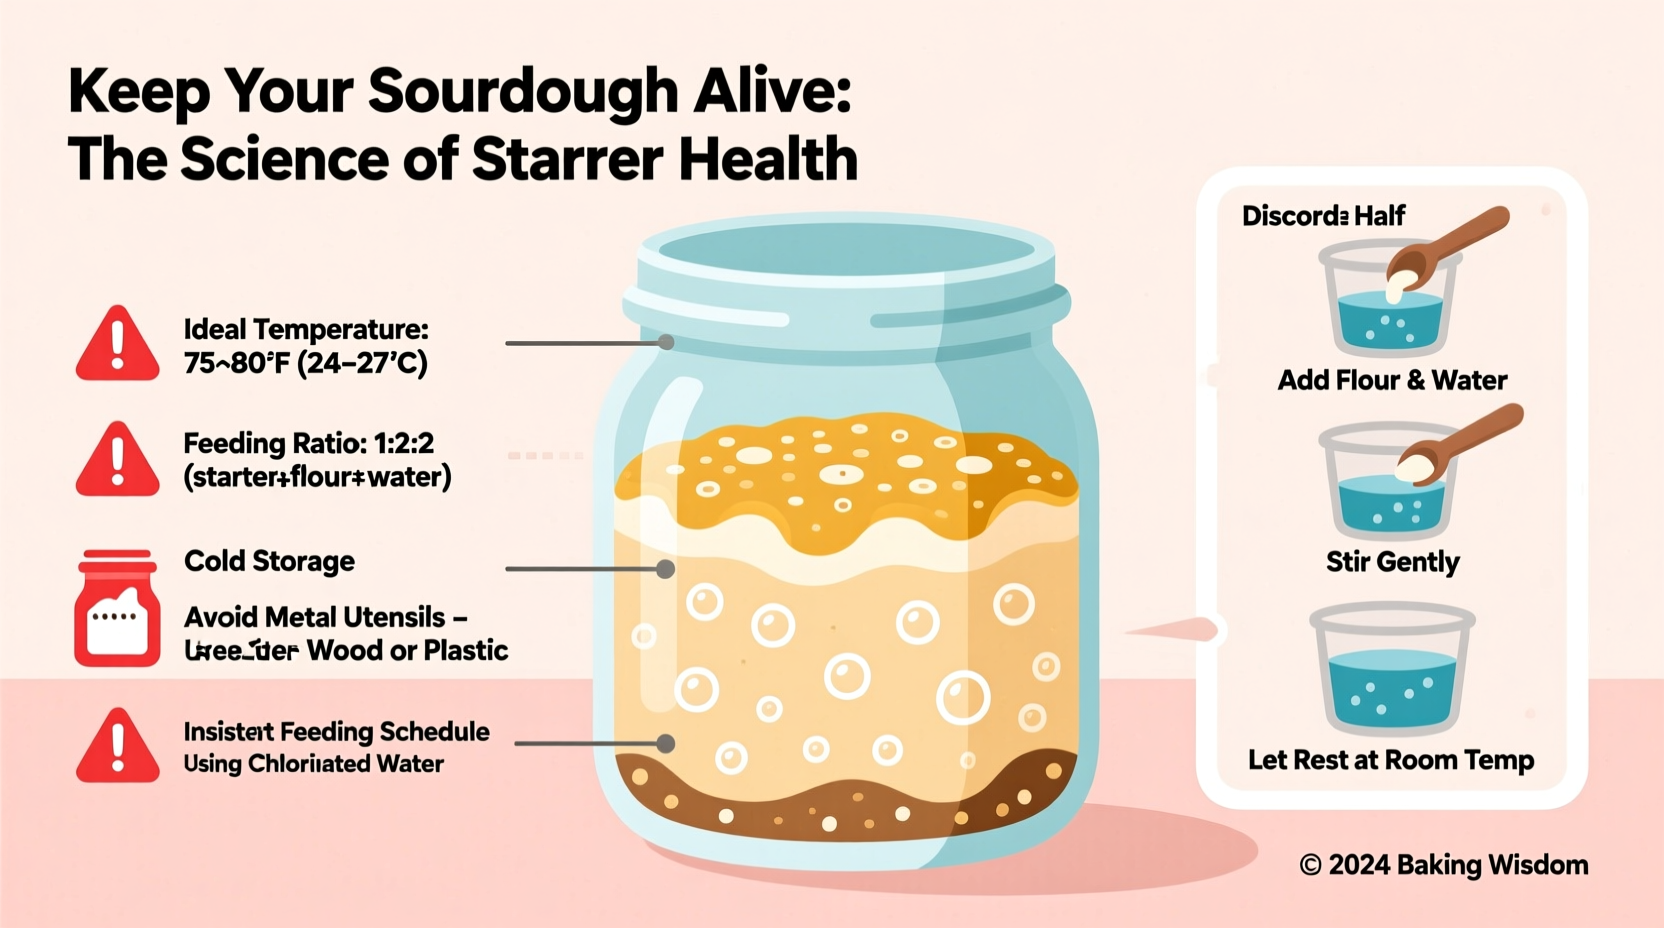
At its core, a sourdough starter thrives on two things: food (flour) and time. The microbes consume starches in flour, producing carbon dioxide (which leavens bread) and organic acids (which give sourdough its signature tang). But this ecosystem is fragile. If underfed, the microbes starve. If overfed, they drown in excess moisture. Temperature, hydration, and flour type all influence microbial activity.
Many beginners assume that more frequent feeding equals better results. In reality, overfeeding dilutes the culture, washing away essential acids and microorganisms needed for stability. Conversely, skipping feedings allows harmful bacteria and molds to take over. The key is consistency—not frequency. A healthy starter follows a rhythm: peak activity 4–8 hours after feeding, then gradual decline until the next meal.
Common Mistakes That Kill Sourdough Starters
Even experienced bakers make errors when managing a starter. These recurring pitfalls often go unnoticed until the culture fails. Below are the most frequent missteps—and how to correct them.
1. Using Chlorinated Tap Water
Chlorine and chloramines, commonly added to municipal water supplies, are designed to kill microbes—including the beneficial ones in your starter. While small amounts may not immediately destroy a mature culture, repeated exposure weakens microbial diversity and slows fermentation.
2. Inconsistent Feeding Schedule
Irregular feeding disrupts microbial balance. Skipping a feeding or delaying it by several hours forces the culture into starvation mode. This leads to hooch (a gray liquid on top), excessive acidity, and weakened yeast activity. Over time, the starter becomes sluggish or dies.
3. Wrong Flour Choice
Not all flours support fermentation equally. Highly processed white flours lack the nutrients wild microbes need. Conversely, whole grain flours like rye or whole wheat are rich in minerals and bran, making them ideal for jumpstarting and maintaining a robust culture.
“Rye flour is one of the best starters for wild cultures—it’s packed with enzymes and soluble fibers that feed lactobacilli.” — Dr. Carl Petersen, Microbial Fermentation Researcher, University of Copenhagen
4. Incorrect Hydration Levels
Hydration refers to the ratio of water to flour by weight. A 100% hydration starter uses equal parts water and flour. Deviating too far from this standard without adjusting feeding ratios can create a too-runny or overly stiff starter, both of which hinder gas retention and microbial movement.
5. Poor Temperature Control
Yeast and bacteria thrive between 70°F and 78°F (21°C–26°C). Colder environments slow fermentation; warmer ones encourage rapid acid production, which can overwhelm the culture. Drafts, refrigerators, and kitchen appliances create microclimates that destabilize growth.
Do’s and Don’ts: A Starter Care Table
| Do’s | Don’ts |
|---|---|
| Use unbleached flour (preferably whole grain for maintenance) | Use bleached or enriched white flour exclusively |
| Feed at consistent intervals (daily or twice daily if room temp) | Feed sporadically or skip days without refrigeration |
| Store in a loosely covered container to allow gas escape | Seal tightly—pressure buildup can cause explosions |
| Discard half before each feeding to prevent overgrowth | Let starter grow unchecked—volume affects balance |
| Keep in a warm, draft-free spot (top of fridge works well) | Place near windows, AC vents, or stoves with fluctuating heat |
Step-by-Step Guide to Reviving a Failing Starter
If your starter shows signs of distress—no rise, foul odor, mold, or thick hooch—it may still be salvageable. Follow this timeline to restore balance.
- Day 1 – Assessment: Check for pink, orange, or black mold. If present, discard entirely. If only gray hooch or a strong vinegar smell exists, proceed.
- Day 1 – First Feeding: Pour off any hooch. Discard 80% of the starter. Feed with 50g whole grain rye flour and 50g filtered water. Mix well, cover loosely, and place in a warm spot (75°F).
- Day 2 – Observe: Look for bubbles and expansion. If little activity, repeat feeding once more later in the day.
- Day 3 – Double Feeding: Feed every 12 hours. Use 25g existing starter, 50g rye flour, 50g water. Stir thoroughly.
- Day 4–5 – Monitor Peak Activity: After each feeding, track when the starter doubles in size. This is its peak—ideal for baking or another feeding.
- Day 6+ – Stabilize Routine: Once doubling consistently within 6–8 hours, you’ve regained vitality. Switch to daily feeding or refrigerate if storing long-term.
Real Example: Sarah’s Struggle with Starter Survival
Sarah, a home baker in Portland, tried starting sourdough three times. Each attempt began with promise—bubbles on day two, a pleasant sour aroma by day four—only to collapse by day six. Her starter developed dark liquid on top and stopped rising.
After researching, she realized her tap water was heavily chlorinated. She also admitted to feeding inconsistently, sometimes forgetting for two days. Her kitchen, located above a garage, stayed below 65°F in winter.
She switched to filtered water, moved her starter to the top of her refrigerator (warmer due to heat rising), and set a daily phone reminder to feed at 8 a.m. Within four days of using rye flour and a strict schedule, her starter doubled reliably. Six months later, she bakes weekly and shares starter with friends.
Sarah’s experience reflects a common pattern: multiple small factors compound into failure. Fixing just one—like water quality—is rarely enough. It’s the combination of corrections that restores health.
Storage Strategies: Room Temperature vs. Refrigeration
How you store your starter determines how often it needs care.
- Room Temperature (70–78°F): Requires feeding every 12–24 hours. Best for active bakers who bake frequently. Promotes strong, predictable fermentation.
- Refrigeration (35–40°F): Slows microbial activity. Can go 7–14 days between feedings. Ideal for occasional bakers. Must be revived with 2–3 consecutive feedings before use.
To refrigerate: Feed your starter, let it sit at room temperature for 1–2 hours (to reactivate), then place in a sealed container in the fridge. Never store a weak or collapsed starter in the fridge—it likely won’t survive.
Reviving a refrigerated starter: Remove from fridge, discard half, feed with fresh flour and water, and wait 8–12 hours. Repeat once or twice until it doubles within 6–8 hours.
Essential Checklist for Starter Success
Follow this checklist daily or weekly, depending on your storage method:
- ✅ Use filtered or non-chlorinated water
- ✅ Feed with unbleached flour (rye or whole wheat recommended)
- ✅ Maintain 1:1 flour-to-water ratio by weight (100% hydration)
- ✅ Discard half before each feeding
- ✅ Keep in a warm, stable environment (70–78°F)
- ✅ Use a breathable lid (loose screw-top or cloth cover)
- ✅ Track rise with markings on the jar
- ✅ Clean container weekly to prevent residue buildup
Frequently Asked Questions
Can I use my starter if it has hooch?
Yes. Hooch (the gray or brown liquid on top) is alcohol produced during fermentation. It indicates hunger, not spoilage. Pour it off or stir it in, then feed immediately. A healthy starter will recover quickly.
Why does my starter smell like acetone or nail polish remover?
This sharp odor comes from acetic acid buildup, usually due to infrequent feeding or too much time between meals. It’s normal in hungry starters. Feed twice daily with whole grain flour to rebalance the culture.
How do I know when my starter is ready to bake with?
Your starter should double in size within 4–8 hours of feeding, have lots of bubbles throughout, and pass the float test: drop a teaspoon in water—if it floats, it’s ready. If it sinks, feed again and wait.
Conclusion: Patience, Consistency, and Observation
A sourdough starter isn’t a machine; it’s a living thing shaped by your habits and environment. Its challenges aren’t flaws—they’re invitations to pay closer attention. The difficulty many face isn’t in the process itself, but in aligning expectations with reality. A starter won’t thrive on autopilot. It demands regularity, informed choices, and a willingness to learn from setbacks.
By avoiding the common mistakes outlined here—chlorinated water, inconsistent feeding, poor flour choices, and unstable temperatures—you dramatically increase your chances of long-term success. Remember, every failed batch is data. Every adjustment brings you closer to mastery.


 浙公网安备
33010002000092号
浙公网安备
33010002000092号 浙B2-20120091-4
Comments
No comments yet. Why don't you start the discussion?