
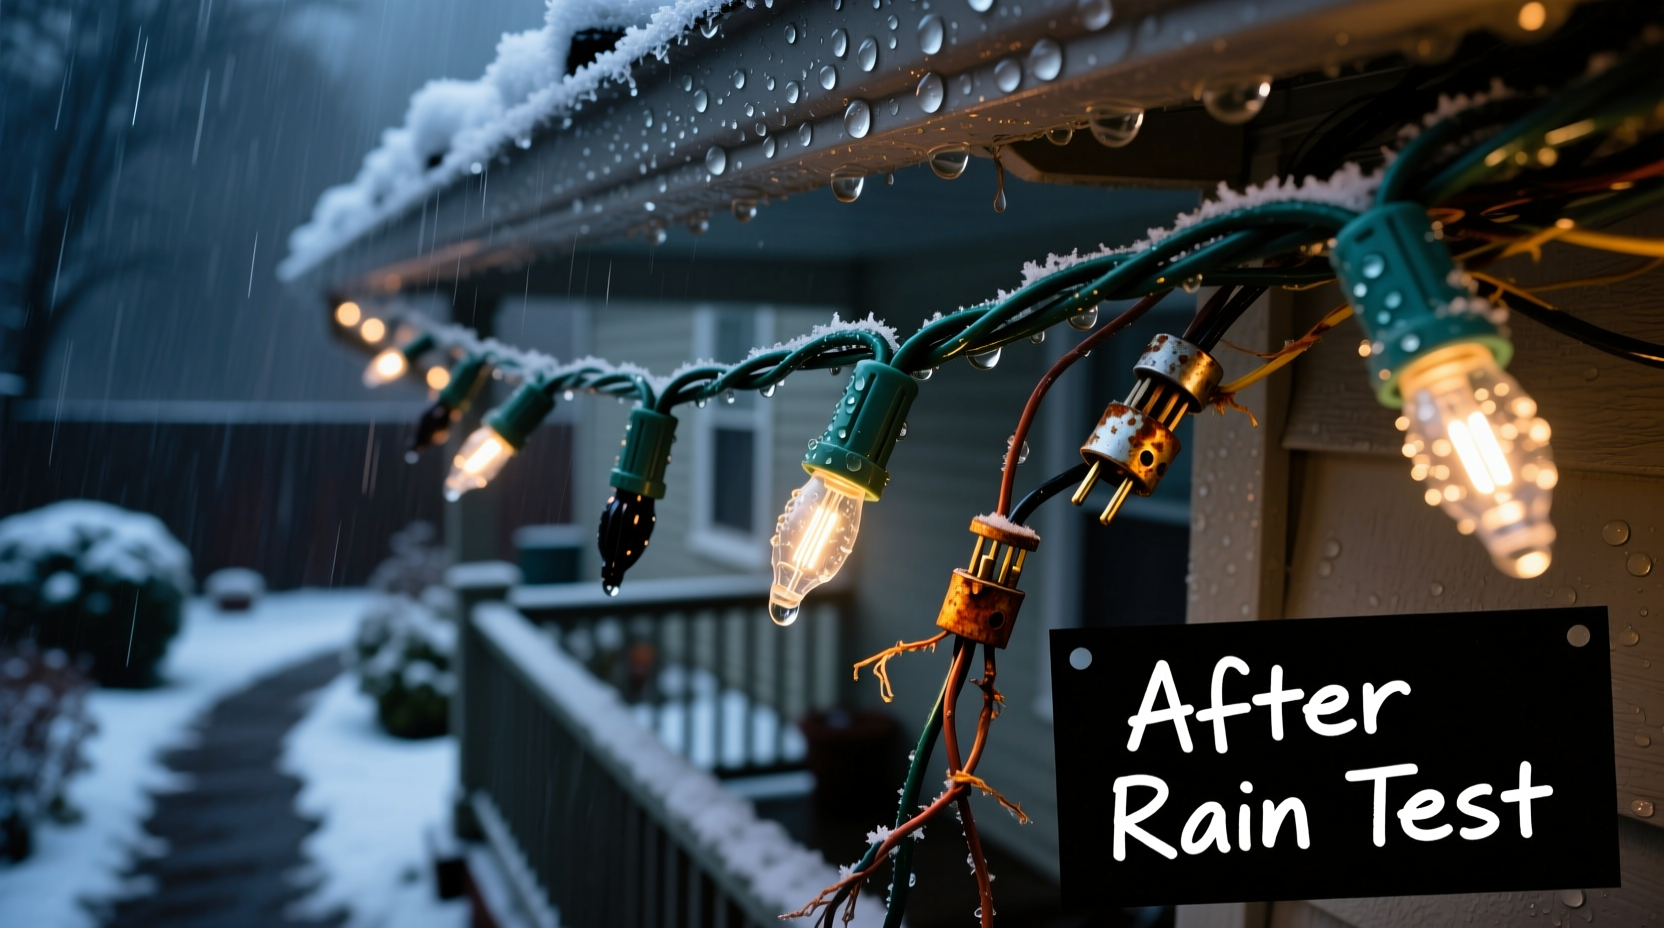
It happens every year: you hang your favorite string lights with care, they glow beautifully through the first few December evenings—and then a single overnight shower turns them into a tangled, silent mess. No flicker. No hum. Just dead pixels and cold wires. You check the outlet, jiggle the plug, swap fuses—but nothing restores the light. The culprit isn’t faulty wiring or cheap bulbs. It’s water. And not just any water—condensation, micro-gaps in insulation, corroded contacts, and voltage leakage that only reveals itself when humidity rises and rain seeps where it shouldn’t.
This isn’t a manufacturing flaw—it’s physics meeting poor environmental adaptation. Most “outdoor-rated” lights sold at big-box stores meet only the bare minimum of UL 588 (the U.S. safety standard for seasonal lighting), which tests for basic splash resistance—not sustained exposure to freezing rain, coastal salt spray, or temperature swings that drive condensation deep into connectors. Understanding *why* rain kills lights is the first step toward preventing it. The second is applying targeted, field-tested waterproofing strategies—not as a one-time fix, but as part of an annual maintenance rhythm.
Why Rain Causes Failure: The Hidden Pathways of Moisture Damage
Water doesn’t need to flood your lights to disable them. It exploits microscopic vulnerabilities most consumers never see:
- Capillary action in stranded wire insulation: Fine copper strands wick moisture like a paper towel. Even if the outer jacket appears intact, water migrates centimeters inside—especially where wires bend or twist near plugs and splices.
- Thermal cycling gaps: Plastic housings expand in heat and contract in cold. Repeated cycles open hairline fractures around LED bases and socket seals—inviting moisture in during high-humidity nights, long before rain arrives.
- Galvanic corrosion at copper-aluminum junctions: Many low-cost light sets use aluminum wire leads soldered to copper terminals. When damp, this pairing creates a tiny battery effect—corroding connections from within and increasing resistance until current stops flowing.
- Ground-fault leakage (not tripping breakers): Modern GFCI outlets trip at 5mA leakage—but many failing light strings leak between 3–4.9mA. Enough to disrupt LED drivers and cause intermittent or total failure, yet too little to trigger a reset. This often manifests as “half the string works” or flickering that worsens in damp conditions.
Crucially, damage is rarely instantaneous. A single rain event may only reveal pre-existing weaknesses—like compromised seals from last season’s UV exposure or cracked plastic from improper storage. That’s why prevention must begin *before* the first bulb is hung.
Waterproofing That Actually Works: Beyond Tape and Glue
Generic “waterproofing” solutions—duct tape, hot glue, silicone caulk applied haphazardly—often make things worse. They trap moisture instead of repelling it, restrict thermal expansion, and degrade under UV exposure. Real protection requires material-aware, layered strategies.
The most effective approach combines three tiers:
- Preventive sealing (applied before installation)
- Environmental hardening (hardware and layout choices)
- Maintenance-level protection (seasonal checks and interventions)
Each tier addresses a different stage of moisture intrusion—and skipping any one undermines the others.
Step-by-Step: Annual Waterproofing Protocol for Outdoor Lights
Follow this sequence each fall, before hanging new or stored lights. It takes under 45 minutes per 100-foot set and extends functional life by 3–5 years on average.
- Inspect & Dry: Uncoil lights fully. Examine every connector, plug, and bulb base for cracks, discoloration (green/white corrosion), or sticky residue. Place the entire string in a dry, warm room (65–75°F) for 48 hours. Use silica gel packs inside sealed plastic bins if humidity exceeds 60%.
- Clean Contacts: Dip a cotton swab in 91% isopropyl alcohol. Gently wipe all metal contacts—plug blades, socket terminals, and female receptacles. Let air-dry 10 minutes. Do not use vinegar, baking soda, or abrasive pads—they leave conductive residues or scratch plating.
- Seal Connectors (Critical Step): Apply a thin, even coat of dielectric grease (e.g., Permatex 22058) to all exposed metal contacts *before* mating plugs. Then, wrap the mated connection with self-fusing silicone tape (e.g., Rescue Tape), stretching it 50% while wrapping—no overlaps, no gaps. Finish with a 2-inch wrap of UV-resistant vinyl electrical tape over the silicone layer.
- Protect End Caps & Sockets: For C7/C9 bulb sockets, inject 1–2 drops of dielectric grease into each socket cavity using a needle-tip applicator. For LED string ends, apply a pea-sized dab of marine-grade polysulfide sealant (e.g., BoatLife LifeCaulk) around the cord exit point of the plug housing—only where cord meets plastic.
- Mount Strategically: Hang lights so connectors face downward (gravity sheds water). Avoid mounting directly against porous surfaces like brick or stucco—leave a ½-inch air gap using standoff clips. Route cords along roof overhangs, not gutters, to minimize pooling.
Do’s and Don’ts: What Holds Up—and What Fails—Under Real Weather
| Action | Do | Don’t |
|---|---|---|
| Connector Sealing | Use dielectric grease + self-fusing silicone tape + UV vinyl tape | Use duct tape, hot glue, or clear nail polish |
| Bulb Socket Protection | Inject dielectric grease into socket cavities annually | Fill sockets with petroleum jelly or silicone caulk |
| Storage After Season | Coil loosely; store in ventilated, climate-controlled space with desiccant packs | Store in sealed plastic bins or damp garages |
| Power Supply | Use GFCI-protected outlets with weatherproof covers rated for wet locations (WR) | Plug into uncovered outlets or daisy-chain more than 3 sets |
| Light Selection | Choose sets with IP65 rating or higher; look for double-insulated wire (SPT-2) and molded-on connectors | Buy “indoor/outdoor” labeled sets without checking UL listing or IP rating |
Note: “IP65” means dust-tight and protected against low-pressure water jets from any direction—far superior to basic “outdoor-rated.” Look for the full IP code stamped on the packaging or plug housing, not just marketing text.
Real-World Example: The Seattle Porch Light Recovery
In November 2023, Sarah K., a homeowner in Seattle’s rainy Ravenna neighborhood, faced exactly this problem. Her 2021 LED string lights—installed on her covered front porch—failed completely after two weeks of drizzle. She’d used “outdoor-rated” lights from a national retailer and wrapped connectors in duct tape. An electrician diagnosed ground-fault leakage at 4.3mA and severe aluminum corrosion inside the male plug. He replaced the plug, cleaned contacts, and resealed with dielectric grease and silicone tape. But Sarah went further: she installed standoff clips to lift cords ¾ inch off the wooden fascia, added a small drip loop before each plug-in point, and began storing lights in ventilated mesh bags with silica gel. This December, her same lights—now in their fourth season—still operate flawlessly through daily 45°F rain showers.
Her success wasn’t luck. It was the deliberate application of layered protection: environmental control (standoffs + drip loops), contact preservation (grease), and physical sealing (tape system). She treated the lights not as disposable decor, but as engineered electrical systems operating in harsh conditions.
Expert Insight: What Lighting Engineers Prioritize
“Most consumer failures stem from treating waterproofing as a ‘one-and-done’ event. In reality, it’s a dynamic process—seals degrade, greases migrate, and thermal stress opens new pathways. The best installers re-seal connectors every 18 months and replace end caps every 3 years—even on premium sets. Prevention isn’t about perfection; it’s about predictable, scheduled intervention.” — Mark Delaney, Senior Applications Engineer, Philips Lighting Solutions Group
Delaney’s team designs commercial-grade holiday lighting for stadiums and historic districts—environments where downtime isn’t an option. Their field data shows that scheduled re-sealing cuts moisture-related failures by 87% compared to reactive fixes alone. It’s not glamorous work—but it’s what separates lasting performance from seasonal frustration.
FAQ: Your Top Rain-Related Lighting Questions Answered
Can I use WD-40 to protect my light connections?
No. WD-40 is a water-displacing solvent—not a protective lubricant. It leaves a thin, non-conductive film that attracts dust and degrades rubber insulation over time. It may provide temporary function, but accelerates long-term corrosion. Use dielectric grease instead: it’s non-conductive, non-reactive, and designed specifically for electrical contacts.
Why do some lights work fine in fog but fail in rain?
Fog deposits moisture on surfaces, but rain delivers kinetic energy—forcing water into micro-cracks and capillary channels. Fog may also evaporate quickly in daytime warmth, while rain-soaked lights cool overnight, causing condensation to form *inside* sealed housings. The combination of forced ingress + thermal contraction is uniquely destructive.
Is there a safe way to repair a cut or nicked wire outdoors?
Yes—but only with proper materials. Strip ½ inch of insulation, twist wires tightly, slide on a heat-shrink butt connector (e.g., 3M Scotchlok 314), and shrink evenly with a heat gun (not a lighter). Seal the entire joint with self-fusing silicone tape, then cover with UV vinyl tape. Never use wire nuts, electrical tape alone, or liquid tape—these lack moisture resistance and UV stability.
Conclusion: Light That Lasts Beyond the Season
Your Christmas lights don’t have to be a yearly expense—or a source of December disappointment. The reason they failed after rain wasn’t bad luck or poor quality alone. It was a mismatch between how the lights were built and how they were used, maintained, and protected. Water doesn’t attack randomly; it follows predictable paths—along wires, into cracks, across dissimilar metals. When you understand those paths, you gain control. Not through guesswork or quick fixes, but through informed, repeatable actions: cleaning contacts with precision, sealing with purpose-built materials, mounting with physics in mind, and maintaining with consistency.
This isn’t about making lights “rainproof”—an impossible standard. It’s about making them *rain-resilient*. Resilience comes from preparation, not panic. From knowledge, not hope. From doing the quiet, unglamorous work in October so your lights shine reliably through January’s storms.


 浙公网安备
33010002000092号
浙公网安备
33010002000092号 浙B2-20120091-4
Comments
No comments yet. Why don't you start the discussion?