
Every year, millions of households encounter the same holiday mystery: one section of lights goes dark while the rest stay bright—or worse, the entire strand fails with no obvious reason. The culprit is rarely faulty bulbs or broken wires. More often than not, it’s a blown fuse—small, unassuming, and critically important. Unlike modern electronics that rely on circuit breakers or surge protectors, traditional incandescent and many LED Christmas light sets use inline fuses as their first and only line of defense against electrical overload. Understanding why they exist—and how to handle them correctly—isn’t just about restoring twinkle; it’s about preventing fire hazards, extending product life, and avoiding unnecessary replacements.
The Safety Science Behind Christmas Light Fuses
Fuses in Christmas light strands serve a precise engineering purpose: they act as sacrificial overcurrent protection devices. When too much current flows through the circuit—due to a short, voltage spike, moisture ingress, or daisy-chaining too many strands—the thin metal filament inside the fuse heats rapidly and melts, breaking the circuit before wiring overheats or insulation degrades. This isn’t an outdated design choice; it’s a deliberate, cost-effective, and UL-mandated safety requirement for plug-in decorative lighting rated for indoor/outdoor use.
Most standard 120V AC light strings sold in North America contain two 3-amp or 5-amp fuses housed in a small, slide-out compartment near the male plug. These are typically AGC-style glass tube fuses (often labeled “F3A” or “F5A”), though some newer LED sets use proprietary micro-fuses embedded in the plug housing. Crucially, the fuse rating matches the strand’s total wattage draw—not the outlet’s capacity. For example, a 25-light incandescent strand drawing ~24 watts per bulb (600W total) requires a 5-amp fuse (since 600W ÷ 120V = 5A). Exceeding that load—even by plugging in one extra string—can cause immediate fuse failure.
“Fuses in light strings aren’t convenience features—they’re non-negotiable safety components mandated under UL 588. Removing or bypassing them voids certification and significantly increases fire risk during extended operation.” — Dr. Lena Torres, Electrical Safety Engineer, Underwriters Laboratories (UL)
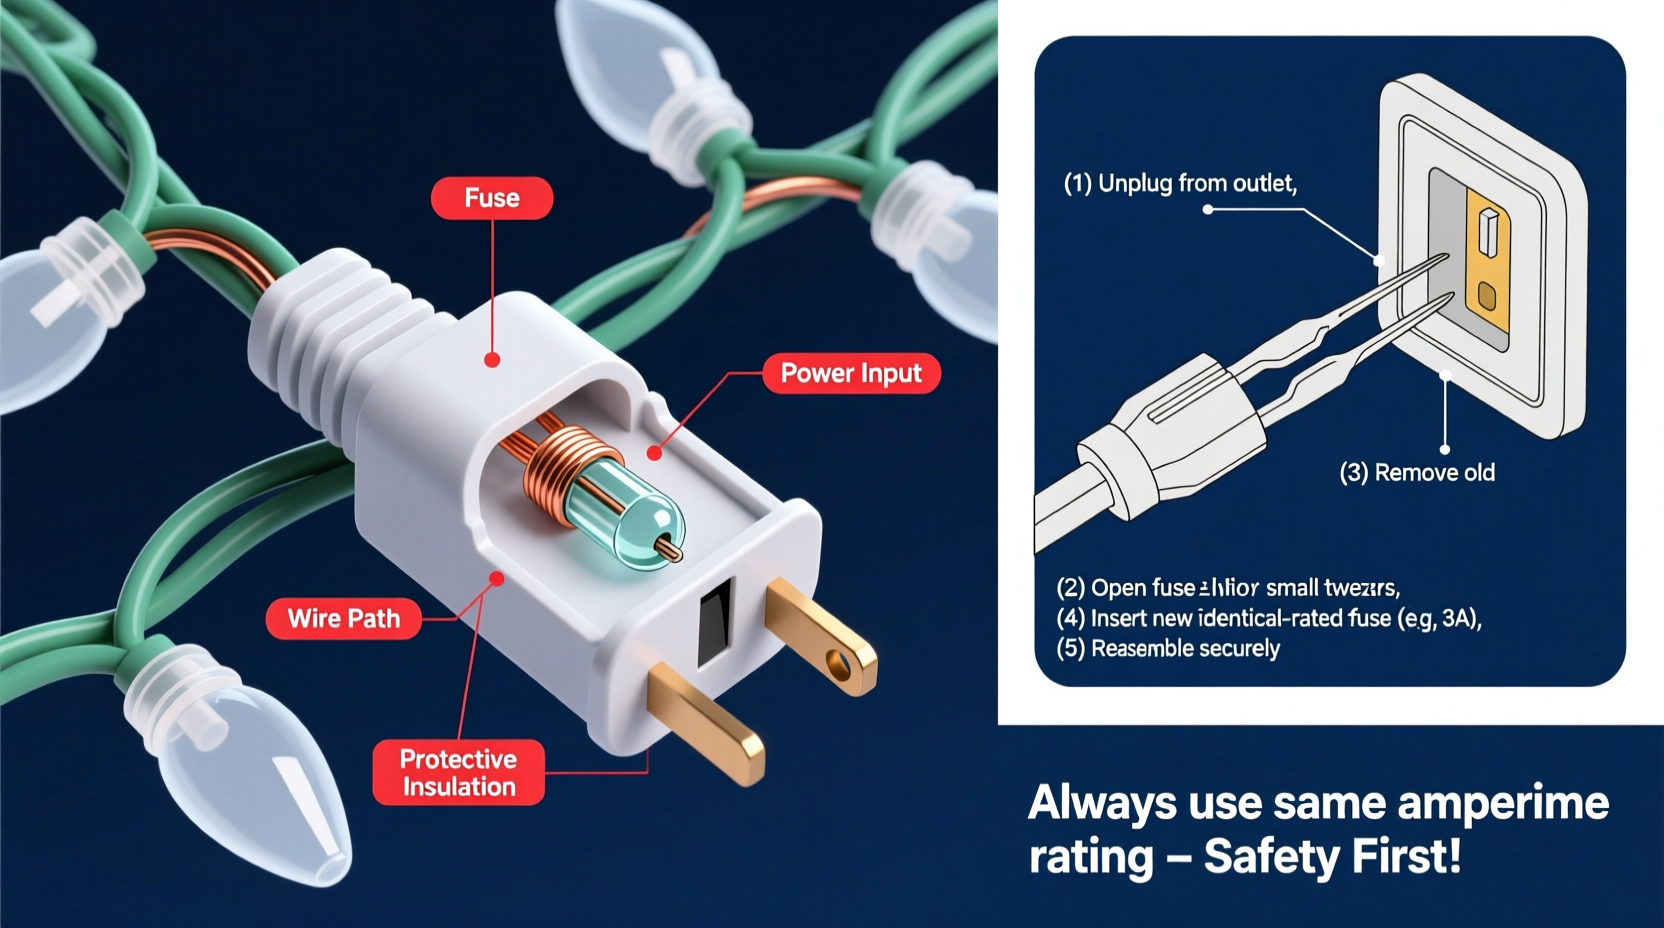
How to Locate and Identify Your Strand’s Fuse Compartment
Fuse compartments vary by manufacturer and era—but they follow predictable patterns. On most pre-2015 incandescent sets, look for a small rectangular plastic tab or sliding door directly adjacent to the male (pronged) end of the plug. It’s usually textured, slightly recessed, and may have a tiny arrow icon or “FUSE” embossed nearby. Gently pry it open with your thumbnail or a flat-head screwdriver—do not force it. Inside, you’ll find two identical glass fuses seated in spring-loaded metal clips.
Newer LED strands often integrate fuses more discreetly. Some hide them behind a removable rubber gasket on the plug body; others embed them within the molded plastic—requiring careful disassembly (not recommended unless explicitly designed for user service). If your strand lacks a visible fuse door and fails entirely, check the packaging or manufacturer’s website: many budget LED sets omit replaceable fuses entirely, relying instead on internal polyfuses or thermal cutoffs that cannot be user-replaced.
A Step-by-Step Guide to Safely Replace a Blown Fuse
- Unplug the strand completely from all power sources—including any extension cords or timers.
- Locate the fuse compartment at the male plug end. Slide or pry open the cover carefully.
- Remove both fuses using needle-nose pliers or your fingers—never use metal tools that could short the clips.
- Inspect visually: Hold each fuse up to light. A blown fuse shows a visibly broken or blackened filament, or a cloudy, discolored glass tube. If uncertain, proceed to step 5.
- Test continuity with a multimeter (set to continuity or Ω mode): Touch probes to each metal end cap. A working fuse reads near 0Ω; an open circuit (displaying “OL” or “1”) confirms failure.
- Replace with identical specification fuses only. Match both amperage (e.g., 3A or 5A) and physical size (AGC, 1/4\" x 1-1/4\"). Never substitute automotive fuses or higher-rated units.
- Reinsert fuses firmly into clips—ensure full contact and no bending of metal ends.
- Secure the compartment cover and plug in briefly to test. If lights remain dark, the issue lies elsewhere (e.g., wiring, controller, or bulb shunts).
Note: Always replace both fuses—even if only one appears blown. They age identically, and installing mismatched fuses creates imbalance and premature failure.
Common Mistakes That Cause Repeated Fuse Blowing
Replacing a fuse only to have it blow again minutes later is frustrating—and dangerous. Recurrent failure signals an underlying problem requiring diagnosis, not repeated replacement. Below are the top causes, ranked by frequency and severity:
| Issue | Why It Triggers the Fuse | How to Confirm & Fix |
|---|---|---|
| Daisy-chained overload | Exceeding manufacturer’s maximum strand count (e.g., linking 5+ incandescent sets rated for “3 max”) | Count total connected strands. Unplug all but one; add back one at a time while monitoring heat at plug and fuse compartment. |
| Misaligned or damaged bulb shunts | In incandescent mini-lights, broken shunt wires create open circuits; in some cases, partial shorts occur when shunts corrode or bridge incorrectly | Visually inspect each socket for bent contacts, melted plastic, or green corrosion. Use a bulb tester to isolate dead bulbs with failed shunts. |
| Moisture intrusion | Water in outdoor plugs or sockets lowers resistance, causing momentary surges during temperature shifts | Check for condensation inside plug housing or sockets. Dry thoroughly with compressed air; apply dielectric grease to plug contacts before reassembly. |
| Voltage spikes | Utility grid fluctuations (especially during storms or high-demand periods) overwhelm low-voltage fuse tolerance | Plug strands into a UL-listed surge-protecting power strip—not a basic extension cord. |
| Physical damage | Crushed or pinched wires near the plug create intermittent shorts | Flex the cord near the plug while powered (with caution) and watch for flickering or popping sounds. |
Real-World Example: The Case of the Overheating Porch Lights
Last December, Sarah in Portland noticed her front-porch light display—three 100-bulb incandescent strands—would illuminate for 20 minutes, then go dark. She replaced bulbs, checked outlets, and even swapped extension cords. Each time, the fuse blew again within minutes. After consulting her strand’s manual, she discovered the “max 2 strands” limit printed on the plug housing. Her setup had exceeded safe load by 40%. She reduced to two strands, added a 1500W-rated surge protector, and installed a timer limiting runtime to 8 hours nightly. No further fuse failures occurred—and her electrician confirmed the original setup drew 7.2 amps continuously, exceeding the 5-amp fuse rating by 44%.
This scenario underscores a critical point: fuses don’t fail randomly. They respond precisely to conditions the user controls. Ignoring manufacturer limits transforms a safety device into a recurring symptom of misuse.
Do’s and Don’ts of Christmas Light Fuse Maintenance
- Do store spare fuses in a labeled, dry container with your holiday decorations.
- Do label each strand’s fuse rating on its storage bag using masking tape and a permanent marker.
- Do inspect fuse compartments annually for corrosion, especially after outdoor use.
- Don’t use aluminum foil, paperclips, or wire to “jump” a fuse—even temporarily.
- Don’t install a higher-amp fuse to prevent blowing. This risks melting wire insulation and igniting nearby materials.
- Don’t assume LED strands are fuse-free. Many still use them—check packaging or UL listing details.
FAQ: Quick Answers to Common Fuse Questions
Can I replace a blown fuse with one from my car?
No. Automotive blade fuses (ATO, Mini) differ in voltage rating, response time, and physical dimensions. Christmas light fuses are rated for 125V AC and designed for slow-blow characteristics to tolerate brief inrush currents. Car fuses are 12–24V DC and fast-blow—making them unsafe and incompatible.
Why do some new LED light sets not have replaceable fuses?
Many modern LED strands use surface-mount polymeric positive temperature coefficient (PPTC) resettable fuses integrated into the circuit board. These “polyfuses” trip during overloads and reset automatically once cooled. While convenient, they degrade after repeated trips and cannot be user-replaced—meaning the entire plug assembly must be discarded if permanently tripped.
Is it safe to operate a strand with one fuse removed?
No. Removing one fuse leaves the circuit unprotected on half the load path. Current may divert unpredictably, causing uneven heating, socket arcing, or complete failure. Always replace both fuses simultaneously—or retire the strand if spares are unavailable.
Conclusion: Respect the Fuse, Respect the Season
Fuses in Christmas light strands are neither relics nor inconveniences—they’re quiet guardians of your home’s safety and your family’s peace of mind. They represent decades of electrical safety evolution, distilled into a 1-inch glass cylinder. Replacing one correctly takes less than two minutes. Ignoring its purpose—or worse, circumventing it—invites avoidable risk during a season already filled with heightened electrical loads and combustible decor. This holiday, take five minutes to audit your light inventory: verify fuse ratings, stock correct spares, and commit to manufacturer-recommended connection limits. Your future self—standing in a dark living room on Christmas Eve—will thank you. And if you’ve successfully revived a strand this year using these steps, share your experience in the comments below. Real stories help others troubleshoot faster, safer, and smarter.


 浙公网安备
33010002000092号
浙公网安备
33010002000092号 浙B2-20120091-4
Comments
No comments yet. Why don't you start the discussion?