
Flickering Christmas lights are more than a seasonal annoyance—they’re a telltale sign of underlying electrical conditions that range from harmless quirks to genuine safety hazards. Whether you’re decorating a modest porch or illuminating an entire neighborhood block, inconsistent lighting disrupts ambiance, signals potential equipment failure, and, in some cases, indicates dangerous wiring practices. Unlike the warm, rhythmic pulse of vintage incandescent strings (a design feature, not a flaw), modern flickering is often erratic, intermittent, or localized—clues pointing directly to specific causes. This article cuts through myth and marketing hype to deliver grounded, electrician-vetted explanations and actionable solutions. No assumptions. No jargon without definition. Just clear diagnostics and safe, effective repairs you can perform yourself—with guidance on when to call a licensed professional.
Why Flickering Happens: The Core Electrical Principles
Flickering occurs when the electrical current supplying your lights is interrupted, reduced, or inconsistently delivered. In AC (alternating current) systems—the standard for residential power in North America and much of the world—voltage naturally cycles 60 times per second (60 Hz). Well-designed light strings smooth this oscillation into steady illumination. When that smoothing fails, flickering appears. Three primary physical mechanisms drive most holiday-light instability:
- Voltage drop: Occurs when too many lights draw power over long extension cord runs or undersized wiring. Voltage diminishes with distance and load, causing dimming or strobing—especially noticeable at the far end of a string.
- Intermittent connection: A loose bulb, corroded socket, damaged wire strand, or poor plug contact creates a “make-or-break” circuit. Each time the connection wavers, the light blinks on and off.
- Overloaded circuit: Residential circuits are rated for maximum amperage (typically 15A or 20A). Exceeding that limit—by plugging multiple light strings, outdoor heaters, or power tools into the same outlet—triggers thermal protection in breakers or GFCI outlets, resulting in periodic shutdowns and restarts.
Importantly, LED lights behave differently than incandescents under stress. Their low-wattage efficiency makes them sensitive to minor voltage fluctuations that older bulbs would simply absorb. That’s why flickering has become *more* common—not less—as LED adoption grows.
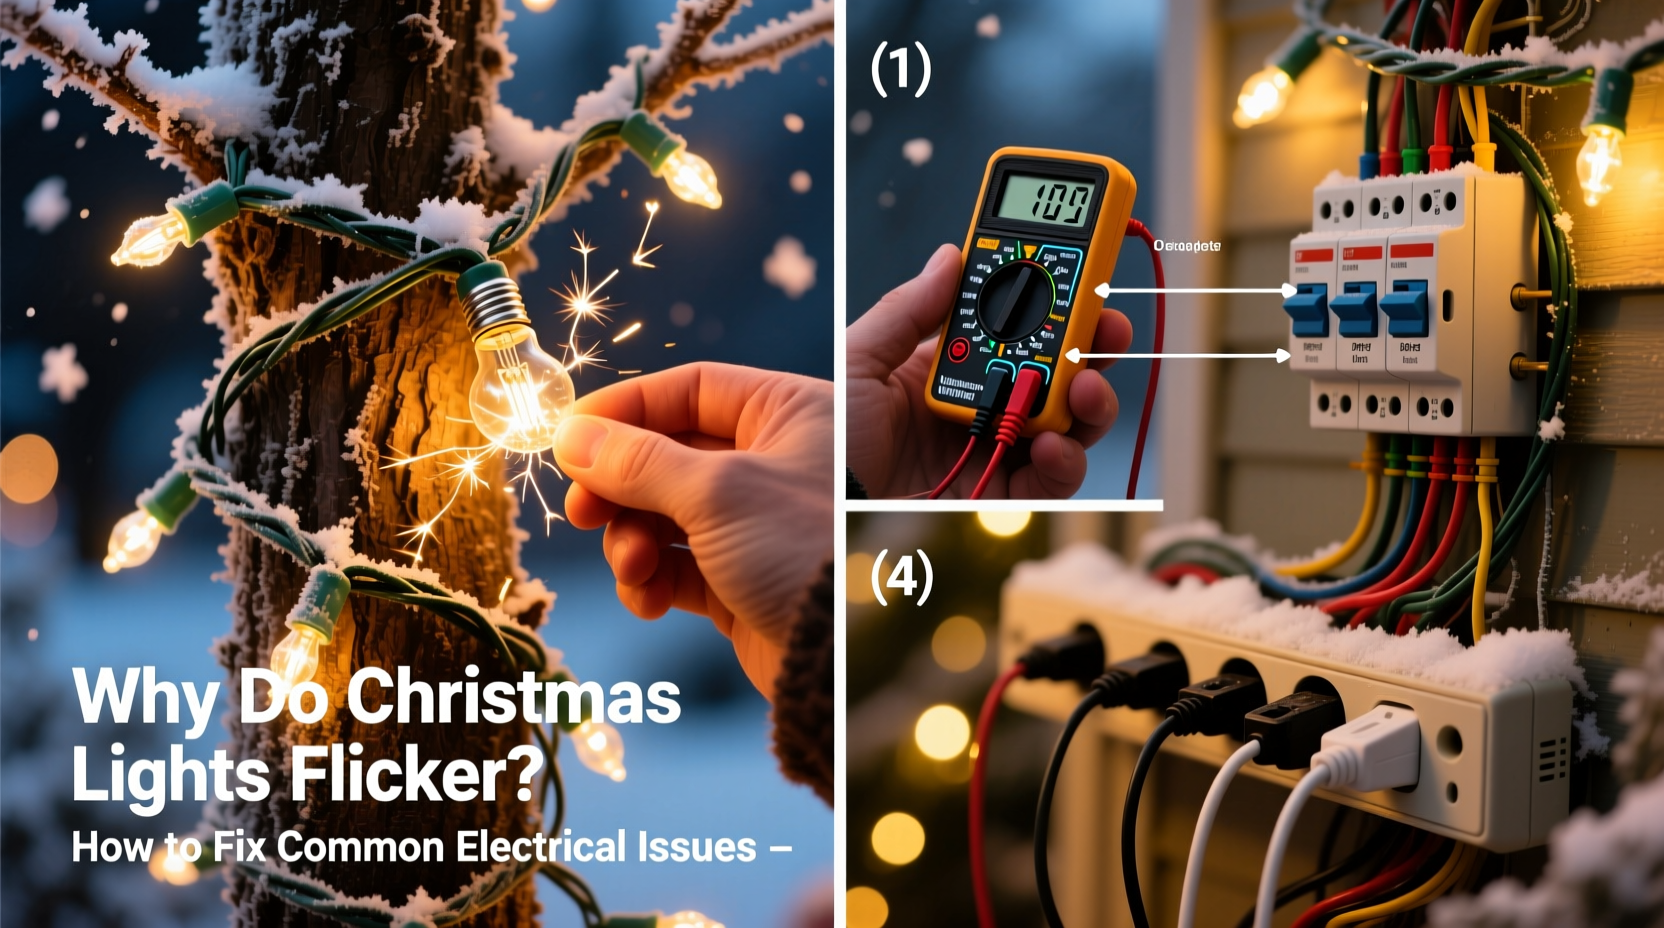
Step-by-Step Diagnostic & Repair Guide
Before replacing any component, follow this logical sequence. It isolates root cause efficiently and avoids unnecessary purchases or unsafe improvisations.
- Unplug everything. Safety first: disconnect all light strings and extension cords from outlets and each other.
- Inspect visually. Look for cracked sockets, exposed copper, melted plastic near plugs, or bent/missing bulb bases. Discard any string showing physical damage.
- Test one string at a time. Plug a single string directly into a known-good indoor outlet—no extension cords. Observe for 2–3 minutes. If it flickers alone, the issue is internal (bulb, fuse, or controller).
- Check the fuse. Most plug-in light strings contain two small, replaceable fuses inside the male plug housing. Use needle-nose pliers to gently remove the cover. Replace blown fuses only with identical amperage ratings (e.g., 3A or 5A—never higher).
- Swap bulbs methodically. For incandescent mini-lights, remove one bulb at a time and insert a known-working spare. If flickering stops after removing a specific bulb, that bulb’s shunt (a tiny internal bypass wire) has failed. Replace it.
- Verify extension cord specs. Use only outdoor-rated, 16-gauge (or thicker) cords for exterior use. Avoid daisy-chaining more than three standard 16-gauge cords—total length should stay under 25 feet for reliable voltage delivery.
- Measure circuit load. Add up wattage: LED strings typically draw 4–10W; incandescent mini-lights average 20–40W per 100-bulb string. A 15A circuit supports up to 1,800W (15A × 120V). Stay below 80% capacity (1,440W) for safety margin.
Do’s and Don’ts: Holiday Lighting Safety Checklist
| Action | Do | Don’t |
|---|---|---|
| Outdoor Wiring | Use only UL-listed, weather-resistant cords and outlets. Secure cords with insulated staples—not nails or screws. | Run indoor-rated cords outside, or staple cords directly to gutters or siding. |
| Bulb Replacement | Match bulb type (LED/incandescent), voltage (120V), and base (E12, E17, etc.). Use gloves to avoid skin oils on halogen bulbs. | Force-fit bulbs of different sizes or swap LED bulbs into incandescent-only controllers. |
| Circuit Management | Dedicate one outdoor GFCI outlet per 3–4 light strings. Use a power strip with built-in surge protection for indoor displays. | Plug multiple high-wattage strings into a single power strip or multi-outlet adapter. |
| Storage & Maintenance | Coil lights loosely around cardboard spools. Store in climate-controlled, dry space away from rodents. | Wrap tightly around metal hangers or store in damp garages where condensation corrodes contacts. |
| Troubleshooting | Use a non-contact voltage tester to confirm outlets are live before assuming lights are faulty. | Assume flickering is “normal” for LEDs—or ignore persistent blinking near outlets or switches. |
Real-World Case Study: The Overloaded Porch Circuit
Mark, a homeowner in Portland, OR, installed 12 strands of warm-white LED net lights (80W total), two inflatable yard figures (120W), and a heated birdbath (450W) on his front-porch circuit—all plugged into one GFCI outlet via three daisy-chained 16-gauge extension cords totaling 60 feet. Each evening at 5:30 p.m., the lights would flicker violently for 10 seconds, then go dark for 2 minutes before resetting. He assumed the lights were defective and replaced two strings—only to see the same pattern recur.
A licensed electrician diagnosed the issue in under five minutes: the combined 650W load wasn’t excessive, but the 60-foot cord run caused significant voltage drop (measured at 102V at the last string). Worse, the GFCI outlet’s internal thermal protection was tripping due to sustained low-voltage stress—a condition not triggered by standard breakers. The fix? Replacing the longest cord with a single 25-foot, 14-gauge outdoor-rated cord and moving the heated birdbath to a separate garage circuit. Total cost: $22 for cord + $0 labor. Lights now operate steadily from dusk to dawn.
“Flickering isn’t just about the lights—it’s about the entire path electricity travels. A 3-cent bulb shunt or a $15 extension cord can be the difference between festive cheer and a hazardous situation.” — Carlos Mendez, Master Electrician & NFPA 70E Certified Trainer
Common Causes & Targeted Fixes
Not all flickering stems from the same source. Match your symptom to the likely cause and solution:
- Flickering only at the end of a long string: Voltage drop. Shorten extension runs. Use heavier-gauge cords (14 AWG instead of 16 AWG) for distances over 25 feet. Or, feed power from both ends of very long runs (if the string supports parallel input).
- One section flickers while others glow steadily: Faulty bulb or socket in that segment. For incandescent mini-lights, walk the strand and check each bulb—look for blackened glass or loose bases. For LED strings with integrated controllers, isolate the segment and test with a multimeter if experienced; otherwise, replace the segment.
- Flickering coincides with appliances cycling on (fridge, furnace, sump pump): Shared circuit overload or poor grounding. Move lights to a dedicated circuit or install a whole-house surge protector with voltage regulation.
- Entire display blinks in unison every few minutes: GFCI or AFCI breaker nuisance tripping. Test the outlet’s GFCI button. If reset doesn’t hold, inspect for moisture intrusion in outdoor outlets or damaged cord insulation. Replace outdated GFCIs (units older than 10 years lose sensitivity).
- New LED string flickers immediately out of the box: Incompatible controller or dimmer switch. Many smart LED strings require constant-voltage drivers—not standard TRIAC dimmers. Check manufacturer specs. If using a wall dimmer, replace it with an ELV (electronic low-voltage) compatible model.
FAQ: Quick Answers to Pressing Questions
Can I mix LED and incandescent light strings on the same circuit?
Yes—but not on the same *string*. Never connect incandescent and LED strings end-to-end, as their voltage requirements and internal circuitry differ drastically. They can share a circuit if total wattage stays within safe limits, but avoid plugging them into the same power strip with shared controllers or timers.
Why do my lights flicker only when it’s windy or rainy?
Movement or moisture is exposing a compromised connection—often at an outdoor outlet cover, a poorly sealed cord connector, or a corroded socket. Wind vibrates loose wires; rain bridges gaps between conductors. Turn off power, inspect all outdoor connections for cracks or gaps, and seal openings with outdoor-rated silicone caulk or waterproof cord connectors.
Is flickering a fire hazard?
Intermittent flickering from a single loose bulb is low-risk. But persistent, rhythmic blinking—especially accompanied by buzzing, warmth at plugs, or burning smells—indicates arcing or overheating. Arcing can ignite nearby combustibles in seconds. Unplug immediately and discard the affected string or cord. Do not attempt repair unless certified.
Conclusion: Light Up Your Holidays—Safely and Reliably
Flickering Christmas lights aren’t a holiday inevitability—they’re a solvable puzzle rooted in physics, not fate. Understanding voltage, load, and connection integrity transforms troubleshooting from guesswork into precision work. You now know how to distinguish between a $2 fuse replacement and a $200 electrician visit. You understand why a 14-gauge cord matters more than a shiny new controller, and why checking your GFCI outlet takes 15 seconds but prevents hours of frustration. These aren’t just seasonal tips; they’re foundational electrical literacy skills that protect your home year-round. As you untangle, test, and restring this season, approach each flicker as data—not distraction. Replace what’s worn, simplify what’s overcomplicated, and never compromise on outdoor-rated components. Your peace of mind, your energy bill, and your family’s safety are worth the extra 10 minutes of careful setup.


 浙公网安备
33010002000092号
浙公网安备
33010002000092号 浙B2-20120091-4
Comments
No comments yet. Why don't you start the discussion?