
It’s a familiar holiday frustration: you’ve spent hours stringing lights across the roofline, wrapping the porch columns, and outlining the shrubs—only for everything to flicker and die the moment the first raindrop hits. You check the breaker, jiggle the plug, and find the outlet dead. No tripped GFCI. No blown fuse. Just silence—and damp disappointment. This isn’t random failure. It’s physics meeting poor weather resilience. Rain doesn’t “short” lights in the dramatic spark-and-smoke sense most assume. Instead, moisture infiltrates weak points—cracked insulation, unsealed connections, corroded sockets, or non-rated components—creating leakage paths that overwhelm safety devices or simply break continuity. The good news? Nearly all of these failures are preventable. With the right understanding of electrical ratings, strategic sealing, and proper installation habits, your display can shine brightly through wind, sleet, and steady downpours.
Why Rain Triggers Failure: The Real Electrical Culprits
Rain-induced light outages rarely stem from a single cause. They’re usually the result of cumulative vulnerabilities exploited by moisture. Three primary mechanisms dominate:
- Ground Fault Leakage: Water bridges small gaps between live conductors and grounded metal (e.g., gutters, brackets, or wet wood), allowing current to bleed away. Modern outdoor outlets use GFCIs (Ground Fault Circuit Interrupters) that detect imbalances as tiny as 4–6 milliamps—and cut power instantly. That’s why lights don’t spark or shock; they just vanish.
- Connection Corrosion & Oxidation: Even brief exposure to humidity accelerates oxidation on copper contacts inside sockets and plugs. Over time, this forms a resistive layer that increases heat and voltage drop. When rain adds conductivity, resistance spikes further—causing intermittent flickering or total dropout.
- Insulation Breakdown: Older or indoor-rated lights often use thin PVC jackets that become brittle in UV exposure. Micro-cracks form, letting water wick along wire strands. Once moisture reaches the internal conductor junctions, it creates parallel current paths—or worse, conducts enough current to trip the circuit’s overcurrent protection.
Crucially, many consumers mistakenly assume “outdoor-rated” means “rainproof.” In reality, UL 588 certification for seasonal lighting only guarantees basic environmental resistance—not submersion tolerance or long-term wet-location performance. As electrical engineer and holiday lighting consultant Rafael Torres explains:
“UL 588 ‘outdoor’ rating means the product passed a 15-minute water spray test at room temperature—not sustained rainfall during freezing conditions. If your lights fail in drizzle, the issue is almost certainly degraded connections or underspecified components—not the lights themselves.” — Rafael Torres, PE, Lighting Systems Specialist, HolidaySafe Labs
Weatherproofing Step-by-Step: A Practical Installation Protocol
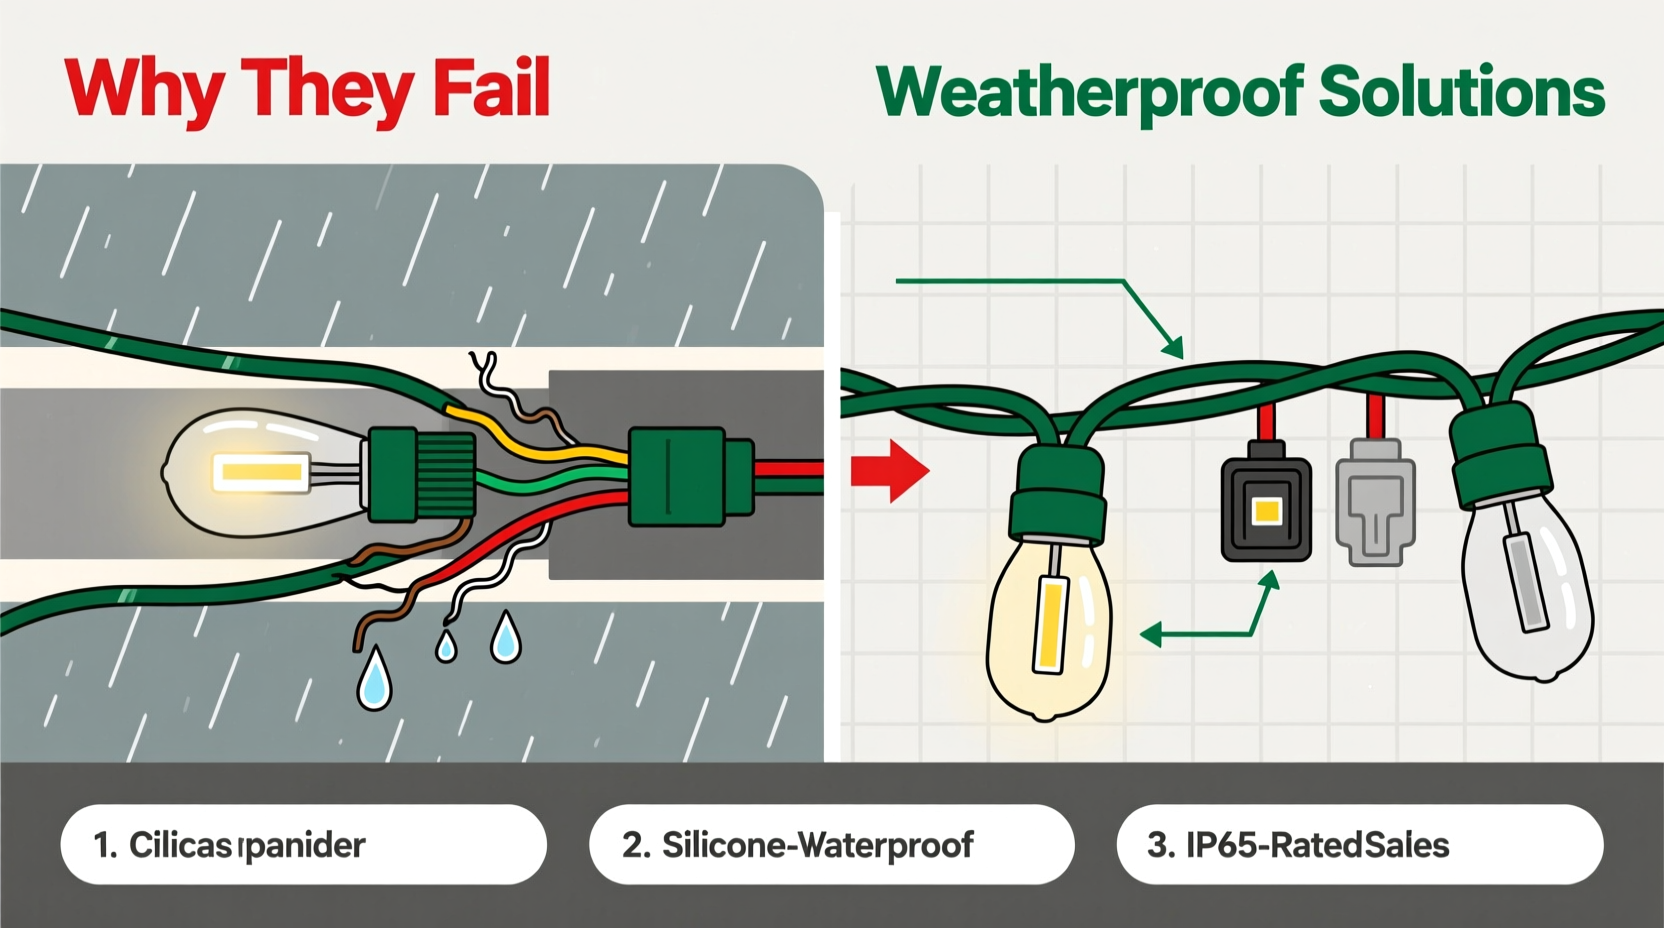
Effective weatherproofing isn’t about slathering silicone everywhere. It’s about controlling moisture at its points of entry using layered defense. Follow this field-tested sequence for any permanent or semi-permanent outdoor lighting setup:
- Evaluate & Replace Vulnerable Components: Discard any lights with cracked wire jackets, discolored sockets, or bent prongs. Check packaging for “UL Listed for Wet Locations” (not just “Outdoor Use”). If absent, replace them before proceeding.
- Seal All Plug & Receptacle Junctions: Use waterproof outlet covers rated for *in-use* conditions (look for “bubble cover” or “while-in-use” designation). Never rely on standard flip-cover boxes—they only protect when nothing is plugged in.
- Protect Daisy-Chained Connections: Where strings connect end-to-end, wrap each male/female coupling tightly with self-fusing silicone tape (not duct tape or electrical tape), then cover with a heavy-duty, UV-resistant wire nut cap designed for outdoor use.
- Manage Drip Loops Strategically: Before any plug enters an outlet or transformer, create a U-shaped loop hanging at least 6 inches below the entry point. Gravity pulls water down the loop—not into the connection.
- Terminate Wires with Waterproof Wire Nuts: For hardwired sections (e.g., connecting a transformer to a custom run), strip wires cleanly, twist tightly, and use gel-filled wire nuts (e.g., Ideal WeatherProof™ or 3M Scotchlok™). These contain silicone sealant that flows around conductors under pressure.
Do’s and Don’ts: Critical Weatherproofing Practices
Missteps compound risk faster than rain accumulates. This table distills decades of field service data from professional installers and utility inspectors:
| Practice | Do | Don’t |
|---|---|---|
| Outlet Protection | Use “in-use” bubble covers with gasketed flaps and IP66 rating | Install standard indoor-style receptacles—even if GFCI-protected |
| Connection Sealing | Apply self-fusing silicone tape *before* plugging in; stretch 50% while wrapping | Wrap connections after plugging in—tension will loosen the seal |
| Light String Selection | Choose sets with shunt-wire technology and copper-clad aluminum (CCA) or pure copper wire | Use older incandescent sets with brittle rubberized cords or unknown origin |
| Mounting Hardware | Use stainless steel or coated deck screws—not untreated nails or staples | Staple cords directly to wood or vinyl—compression cracks insulation |
| Transformer Placement | Mount transformers under eaves or in ventilated, shaded enclosures above grade | Leave transformers on the ground, in plastic bags, or against foundation walls |
Real-World Case Study: The Lakeview Condo Balcony Fix
At a high-rise condo complex in Portland, Oregon, residents consistently reported light failures every November—coinciding with the region’s persistent drizzle. Maintenance logs showed repeated GFCI trips on balcony circuits, but no faults were found during dry inspections. An electrician traced the issue to a seemingly minor detail: tenants used standard extension cords (rated for “dry locations only”) to reach outlets from rail-mounted light strings. Rain ran down the cord jacket, pooled at the plug base, and wicked into the receptacle’s internal gap. The solution wasn’t rewiring the building—it was education and hardware replacement.
The property manager distributed kits containing: (1) 50-ft 14/3 SJTW-rated extension cords (UL-listed for wet locations), (2) in-use outlet covers, (3) self-fusing silicone tape, and (4) drip-loop hangers. Within two weeks, GFCI trips dropped from 17 per week to zero. More importantly, resident surveys showed a 92% increase in display longevity—most sets lasted the full season without a single outage. The fix cost less than $12 per unit and required no licensed labor.
Proven Weatherproofing Tools & Materials You Actually Need
Not all “weatherproofing” products deliver real-world results. Focus investments on components tested in actual wet conditions—not marketing claims. Here’s what works—and why:
- Self-Fusing Silicone Tape (e.g., Rescue Tape®, Sugru): Fuses to itself without adhesive, remains flexible from -76°F to 500°F, and resists UV degradation for 10+ years. Unlike vinyl tape, it doesn’t leave sticky residue or constrict when cold.
- Gel-Filled Wire Nuts (e.g., Ideal 454TW, 3M 2200F): Contain non-hardening silicone gel that seals micro-gaps even as wires expand/contract with temperature swings. Standard wire nuts allow moisture migration along stranded conductors.
- UL 588 “Wet Location” Rated Lights: Look for the phrase “Suitable for Wet Locations” printed on the UL label—not just “For Outdoor Use.” These undergo extended immersion testing and use thicker, cross-linked polyethylene (XLPE) insulation.
- Dielectric Grease (e.g., NO-OX-ID A-Special): Applied sparingly to plug blades and socket contacts before insertion, it repels moisture and inhibits oxidation without affecting conductivity. Never use petroleum jelly—it attracts dust and breaks down under UV exposure.
FAQ: Quick Answers to Persistent Rain-Related Questions
Can I use indoor lights outside if I cover the plugs?
No. Indoor lights lack UV-stabilized insulation and corrosion-resistant contacts. Covering plugs only addresses one failure point—while ignoring embrittled wire jackets, non-sealed sockets, and inadequate spacing between conductors. UL explicitly prohibits this practice, and insurers may void coverage for fire-related claims.
Why do LED lights sometimes stay on longer in rain than incandescents—but still fail?
LED strings use lower voltage and current, so leakage paths take longer to trigger GFCIs. However, their driver circuits are more sensitive to voltage fluctuations caused by moisture-induced resistance changes. Many cheaper LED sets also omit shunt wires, so one failed bulb opens the entire circuit—especially when condensation alters contact resistance.
Is there a safe way to bury extension cords for ground-level displays?
Only with direct-burial rated cable (e.g., UF-B type), installed at minimum 12-inch depth, and protected by rigid conduit where exposed. Never use standard extension cords underground—they lack moisture-blocking sheaths and will degrade within weeks. For temporary setups, use above-ground cord protectors with integrated drip channels instead.
Conclusion: Light Up Without Letting the Weather Dim Your Spirit
Rain shouldn’t mean resignation to dark eaves and disappointed kids. Understanding *why* moisture disrupts your display transforms troubleshooting from guesswork into targeted action. It shifts focus from chasing symptoms—like resetting GFCIs—to eliminating root causes: compromised insulation, unsealed junctions, and misapplied ratings. Weatherproofing isn’t about perfection—it’s about intelligent layering. One drip loop. One properly rated outlet cover. One application of dielectric grease. These aren’t luxuries; they’re the baseline for reliable outdoor lighting in any climate. Start this season with intention: inspect every cord, verify every rating, seal every connection. Your future self—standing on a rainy December evening, watching lights glow steadily against the gray—will thank you. And when neighbors ask how you kept yours shining, you’ll know exactly what to tell them.


 浙公网安备
33010002000092号
浙公网安备
33010002000092号 浙B2-20120091-4
Comments
No comments yet. Why don't you start the discussion?