
Candles create ambiance, comfort, and warmth—whether used for relaxation, decoration, or fragrance. But nothing disrupts the experience like a candle that flickers erratically, tunnels down one side, or extinguishes prematurely. Uneven flickering and poor burn performance aren’t just annoyances; they can signal deeper issues in candle design, placement, or usage. Understanding the science behind flame behavior and wick dynamics is key to enjoying a clean, consistent burn every time.
While many assume all candles behave the same, factors such as wax type, wick size, container shape, and environmental conditions play critical roles in how evenly a candle burns. By identifying the root causes of flickering and inefficient melting, you can make informed choices about which candles to buy—and how to use them properly.
Understanding Candle Flame Behavior
A healthy candle flame should be steady, teardrop-shaped, and emit a soft yellow glow without excessive smoke or sputtering. When a flame flickers unevenly, it’s often struggling to maintain equilibrium between fuel (melted wax), oxygen, and heat. This balance is delicate and easily disrupted.
The process begins when the wick draws liquid wax upward via capillary action. The heat of the flame vaporizes this wax, which then combusts with oxygen in the air. If any part of this system falters—too much wax, too little oxygen, an obstructed wick—the flame becomes unstable.
Common signs of imbalance include:
- Flickering or dancing flames: Often caused by drafts or inconsistent fuel supply.
- Smoking or soot: Indicates incomplete combustion due to wick length or poor wax quality.
- Tunneling: Wax melts only around the wick, leaving hard walls on the sides.
- Extinguishing shortly after lighting: May result from a drowned wick or cold wax pool.
“Flame stability depends on three things: proper wick-to-wax ratio, adequate airflow, and consistent melt pool formation.” — Dr. Alan Pierce, Combustion Scientist and Home Fragrance Consultant
Common Causes of Uneven Flickering and Poor Burn Performance
Not all flickering is problematic—minor fluctuations are normal. However, persistent or violent flickering indicates underlying issues. Below are the most frequent culprits:
1. Drafts and Air Currents
Even a slight breeze from a fan, HVAC vent, or open window can destabilize a flame. Moving air cools the wax pool and disrupts the thermal plume above the wick, leading to erratic flickering and increased soot.
2. Incorrect Wick Size or Type
A wick that's too large produces a flame that overheats the wax, causing rapid consumption and carbon buildup. One that's too small struggles to sustain a stable flame, especially as the wax pool deepens. Natural wicks like cotton or wood must match the candle’s diameter and wax density.
3. Poor Initial Burn (First Lighting)
The first burn sets the tone. If extinguished too early, the candle forms a “memory ring”—a shallow melt pool that leads to tunneling. Subsequent burns won’t reach the edges, wasting wax and reducing scent throw.
4. Low-Quality Wax or Additives
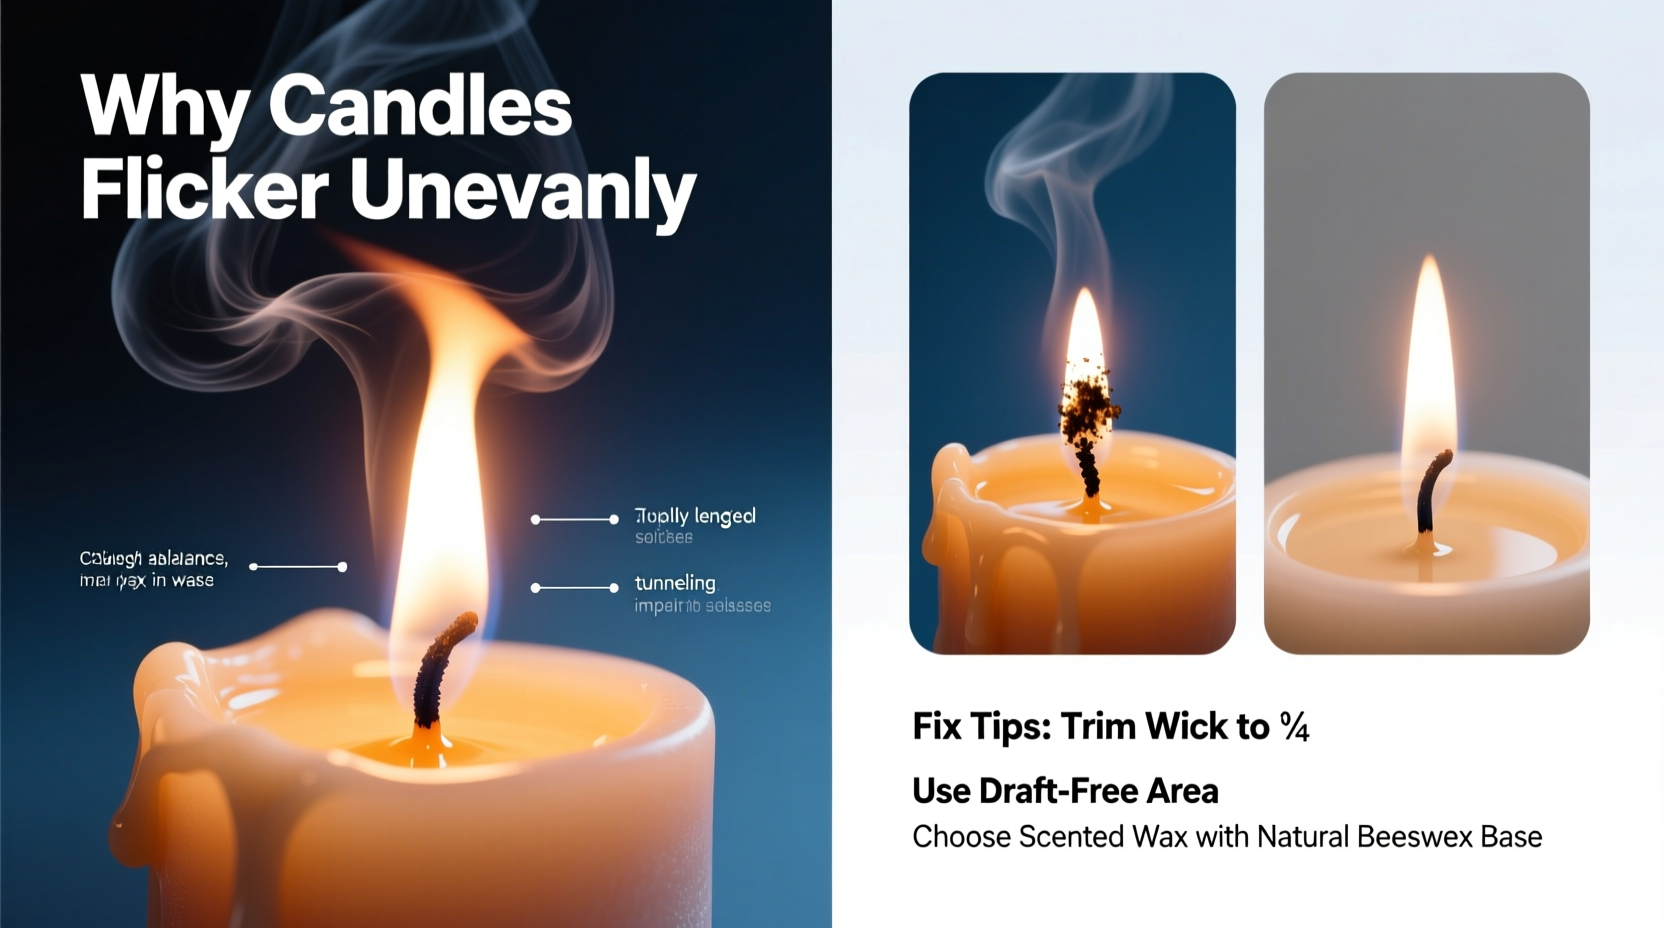
Paraffin, soy, beeswax, and coconut blends each have different melting points and viscosity. Cheap candles may use low-grade wax or fillers that don’t melt evenly. Synthetic fragrances or dyes can clog the wick or alter combustion efficiency.
5. Container Shape and Material
Narrow containers restrict airflow; wide ones may require multiple wicks. Thick glass retains heat and can cause overheating, while thin glass may crack from thermal stress. Asymmetric shapes lead to uneven melting.
How to Fix and Prevent Poor Candle Performance
Many burn issues can be corrected with simple adjustments. Here’s a step-by-step guide to restoring optimal performance—or avoiding problems altogether.
Step 1: Trim the Wick Before Every Use
An untrimmed wick develops a carbon “mushroom” at the tip, which increases flame size and soot. Trim to ¼ inch (6 mm) using wick trimmers or nail clippers. Do this when the candle is cool and fully hardened.
Step 2: Eliminate Drafts
Relocate candles away from windows, vents, doorways, and ceiling fans. Consider using candle shades or hurricane jars to protect the flame—just ensure there’s enough space for airflow.
Step 3: Allow Full Melt Pool Formation
On the first burn, let the candle remain lit until the entire top layer has liquefied across the surface. For a 3-inch diameter candle, this typically takes 3–4 hours. Never exceed 4 hours at a time to avoid overheating.
Step 4: Rotate Candles (If Applicable)
If you notice one side burning faster, gently rotate the candle a quarter turn every 30 minutes during burning. This compensates for uneven room temperature or light exposure.
Step 5: Re-center the Wick if It Drifts
As wax melts, the wick can drift toward the edge. Use a non-flammable tool (like a metal skewer) to gently nudge it back to center while the wax is still semi-liquid.
Step 6: Avoid Overheating the Container
Extended burns can overheat glass, increasing fire risk and causing cracking. Limit burn sessions to 3–4 hours, and allow the candle to cool completely before relighting.
“The ideal burn cycle includes a trimmed wick, draft-free zone, and sufficient time to form a complete melt pool. Skip any of these, and performance suffers.” — Lila Chen, Artisan Candle Maker and Educator
Do’s and Don’ts of Candle Care
| Do | Don't |
|---|---|
| Trim the wick to ¼ inch before each burn | Leave wicks long or frayed |
| Burn long enough to achieve full melt pool | Blow out candles too soon (before edges melt) |
| Place candles on level, heat-resistant surfaces | Set them near drafts or flammable materials |
| Use a wick dipper to extinguish flames gently | Blow out candles aggressively (spreads soot) |
| Store unused candles in cool, dark places | Leave them in direct sunlight or humid areas |
Real-World Example: Solving Tunneling in a Soy Candle
Sarah purchased a popular soy-blend candle in a wide mason jar. After three short burns (about 1 hour each), she noticed the flame was sinking into a narrow tunnel while thick wax walls remained untouched. Concerned about wasted wax and weak scent, she researched solutions.
Following expert advice, Sarah performed a “recovery burn”: She placed the candle in a preheated oven at 170°F (77°C) for 10 minutes to soften the outer wax. Then, she lit the candle and allowed it to burn for 4 hours under draft-free conditions. She rotated it twice and trimmed the wick midway.
The result? A full melt pool formed, reaching the container’s edges. On subsequent burns, the candle performed flawlessly, with even melting and strong fragrance diffusion. Sarah now follows a strict 3-hour minimum burn rule for all her candles.
Checklist: Achieve a Perfect Candle Burn
Follow this checklist every time you light a candle:
- ✅ Ensure the candle is on a flat, stable surface
- ✅ Trim the wick to ¼ inch
- ✅ Remove any debris (matchsticks, charred wick bits)
- ✅ Check for drafts—close windows or move location if needed
- ✅ Set a timer based on diameter: 1 hour per inch
- ✅ Monitor the first burn until full melt pool forms
- ✅ Gently re-center the wick if it drifts
- ✅ Extinguish safely using a snuffer or dipper
- ✅ Wait at least 2 hours before relighting
- ✅ Store in a cool, dry place between uses
Frequently Asked Questions
Why does my candle flicker even when there’s no wind?
Flickering without drafts can stem from an overly long wick, moisture in the wax, or fragrance oils interfering with combustion. Trimming the wick and ensuring the candle hasn’t absorbed humidity (especially soy wax) often resolves this.
Can I fix a tunneled candle?
Yes. Use aluminum foil to wrap the top edge, leaving the center open. This reflects heat inward, helping the sides melt. Alternatively, carefully use a blow dryer on low heat to soften outer wax before relighting. Perform a long, monitored burn afterward.
Are certain waxes better for even burning?
Beeswax and high-quality soy-coconut blends tend to burn more cleanly and evenly than paraffin, which can produce more soot. However, formulation matters more than wax type—well-made paraffin candles can outperform poorly made natural ones.
Final Thoughts: Elevate Your Candle Experience
Candles should enhance your space, not frustrate you. Uneven flickering and poor burn performance are rarely random—they’re symptoms of correctable habits or product limitations. By understanding the principles of combustion, respecting burn times, and maintaining your candles with care, you unlock their full potential: steady light, rich fragrance, and lasting value.
Whether you're a casual user or a dedicated collector, applying these strategies transforms candle lighting from a hit-or-miss ritual into a reliable, enjoyable practice. Small actions—like trimming the wick or avoiding drafts—compound into dramatically better results.


 浙公网安备
33010002000092号
浙公网安备
33010002000092号 浙B2-20120091-4
Comments
No comments yet. Why don't you start the discussion?