
Every holiday season, thousands of households encounter the same quiet disappointment: a strand of Christmas lights that won’t illuminate—even though the outlet works and the bulb sockets look intact. More often than not, the culprit isn’t a burnt-out bulb or faulty plug—it’s a blown fuse tucked inside the male end of the light cord. While modern LED strings increasingly omit fuses in favor of built-in circuit protection, many traditional incandescent mini-light sets (especially those rated for indoor/outdoor use and manufactured before 2020) rely on replaceable glass tube fuses as their first line of defense against electrical overload. Understanding why these fuses exist—and how to identify, test, and replace them correctly—isn’t just about restoring twinkle to your tree. It’s about preventing fire hazards, extending strand life, and avoiding unnecessary replacements.
The Engineering Logic Behind Fuses in Christmas Lights
Christmas light strands—particularly older incandescent models—are wired in series-parallel configurations. A typical 100-light set may group 50 bulbs into two parallel circuits, each containing 50 bulbs wired in series. This design allows most of the strand to stay lit even if one bulb fails—but it also means voltage and current flow must remain tightly regulated. When too many strands are daisy-chained together (beyond the manufacturer’s specified limit), when a short occurs due to damaged insulation or moisture intrusion, or when a faulty socket creates an unintended path to ground, current can surge beyond safe thresholds.
A fuse is a deliberate weak point—a thin strip of metal alloy calibrated to melt at a precise amperage (commonly 3A or 5A for standard mini-lights). When current exceeds that rating, the fuse “blows,” interrupting the circuit instantly. Unlike a circuit breaker—which resets—the fuse sacrifices itself to protect the wiring, transformer (if present), and surrounding materials from overheating. This is not redundancy; it’s intentional, passive safety engineering rooted in decades of UL (Underwriters Laboratories) standards for seasonal decorative lighting.
“Fuses in light cords aren’t a cost-cutting measure—they’re a critical fail-safe. Removing or bypassing them voids UL certification and increases fire risk by up to 7x in over-daisy-chained scenarios.” — Dr. Lena Torres, Electrical Safety Engineer, UL Solutions
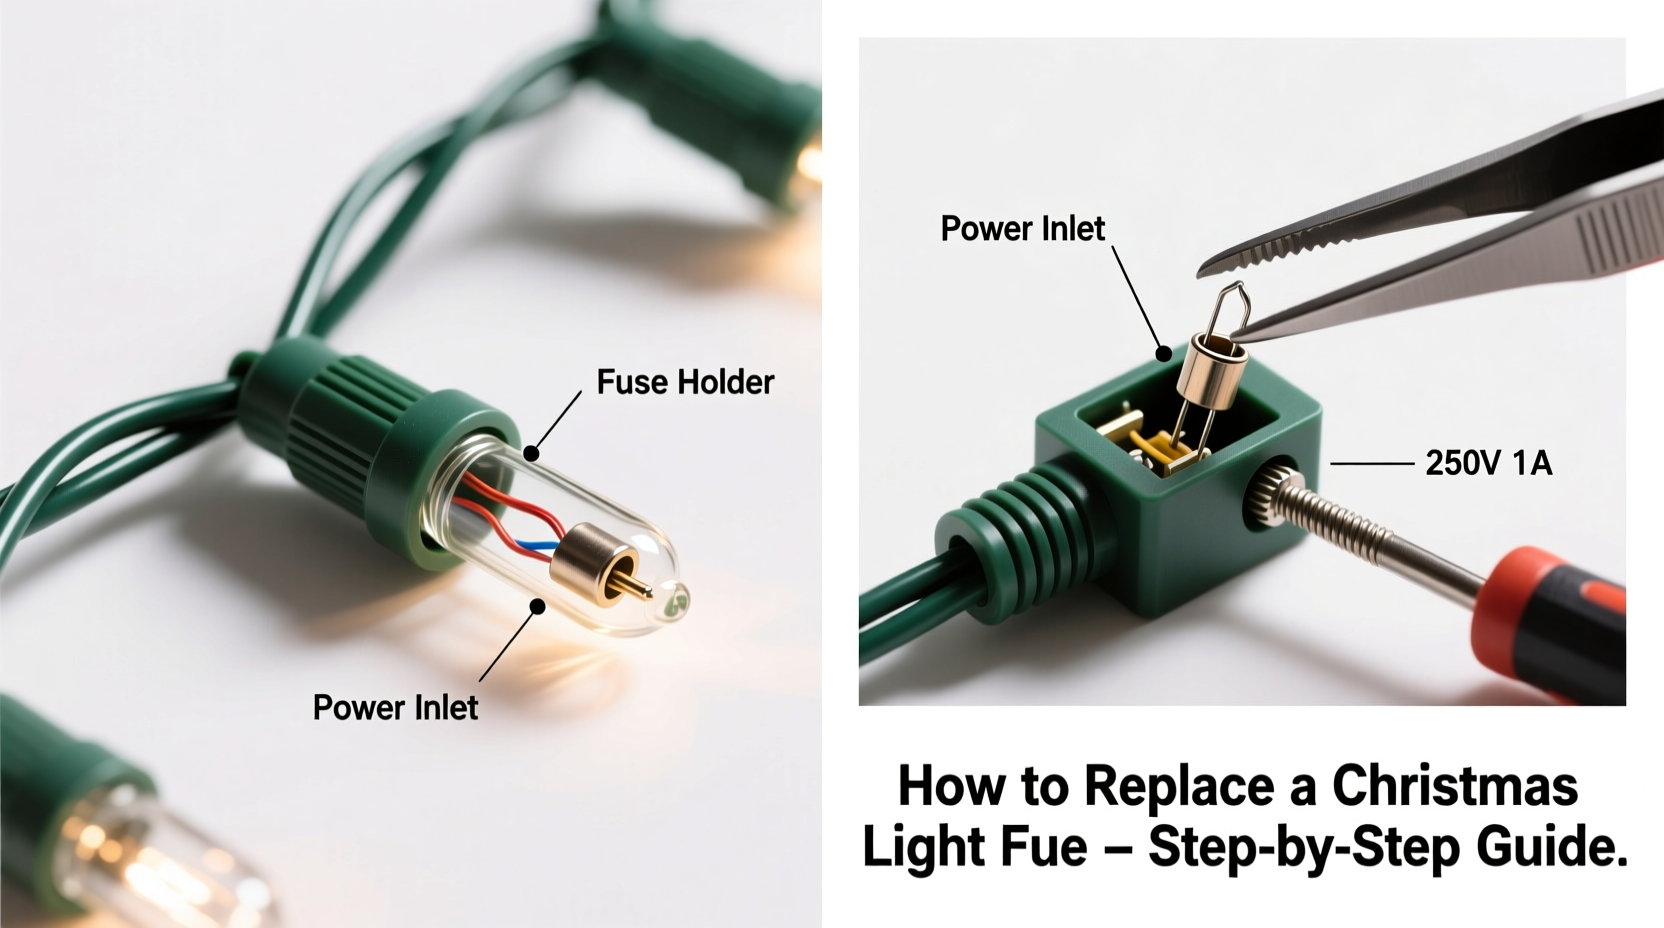
How to Identify Whether Your Lights Have a Fuse (and Where to Find It)
Not all light strands include user-replaceable fuses. Here’s how to tell:
- Check the plug housing: Look closely at the male (pronged) end. If it has a small rectangular or oval sliding door—often translucent white or gray—on the side or bottom, your set almost certainly contains fuses.
- Examine the label: The UL listing tag (usually near the plug or on the cord) may state “Contains replaceable fuses” or list a fuse rating (e.g., “3A 125V”).
- Compare generations: Pre-2010 incandescent mini-lights almost always use fuses. Post-2015 LED sets rarely do—instead relying on thermal cutoffs or integrated IC protection chips.
- Look for twin fuse holders: Most fused plugs contain two identical glass tube fuses—one active, one spare—mounted side-by-side in a plastic holder.
Step-by-Step Guide: Safely Replacing a Blown Fuse
Replacing a fuse takes under 90 seconds—but skipping a single step risks shock, fire, or repeated failure. Follow this verified sequence:
- Unplug the strand completely—not just from the wall, but from any extension cords or power strips connected upstream or downstream.
- Let the plug cool for 2–3 minutes. Overheated components indicate underlying issues (e.g., overloaded circuit or damaged wiring).
- Slide open the fuse door using a fingernail or plastic spudger. Avoid metal tools—they can short adjacent contacts.
- Remove both fuses gently by pulling straight out. Do not twist or force them.
- Inspect visually: A blown fuse shows a broken filament or darkened, cloudy glass. A good fuse has a clear, unbroken silver wire inside.
- Test continuity using a multimeter set to continuity or ohms mode. Touch probes to each metal end. A working fuse reads near 0Ω; a blown one reads “OL” (open loop).
- Insert the replacement fuse firmly until it seats fully in both clips. Use only the exact amperage and voltage rating printed on the original (e.g., 3A 125V). Never substitute with higher-rated fuses.
- Close the fuse door securely—a loose door can cause arcing or intermittent contact.
- Plug in and test—first alone, then only after confirming full operation should you reconnect to other strands.
Fuse Replacement Do’s and Don’ts
| Action | Do | Don’t |
|---|---|---|
| Fuse Rating | Match the original amperage and voltage exactly (e.g., 3A 125V) | Use a 5A fuse “just in case” or a car fuse (12V only) |
| Source | Purchase UL-listed replacements from hardware stores or the manufacturer’s website | Buy generic “Christmas light fuses” from unverified online sellers without UL marks |
| Handling | Hold fuses by the ceramic or glass ends—not the metal caps—to avoid skin oils corroding contacts | Touch metal ends with sweaty fingers or drop them on concrete (can crack glass or deform caps) |
| Troubleshooting | If the new fuse blows immediately, unplug and inspect for pinched wires, melted sockets, or water damage | Keep replacing fuses without diagnosing root cause—this risks overheating and fire |
| Storage | Keep spare fuses in their original packaging in a dry, labeled container | Loose fuses in a drawer where they can roll away or get mixed with other electronics parts |
Real-World Case Study: The Overloaded Porch Display
In December 2022, Sarah K. in Portland, Oregon, purchased three 100-light incandescent mini-light strands to outline her front porch. She daisy-chained all three into a single outdoor-rated extension cord rated for 15A. Within 45 minutes, the entire display went dark. After checking outlets and resetting her GFCI, she opened the first strand’s fuse door—and found both fuses blown. She replaced them with identical 3A fuses, only for them to blow again within 90 seconds.
Instead of repeating the cycle, Sarah unplugged everything and measured total load: Each strand drew 0.33A at 120V (39.6W), so three strands totaled 0.99A—well below the 15A cord rating. But she discovered the fourth strand—hidden behind a planter—had been accidentally included in the chain. That fourth strand had cracked insulation near the third socket, causing a partial short. When current surged during initial power-up, the fuse blew instantly—not from overload, but from fault current.
Sarah cut out the damaged 18-inch section, spliced in a new connector (using heat-shrink tubing and a UL-listed inline splice kit), and reinstalled proper spacing between strands. With the short eliminated, the original 3A fuses held steadily for the rest of the season. Her takeaway? “The fuse didn’t fail me—it told me exactly where to look. I just had to listen.”
FAQ: Common Fuse Questions Answered
Can I use aluminum foil or a paperclip to “fix” a blown fuse?
No—never. This is extremely dangerous. Foil or wire bypasses all overcurrent protection, allowing unchecked current to flow through undersized lamp wiring. Temperatures can exceed 200°C (392°F), melting insulation and igniting nearby combustibles. UL explicitly prohibits fuse bypassing in its Standard 588 for seasonal lighting.
Why do some strands have two fuses instead of one?
Dual-fuse design provides redundancy for polarity-sensitive circuits and helps balance load across hot and neutral lines in AC systems. More importantly, it ensures a spare is always on hand—reducing the chance of users improvising unsafe solutions when the first fuse blows.
My LED lights don’t have a fuse door—does that mean they’re unsafe?
No. Modern LED strands use different protection strategies: polymeric positive temperature coefficient (PPTC) resettable fuses, thermal cutoffs embedded in the rectifier board, or constant-current driver ICs that shut down during overvoltage events. These are not user-serviceable—but they meet or exceed UL 588 safety requirements. If your LED strand fails entirely, it’s usually a driver or controller issue—not a fuse problem.
When Replacement Isn’t Enough: Recognizing Deeper Problems
A fuse that blows repeatedly—even with correct replacements—is a red flag demanding deeper investigation. Common root causes include:
- Over-daisy-chaining: Exceeding the manufacturer’s maximum number of connectable strands (e.g., linking 5 sets when only 3 are approved).
- Mechanical damage: Crushed or kinked sections where internal wires rub and abrade insulation.
- Moisture intrusion: Water entering sockets or the plug housing, especially in outdoor displays exposed to rain or snowmelt.
- Voltage spikes: Lightning-induced surges or grid fluctuations—mitigated by using a UL 1449-rated surge protector, not a basic power strip.
- Aging components: Corroded sockets, brittle wire jackets, or degraded solder joints common in strands over 5 years old.
Proactive Maintenance: Extending Strand Life Beyond Fuse Care
Fuses are reactive—not preventive. To maximize longevity and minimize fuse failures:
- Inspect annually: Before storage, run hands along the entire cord feeling for bulges, cracks, or stiffness. Discard any strand with compromised jacketing.
- Store coiled—not knotted: Use a flat cardboard reel or commercial light winder to prevent wire memory and socket stress.
- Label everything: Note purchase year, max daisy-chain count, and fuse rating on tape affixed to the plug.
- Test before decorating: Plug each strand individually into a known-good outlet for 5 minutes. Monitor for flickering, warmth at the plug, or humming.
- Use timers and smart plugs: Limit daily runtime to 6–8 hours—reducing thermal cycling stress on filaments and solder joints.
Conclusion: Respect the Fuse—It’s There to Protect You
A Christmas light fuse is not a nuisance—it’s a silent guardian calibrated to milliseconds and milliamps. It represents decades of fire-safety research, real-world incident analysis, and rigorous testing. When you replace a fuse correctly, you’re not just restoring light—you’re honoring an engineering safeguard designed to protect your home, your family, and your peace of mind. That tiny glass tube carries more responsibility than most household components. Treat it with the respect it deserves: verify ratings, test before installing, investigate repeat failures, and never compromise on safety for convenience. This holiday season, let every strand you hang be backed by intention—not just illumination.


 浙公网安备
33010002000092号
浙公网安备
33010002000092号 浙B2-20120091-4
Comments
No comments yet. Why don't you start the discussion?