
LED light strands are a staple of holiday décor, patio ambiance, and event lighting. But nothing disrupts the mood faster than turning on your favorite string only to find that one half blinks rhythmically while the other remains stubbornly solid. This inconsistency isn’t just annoying—it can signal underlying electrical or design issues that, if left unaddressed, may shorten the lifespan of your lights or create safety hazards. Understanding why this happens—and how to fix it—can save time, money, and frustration.
The split behavior in a single strand typically stems from how the bulbs are wired, power distribution inconsistencies, or component failure. Modern LED strings often use advanced circuitry like shunt wires, parallel configurations, or built-in controllers that allow sections to operate independently. While these designs improve functionality, they also introduce complexity that can lead to uneven performance.
Understanding LED Strand Wiring Configurations
To diagnose the blinking/solid issue, you must first understand how most decorative LED strands are wired. There are three primary configurations: series, parallel, and combination (series-parallel).
- Series wiring: Bulbs are connected end-to-end in a single path. If one bulb fails, the entire strand goes out—or sections may behave unpredictably.
- Parallel wiring: Each bulb has its own connection to the power source. Failure in one bulb doesn’t affect others, but voltage drops can still cause dimming or erratic behavior.
- Combination wiring: Most modern strands use this hybrid approach. Sections of bulbs are wired in series, then those sections are connected in parallel. This allows partial operation when one section fails.
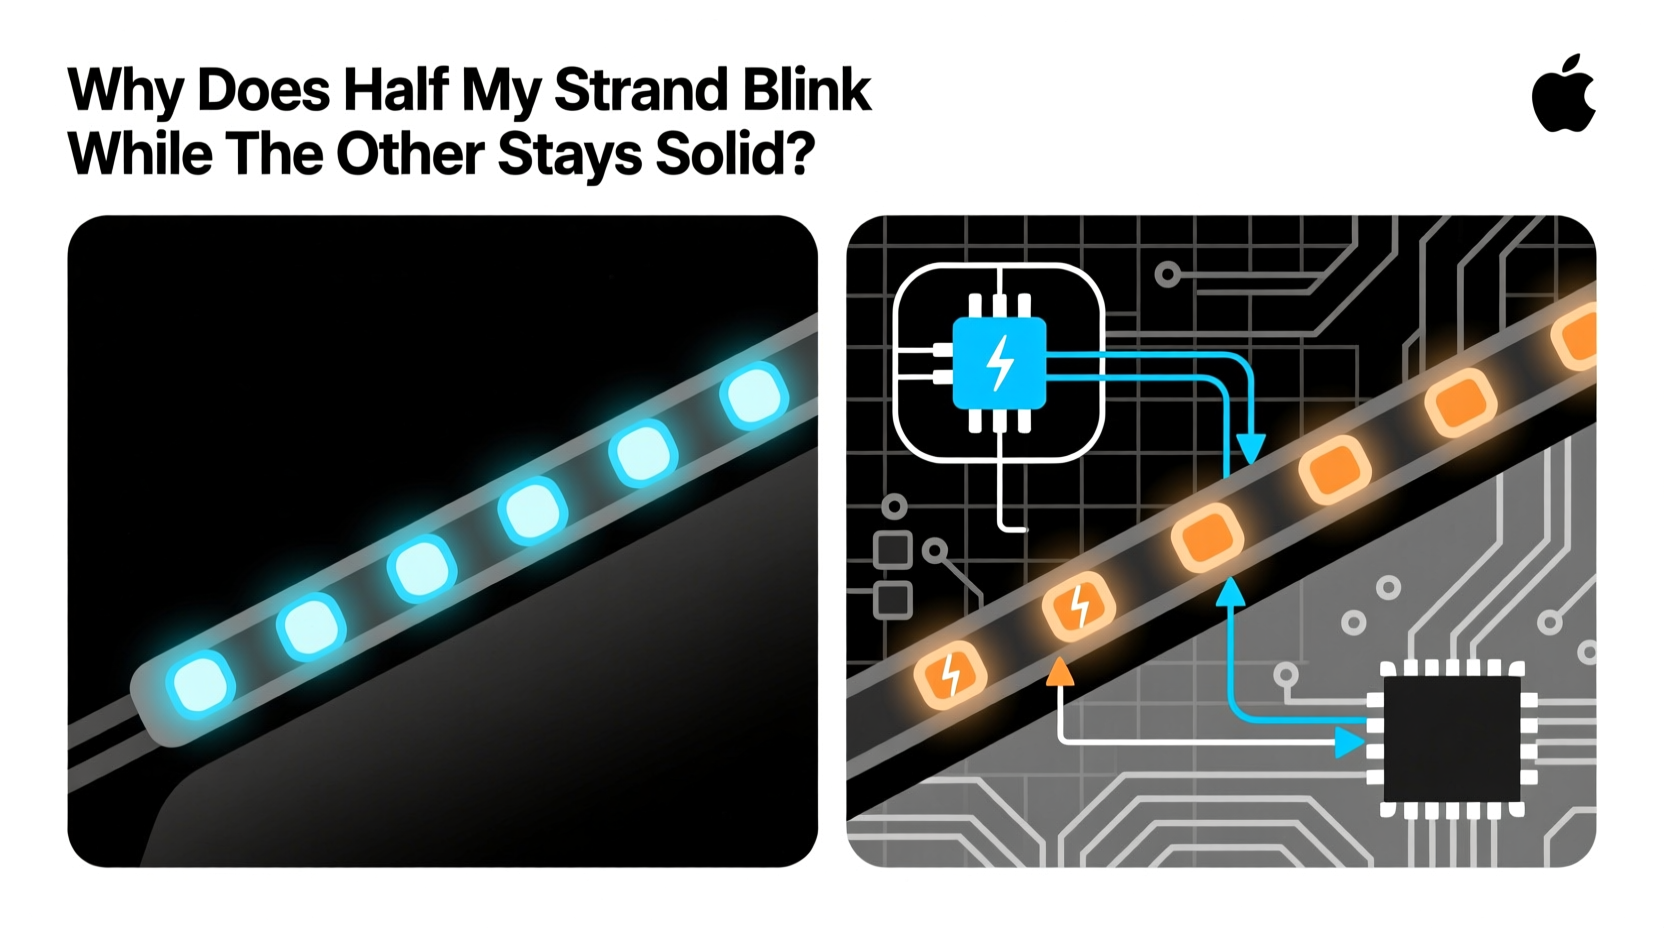
In many cases, the “half blinking, half solid” phenomenon occurs because the strand is divided into two independently controlled circuits. One side might be routed through a built-in flasher module or affected by a failing bulb that interrupts current flow only in that segment.
“Modern LED strings are engineered for energy efficiency, not uniformity. A single faulty bulb or weak solder joint can throw off an entire section.” — Raj Patel, Electrical Technician & Lighting Systems Specialist
Common Causes of Split Behavior in LED Strands
Several factors can cause one half of your strand to blink while the other remains lit. Identifying the root cause is essential before attempting repairs.
Faulty or Missing Bulb
A single loose, burnt-out, or improperly seated LED can break the circuit in a series-wired section. Many strands use shunt wires that bypass dead bulbs, but not all do. When a bulb fails without a working shunt, the current stops flowing beyond that point, leaving part of the strand dark or behaving abnormally.
Damaged Shunt Wires
Shunts are tiny conductive pathways inside each bulb base designed to maintain continuity when a filament fails. Over time, heat cycles and poor manufacturing can degrade these shunts. A failed shunt isolates the downstream bulbs, potentially causing one half to go dark or blink irregularly.
Controller or Flasher Module Malfunction
If your strand has multiple lighting modes (e.g., twinkle, fade, steady), it contains an internal controller. These modules sometimes fail partially, affecting only one circuit. You might see one half responding to the blink command while the other stays constant due to a shorted relay or corrupted timing chip.
Voltage Drop Across Long Runs
Even with low power draw, long strands (over 50 feet) can experience noticeable voltage drop, especially if daisy-chained. The far end receives less voltage, which may prevent blinkers from activating properly while the near-half operates normally.
Water Damage or Corrosion
Outdoor strands exposed to moisture may develop corrosion in sockets or connectors. Oxidation increases resistance, disrupting current flow and leading to inconsistent lighting patterns. This is common in seasonal decorations stored improperly between uses.
Mismatched Bulb Types or Replacements
Replacing a bulb with a non-matching type—such as swapping a steady LED for a blinking one—can create visual discrepancies. Some blinking LEDs have internal oscillators; installing one in a steady circuit will make only that bulb (or section) flicker.
Step-by-Step Fix Guide
Follow this systematic troubleshooting process to restore uniform lighting across your strand.
- Unplug the strand immediately. Safety first—never work on live electrical components.
- Inspect for visible damage. Look for cracked sockets, frayed wires, discolored connectors, or moisture inside the plug.
- Check each bulb. Remove and examine every LED, especially in the non-blinking section. Ensure they’re fully seated and show no dark spots or cracks.
- Test suspect bulbs. Use a multimeter to check continuity or swap them into a known-working strand.
- Verify bulb type consistency. Confirm all bulbs are the same model and function (steady vs. blinking). Replace any mismatched units.
- Examine the controller box (if present). Look for burn marks or swelling. Try switching modes to see if behavior changes consistently.
- Test voltage at both ends. Using a multimeter, measure AC voltage at the plug and again at the far end. A drop exceeding 10% indicates undersized wiring or overload.
- Clean socket contacts. Use a cotton swab dipped in isopropyl alcohol to remove corrosion from metal contacts.
- Replace the fuse (if applicable). Some plugs contain replaceable fuses. Check with a continuity tester and swap in an identical rating.
- Isolate and test sections. If possible, cut and separate the strand to identify where the fault begins.
Troubleshooting Checklist
Use this checklist to ensure no step is missed during diagnosis:
| Action | Status | Notes |
|---|---|---|
| Unplugged strand | ☐ Done | |
| Visual inspection complete | ☐ Done | Note damaged areas |
| All bulbs checked and seated | ☐ Done | Replace missing/burnt ones |
| Bulb types verified | ☐ Done | No blinking bulbs in steady section |
| Controller tested across modes | ☐ Done | Observe pattern changes |
| Voltage tested at start and end | ☐ Done | Compare readings |
| Connectors cleaned | ☐ Done | Alcohol wipe recommended |
| Fuse replaced (if needed) | ☐ Done | Match exact amperage |
| Reassembled and retested | ☐ Done | Confirm uniform operation |
Real-World Example: Fixing a Holiday Light String
Mark, a homeowner in Ohio, noticed that his 70-light C7 LED strand blinked on the left half but stayed solid on the right after being stored in a damp garage over summer. He followed basic checks—no visible breaks, all bulbs appeared intact—but the issue persisted.
After unplugging the lights, he removed each bulb from the solid half and tested them in a working set. All lit normally. Then he inspected the wire path and discovered that the strand used a split-circuit design: the first 35 bulbs were wired in series to a flasher chip, and the second 35 ran directly to power.
Using a multimeter, he found continuity up to the 35th socket but no signal beyond a small junction box hidden under insulation. Inside, a corroded solder point was interrupting the blinker circuit. After cleaning and resoldering the joint, both halves operated uniformly in blink mode.
This case highlights how environmental exposure and hidden connections can cause seemingly mysterious behavior—even when individual components are functional.
Do’s and Don’ts of LED Strand Maintenance
| Do’s | Don’ts |
|---|---|
| Store in dry, temperature-stable environments | Leave lights outdoors year-round |
| Use a surge protector for outdoor setups | Daisy-chain more than three strands unless rated for it |
| Clean connectors annually with isopropyl alcohol | Use household cleaners or water sprays on electrical parts |
| Label spare bulbs by type and color | Mix different brands or voltages on the same run |
| Inspect before each use | Force bulbs into tight sockets—this damages shunts |
Frequently Asked Questions
Can I convert a blinking half to match the solid side?
Yes, but only if the blinking is caused by blinking bulbs rather than a controller. Replace blinking LEDs with steady ones. If the blink comes from a built-in module, you’ll need to bypass or replace the controller entirely—which requires soldering skills and voids warranties.
Why do some replacement bulbs cause only one section to blink?
Some LED replacements have integrated blinking circuits powered by internal chips. Installing one in a steady circuit will make only that bulb flicker. Always confirm the replacement is marked “steady-on” or “non-blinking.”
Is it safe to cut and reconnect a strand?
Only if you insulate connections properly and don’t exceed voltage ratings. Cutting can imbalance load distribution and create hotspots. For permanent modifications, consider using low-voltage DC systems with proper fusing instead.
Conclusion: Restore Uniformity and Extend Lifespan
Half-blinking, half-solid LED strands are more than just a cosmetic nuisance—they reflect deeper electrical imbalances that can compromise performance and safety. By understanding wiring layouts, identifying failure points, and applying targeted fixes, you can restore consistent lighting and extend the usable life of your décor.
Proper maintenance starts before the first plug-in. Inspect, clean, and store your strands correctly. Treat each season as an opportunity to audit your lighting inventory. With careful attention, even older sets can perform reliably for years.


 浙公网安备
33010002000092号
浙公网安备
33010002000092号 浙B2-20120091-4
Comments
No comments yet. Why don't you start the discussion?