
It’s a familiar holiday-season frustration: you hang your string lights, plug them in, and — poof — only the first 25 bulbs glow while the rest sit dark and unresponsive. You check the outlet, jiggle the plug, even swap the fuse. Then you spot it: a single bulb with a blackened filament or a loose base. Replace it, and suddenly the entire second half springs to life. This isn’t faulty manufacturing or bad luck — it’s the unmistakable signature of series wiring. Understanding *why* this happens isn’t just satisfying curiosity; it’s essential for diagnosing issues quickly, choosing safer lighting, and avoiding unnecessary replacements. Unlike household circuits — which run in parallel and keep other devices powered even if one fails — many traditional incandescent and some LED string lights rely on series connections. That design choice has profound consequences for reliability, safety, and troubleshooting.
How Series Wiring Actually Works (and Why It Breaks So Easily)
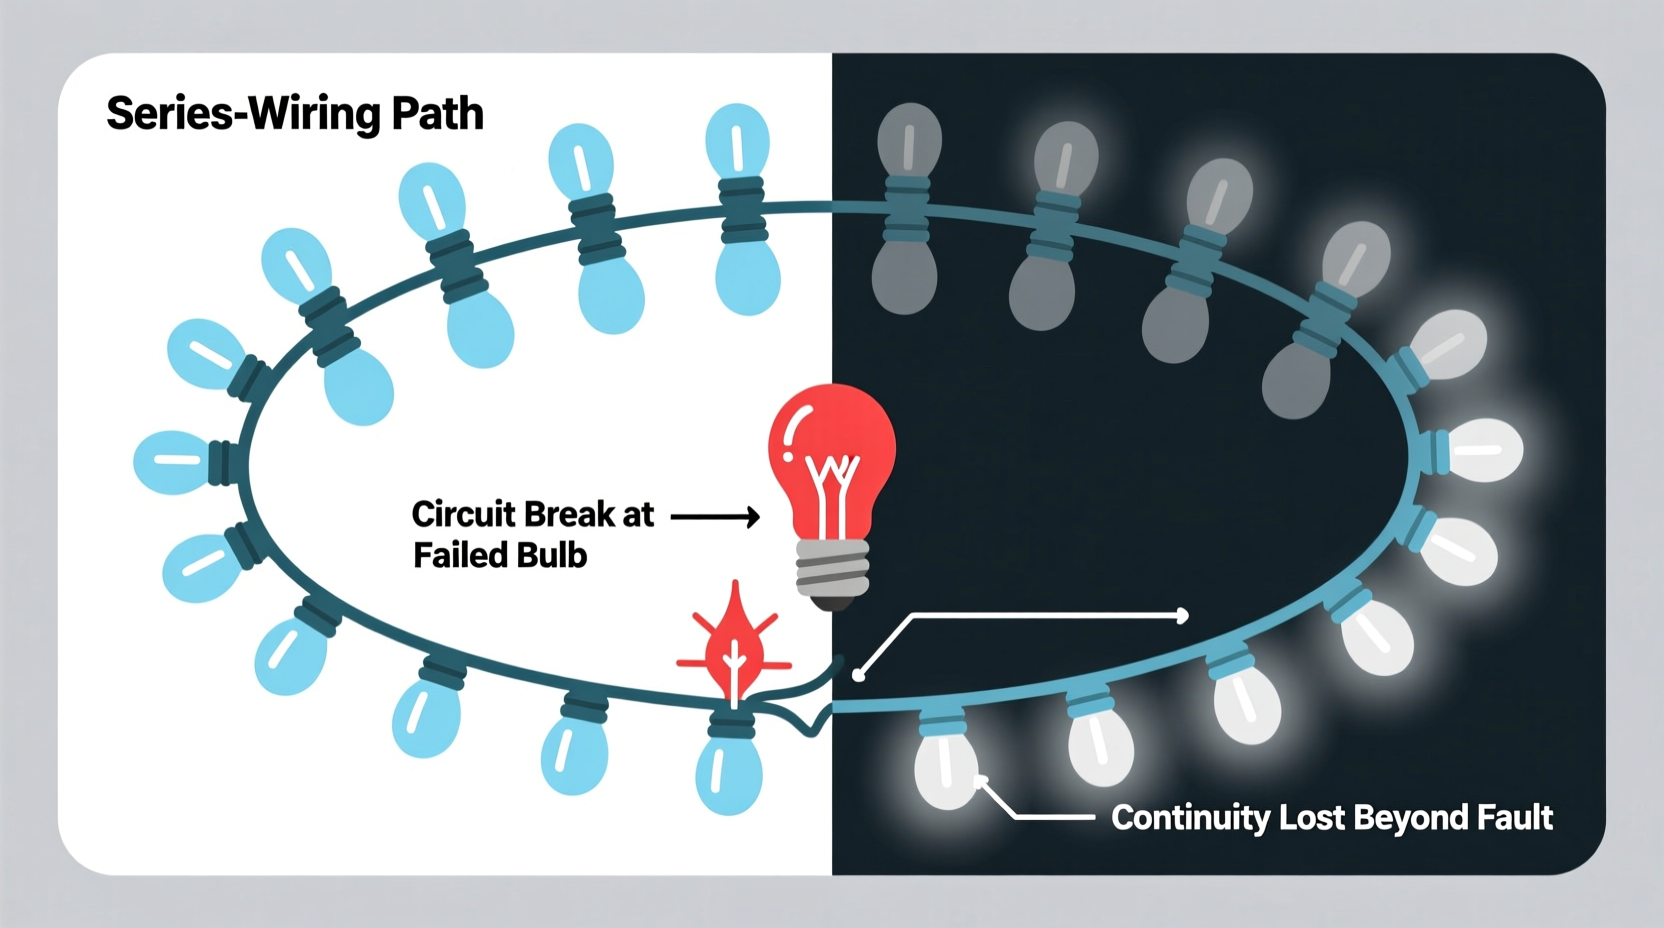
In a series circuit, electricity flows along a single path: from the power source, through each bulb in sequence, and back to the source. Think of it like a relay race where every runner must pass the baton — if one drops it, the race stops. Each bulb acts as both a load (converting electricity into light and heat) and a conductor in that chain. The voltage supplied by the outlet (typically 120V in North America) is divided across all bulbs. For example, a 50-bulb string might allocate ~2.4 volts per bulb. As long as current flows uninterrupted, all bulbs illuminate.
But here’s the critical point: any break in that single path — a burnt-out filament, a corroded socket contact, or even a loose wire inside a bulb base — interrupts the entire circuit. No current can flow past the break, so everything downstream goes dark. Crucially, the break doesn’t have to be at the very end of the string. If the failure occurs at bulb #26 in a 50-bulb set, the first 25 may stay lit (because current reaches them before the break), while bulbs #27 through #50 remain dark. That’s why “half” — or sometimes a third or quarter — goes out. The location of the break determines how much of the string stays functional.
This behavior stands in stark contrast to parallel wiring, where each bulb has its own independent connection to both the live and neutral wires. In parallel circuits, voltage remains constant across every bulb (full 120V), and current divides among branches. A failure in one branch leaves the others unaffected — exactly how your kitchen lights, phone charger, and laptop all operate independently on the same circuit.
The Physics Behind the “Half-Out” Phenomenon
Why does the failure often appear to split the string neatly in half? It’s rarely coincidence — it reflects deliberate engineering choices made to manage voltage, heat, and cost.
Manufacturers divide longer strings into segments — typically two or three — wired in series *within* each segment, but connected *in parallel* between segments. This hybrid approach balances efficiency and fault tolerance. A 100-light string might consist of two 50-light series segments wired in parallel to the plug. If one bulb fails in Segment A, only that 50-light segment goes dark — Segment B remains fully lit. That’s why you see “half out,” not “all out.”
But what about strings where *only* the first half stays lit? That usually indicates a single, continuous series string — common in older incandescent sets — where the physical layout (bulbs spaced evenly along a cord) masks the electrical reality: the circuit snakes forward, then doubles back internally. Many vintage-style lights use a “back-and-forth” wiring pattern: current travels down the cord to the farthest bulb, then loops back along a second internal wire toward the plug. A break anywhere along that loop cuts off everything beyond it — creating the illusion of a clean midpoint failure.
Voltage drop also plays a subtle role. In long series strings, resistance accumulates. Bulbs near the plug receive slightly more voltage than those farther away, making them marginally brighter — and more prone to early failure due to higher thermal stress. That’s why burnouts often begin near the middle or end of the string, reinforcing the “half-out” pattern over time.
Series vs. Parallel: A Practical Comparison for Consumers
Choosing the right string lights starts with understanding these two fundamental wiring methods. Below is a side-by-side comparison highlighting real-world implications:
| Feature | Series-Wired Strings | Parallel-Wired Strings |
|---|---|---|
| Failure Impact | One failed bulb disables all bulbs downstream; partial or total outage common | One failed bulb affects only itself; rest remain lit |
| Voltage per Bulb | Divided (e.g., 2.4V per bulb in 50-bulb set) | Full line voltage (120V) at each bulb |
| Bulb Replacement | Requires identifying & replacing the *exact* faulty bulb; often needs a tester | Simple swap — no circuit tracing needed |
| Energy Efficiency | Generally lower (older incandescent designs dominate this category) | Higher — especially with modern LED parallel sets |
| Safety Considerations | Lower voltage per bulb reduces shock risk, but overheating at poor contacts is common | Full voltage at each socket increases shock risk if exposed; better thermal management in quality LED designs |
| Typical Use Cases | Holiday incandescents, vintage-style mini-lights, budget decorative strings | Commercial displays, high-end residential lighting, most modern LED strings (especially “cuttable” or “individually addressable” types) |
Note: Many modern “LED string lights” misleadingly claim “series wiring” but actually use sophisticated constant-current drivers and shunt resistors — a hybrid approach that mimics series efficiency while providing parallel-like fault tolerance. We’ll return to that distinction shortly.
Real-World Case Study: The December Dilemma in Portland
When Sarah Chen, a graphic designer and avid home decorator in Portland, OR, hung her grandmother’s 1978 C7 incandescent string lights on her front porch last December, she expected charm — not chaos. By dusk, only the first 32 of 60 bulbs glowed. She tried replacing obvious burnouts, wiggling sockets, even checking her GFCI outlet. Nothing worked — until she borrowed a $12 bulb tester from her neighbor.
The tester revealed a subtle but critical detail: bulb #33 had a broken filament, but bulb #34 showed continuity. Confused, Sarah traced the wiring and discovered the string used a “loop-back” design. Current entered at the plug, traveled to bulb #60, then returned via a second internal conductor — passing *through* bulb #33 on the way back. That meant bulb #33 wasn’t just *in* the circuit — it was the *final link* in the return path. Its failure broke the loop, cutting power to everything after bulb #32 on the outbound leg — hence the clean “half-out” effect.
Sarah replaced bulb #33, and the full string illuminated. More importantly, she learned to identify loop-back wiring by gently feeling for two distinct wires inside the cord near the plug — a tactile clue many retailers never mention. She now keeps spare bulbs rated for series use (with integrated shunts, explained below) and tests her vintage strings before storing them each January.
Shunted Bulbs: The Ingenious (But Imperfect) Fix
Recognizing the frustration of hunting for a single dead bulb, manufacturers developed “shunted” replacement bulbs — particularly for mini-incandescent and some LED strings. Inside a shunted bulb, a tiny conductive strip or resistor bridges the filament contacts. When the filament burns out, the shunt activates, maintaining continuity and allowing current to bypass the dead element.
This sounds like a perfect solution — and it often works. But shunts have limitations:
- They don’t restore light — the bulb remains dark, even though the circuit stays closed.
- They increase voltage stress on remaining bulbs. Removing one bulb from a 50-bulb series string means the remaining 49 must now share 120V — raising each to ~2.45V. Over time, this accelerates burnout elsewhere.
- They’re not universal — shunts are designed for specific voltage-per-bulb ratings. Using a 2.5V shunted bulb in a 3.5V string can cause premature failure or overheating.
- They degrade — repeated thermal cycling can weaken shunt integrity, leading to intermittent failures.
Step-by-Step: Diagnosing and Fixing a Partial-Out String Light
Don’t reach for the trash bin yet. Most partial-out series strings can be restored with methodical troubleshooting:
- Unplug the string immediately — safety first. Never handle live wiring.
- Inspect visually — look for blackened bulbs, cracked glass, bent or corroded metal bases, or melted sockets. Pay special attention to the first dark bulb and the last lit one — the failure almost always lies between them.
- Check connections — gently wiggle each bulb in its socket. A loose connection mimics a burnt filament. Also examine the plug and any inline fuses (often hidden under a small sliding door).
- Use a bulb tester or multimeter — set to continuity or diode mode. Touch probes to the bulb’s metal base and tip. A working bulb (or shunted one) should beep or show low resistance. No beep = likely dead.
- Test suspect bulbs individually — remove bulbs from the dark section and test them one by one. Replace any showing no continuity.
- Verify socket integrity — if replacing bulbs doesn’t help, the socket itself may be damaged. Look for bent center contacts or corrosion. Clean gently with isopropyl alcohol and a cotton swab. If bent, carefully straighten the center tab with needle-nose pliers.
- Reassemble and retest — plug in briefly after each replacement. If still partially dark, continue testing downstream bulbs until continuity is restored.
Expert Insight: Engineering Trade-Offs in Lighting Design
“Series wiring persists because it’s cheaper to manufacture, uses thinner gauge wire, and allows dimming without complex electronics. But it trades reliability for economy. The real shift happened when LED technology matured — now we can embed micro-shunts and constant-current drivers that give consumers the efficiency of series with the resilience of parallel. That’s where the industry is headed.” — Dr. Lena Torres, Electrical Engineer & Lighting Standards Advisor, UL Solutions
FAQ: Your Top Series-Wiring Questions Answered
Can I convert my old series-wired string to parallel?
No — not practically or safely. Rewiring requires cutting and splicing dozens of fine internal conductors, recalculating voltage drops, adding individual current-limiting resistors, and re-insulating every joint. The labor vastly exceeds the cost of a new parallel LED string. Focus instead on proper maintenance and selective replacement.
Why do some new LED strings still go half-out if one bulb fails?
Many budget LED strings use “dumb” series wiring with basic shunts — or none at all. True fault-tolerant LEDs use either parallel wiring or intelligent IC-controlled segments (like WS2812B “addressable” lights). Check packaging for terms like “individually replaceable,” “cuttable,” or “IC-controlled.” Avoid strings labeled only “series compatible” or “for indoor use only” if reliability matters.
Is it safe to leave a partially lit series string plugged in?
Not recommended. A partial outage often indicates arcing at a poor contact or overheating in a compromised socket. That generates excess heat and increases fire risk, especially near flammable materials like curtains or dried pine boughs. Unplug, diagnose, and repair before reuse.
What to Do Next: Smarter Choices for Lasting Light
Understanding series wiring doesn’t mean accepting its limitations. It empowers smarter decisions. When shopping for new lights, prioritize strings explicitly labeled “parallel wired,” “individually addressable,” or “constant-current driven.” Look for UL/ETL certification and IP ratings matching your use case (e.g., IP65 for outdoor). For existing series strings, invest in a reliable bulb tester, stock genuine shunted replacements, and perform annual pre-season checks — treating them like precision instruments rather than disposable decor.
Most importantly, recognize that the “half-out” phenomenon isn’t a flaw in your home’s wiring or a sign of impending doom — it’s a predictable outcome of well-understood physics. That predictability is your advantage. With the right knowledge, you move from frustrated troubleshooter to confident lighting steward.


 浙公网安备
33010002000092号
浙公网安备
33010002000092号 浙B2-20120091-4
Comments
No comments yet. Why don't you start the discussion?