
There’s nothing quite as satisfying as a fresh, nutrient-packed smoothie first thing in the morning—unless you’re met with an unpleasant odor when you turn on your blender. That sour, musty, or faintly rotten smell isn’t just annoying; it can taint the flavor of your drink and signal hidden bacterial growth. If you’ve ever paused mid-blend wondering, “Why does my blender smell weird after smoothies?” you're not alone. The truth is, blenders are breeding grounds for bacteria, mold, and trapped organic residue if not cleaned properly. But with the right knowledge and routine, you can eliminate odors for good and keep your appliance hygienic and efficient.
The Science Behind the Smell
Smoothies are made from fruits, vegetables, dairy, yogurt, nut milks, and sometimes protein powders—all rich in sugars, proteins, and moisture. When these ingredients get trapped in hard-to-reach areas like under the blade assembly, along the rubber gasket, or in microscopic scratches on the pitcher, they begin to decompose. Even a small amount of leftover pulp can ferment within hours, especially in warm environments.
Bacteria such as Pseudomonas and Enterobacter, along with molds like Aspergillus, thrive in moist, nutrient-rich conditions. These microorganisms produce volatile organic compounds (VOCs) as metabolic byproducts, which are responsible for the sour, musty, or “fridge-leftover” smell emanating from your blender.
Additionally, many modern blenders use plastic pitchers that can develop micro-scratches over time. These tiny grooves trap food particles and resist standard cleaning, creating persistent odor sources even after rinsing.
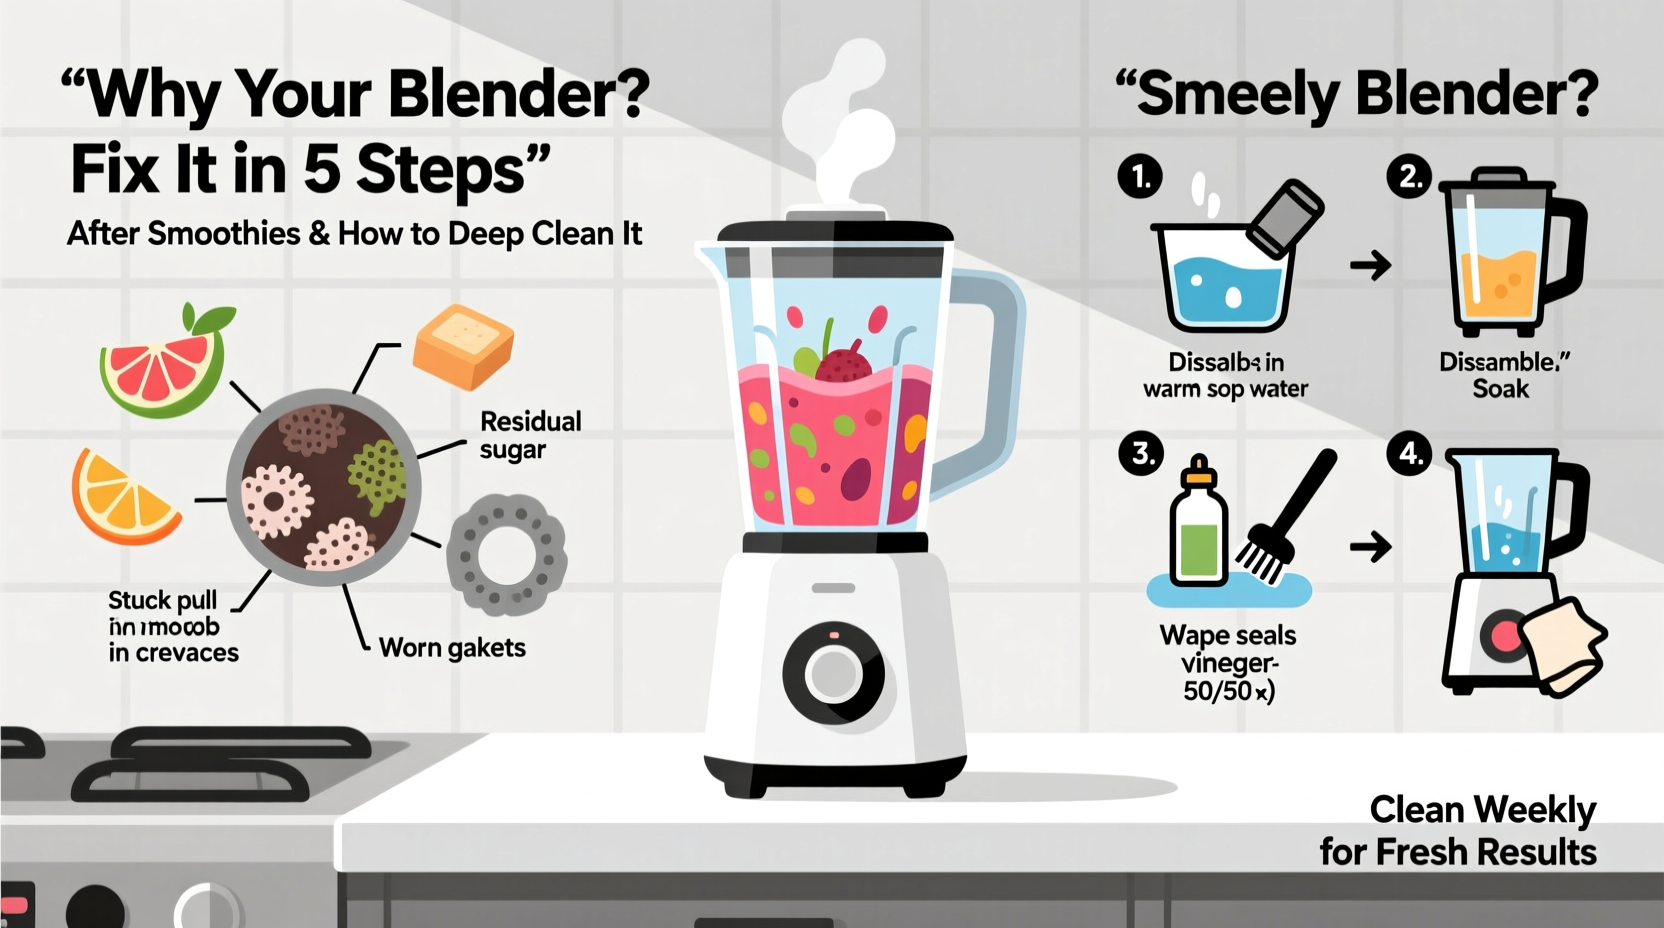
Where Odors Hide: The Blender’s Problem Zones
Most people assume that running soapy water through the blender is enough. But several critical areas are often overlooked during routine cleaning:
- Blade Assembly Base: The area where the blades attach to the pitcher often has a rubber or silicone gasket that seals the connection. Moisture and pulp frequently get trapped beneath this seal.
- Threaded Rim: The screw-on base of the pitcher collects residue, especially if the blender is stored while still slightly damp.
- Micro-scratches in Plastic Pitchers: Over time, fibrous ingredients like kale, celery, or chia seeds can scratch the container, creating pockets where bacteria grow.
- Lid and Cap Openings: Small vent holes or flip lids accumulate drips that dry into sticky films.
- Motor Base Vents: While not in contact with food, dust and kitchen grease can build up here, contributing to stale air circulation.
These zones remain invisible during casual inspection but play a major role in recurring odors. Deep cleaning must go beyond surface washing to address each one.
Step-by-Step Guide to Deep Clean Your Blender
A thorough deep clean should be performed every 2–4 weeks, depending on usage. Follow this detailed process to eliminate odor-causing buildup.
- Disassemble the Blender Base: Remove the pitcher from the motor unit. Unscrew the blade assembly from the bottom. This exposes the rubber gasket and threaded areas where grime accumulates.
- Inspect and Soak Components: Place the blade unit, gasket, and any removable rings in a bowl of warm, soapy water. Let soak for 15–20 minutes to loosen dried residues.
- Clean Under the Gasket: Carefully lift the rubber seal using a cotton swab or soft toothbrush. You’ll likely find dark, sticky material underneath. Scrub gently with a brush dipped in baking soda paste.
- Scrub the Pitcher Interior: Use a long-handled bottle brush with mild dish soap to scrub the inside walls, focusing on the bottom near the blades. For stubborn film, make a paste of baking soda and water and scrub in circular motions.
- Sanitize with Vinegar or Hydrogen Peroxide: Fill the pitcher halfway with equal parts white vinegar and warm water (or 3% hydrogen peroxide). Blend for 30 seconds, then let sit for 10 minutes. This kills bacteria and breaks down organic deposits.
- Rinse and Reassemble: Rinse all components thoroughly with clean water. Ensure no vinegar or soap residue remains. Reattach the blade assembly tightly to prevent leaks.
- Wipe the Motor Base: Dampen a cloth with a vinegar-water solution (1:1) and wipe down the exterior, including vents. Never submerge the base.
- Air-Dry Completely: Place all parts on a drying rack upside down to allow full airflow. Do not reassemble until completely dry to prevent mold.
“Many consumers don’t realize that the blade gasket is a microbial hotspot. Regular disassembly and cleaning are essential for hygiene.” — Dr. Lena Torres, Food Safety Microbiologist at the National Kitchen Health Institute
Alternative Deep-Cleaning Methods
If vinegar isn’t available or you want variety in your cleaning routine, try these proven alternatives:
| Method | How to Use | Best For | Caution |
|---|---|---|---|
| Baking Soda + Lemon | Mix 2 tbsp baking soda with juice of 1 lemon and warm water. Blend for 30 sec, then scrub. | Removing mild odors and light stains | Not effective for heavy mold |
| Denture Tablets | Add 2 tablets to warm water in the pitcher. Soak for 30 minutes, then rinse. | Breaking down protein films and killing bacteria | May discolor older plastic over time |
| Hydrogen Peroxide (3%) | Fill pitcher halfway with H₂O₂. Blend 1 min, wait 10 min, then rinse. | Sanitizing without strong fumes | Do not mix with vinegar |
| Dishwasher (if safe) | Check manufacturer guidelines. Place pitcher and lid on top rack only. | Convenience and heat sanitization | Blade assemblies may corrode; hand-wash recommended |
Preventing Future Odors: A Maintenance Checklist
Consistent habits are more effective than occasional deep cleans. Follow this checklist to keep your blender smelling fresh between deep cleaning sessions:
- ✅ Rinse the pitcher immediately after each use—even if you plan to wash it later.
- ✅ Run a quick \"clean blend\" with warm water and a drop of dish soap after every 2–3 uses.
- ✅ Air-dry the pitcher upside down on a rack; never store it sealed or upright with the lid on.
- ✅ Disassemble and inspect the blade gasket monthly for buildup.
- ✅ Replace plastic pitchers every 1–2 years if scratched or cloudy.
- ✅ Store the blender in a dry, ventilated area away from stove heat or sink moisture.
- ✅ Avoid blending extremely fibrous ingredients daily without thorough cleaning afterward.
Real Example: How Sarah Fixed Her Persistent Blender Smell
Sarah, a health coach from Portland, blended smoothies daily for her clients. After six months, she noticed a sour smell every time she turned on her high-end blender. She had been rinsing it and occasionally running soapy water through it, but the odor persisted. Frustrated, she took it apart for the first time and discovered a thick, blackish ring under the rubber gasket—mold feeding on trapped banana and spinach residue.
She soaked the blade assembly in vinegar overnight, scrubbed with a toothbrush, and replaced the gasket (available as a spare part online). After a full deep clean and improved drying habits, the smell vanished. Now, she demonstrates proper blender maintenance during her wellness workshops, emphasizing that “out of sight” doesn’t mean “clean.”
Frequently Asked Questions
Can I put my blender’s blade assembly in the dishwasher?
Some manufacturers allow it, but it’s generally not recommended. The high heat and harsh detergents can degrade rubber seals and corrode metal blades over time. Hand-washing with warm, soapy water is safer and more effective for longevity.
Why does my blender still smell after cleaning?
If odors persist, the issue may be deeper than surface grime. Check for mold under the gasket, cracks in the pitcher, or biofilm buildup in scratches. Try soaking the entire pitcher in a vinegar solution overnight. If the smell remains, consider replacing the container.
Is it safe to use bleach to clean my blender?
While diluted bleach (1 tablespoon per quart of water) can sanitize, it’s risky. Residual bleach can leach into food and damage plastic. It also produces harmful fumes when mixed with other cleaners. Stick to vinegar, hydrogen peroxide, or commercial blender-safe sanitizers instead.
When to Replace vs. Repair
Even with diligent care, blenders wear out. Consider replacement if:
- The pitcher is deeply scratched or cloudy (harbors bacteria).
- The blade assembly wobbles or won’t tighten securely.
- Odors return within hours of cleaning despite deep scrubbing.
- The motor emits burning smells (indicates electrical issues).
Many brands offer replacement pitchers and gaskets, extending the life of the motor base. However, if multiple components are failing, investing in a new model with glass or high-grade Tritan plastic may be more hygienic and cost-effective long-term.
Conclusion: Take Control of Your Blender’s Hygiene
Your blender shouldn’t come with a side of mystery odor. The smells that develop after smoothie prep are preventable signs of trapped organic matter and microbial growth. By understanding where residue hides and committing to regular deep cleaning and smart storage, you can maintain a fresh, safe appliance that enhances your healthy routine instead of compromising it.
Start today: disassemble your blender, inspect the gasket, and perform a vinegar soak. Make it a habit to rinse immediately after use and allow full air-drying. Small actions compound into lasting cleanliness. Your next smoothie will taste purer—and your kitchen will thank you.


 浙公网安备
33010002000092号
浙公网安备
33010002000092号 浙B2-20120091-4
Comments
No comments yet. Why don't you start the discussion?