
Baking bread at home is a deeply satisfying process—until you open the oven to find your beautiful loaf caved in down the center. A collapsed crown can be frustrating, especially when the crust looks golden and the aroma promises perfection. More often than not, this structural failure isn’t bad luck—it’s the result of one or more preventable dough mistakes made during mixing, fermentation, shaping, or baking.
Understanding why bread collapses in the middle means understanding how gluten, gas, and heat interact to create structure. When any part of this delicate balance fails, the loaf can’t support its own expansion and buckles under pressure. This guide dives into the most common technical errors, explains their impact on bread integrity, and provides actionable fixes so you can bake consistently high-rising, well-structured loaves.
The Science Behind Bread Structure
Bread rises because yeast consumes sugars in the flour and produces carbon dioxide. These gas bubbles are trapped within a network of gluten—the elastic protein matrix formed when flour and water combine and are agitated through kneading or folding. During baking, the gases expand further due to heat (oven spring), and the structure sets as proteins coagulate and starches gelatinize.
A collapse occurs when the structure cannot withstand internal pressure. This usually happens either just before the crust fully sets or immediately after removal from the oven. The center of the loaf is typically the weakest point because it's the last area to bake through, meaning it lacks structural integrity while surrounding areas have already hardened.
“Gluten development and controlled fermentation are the twin pillars of good bread structure. Compromise one, and the whole loaf may fall.” — Dr. Emily Tran, Food Scientist & Artisan Baking Consultant
Common Dough Mistakes That Cause Collapse
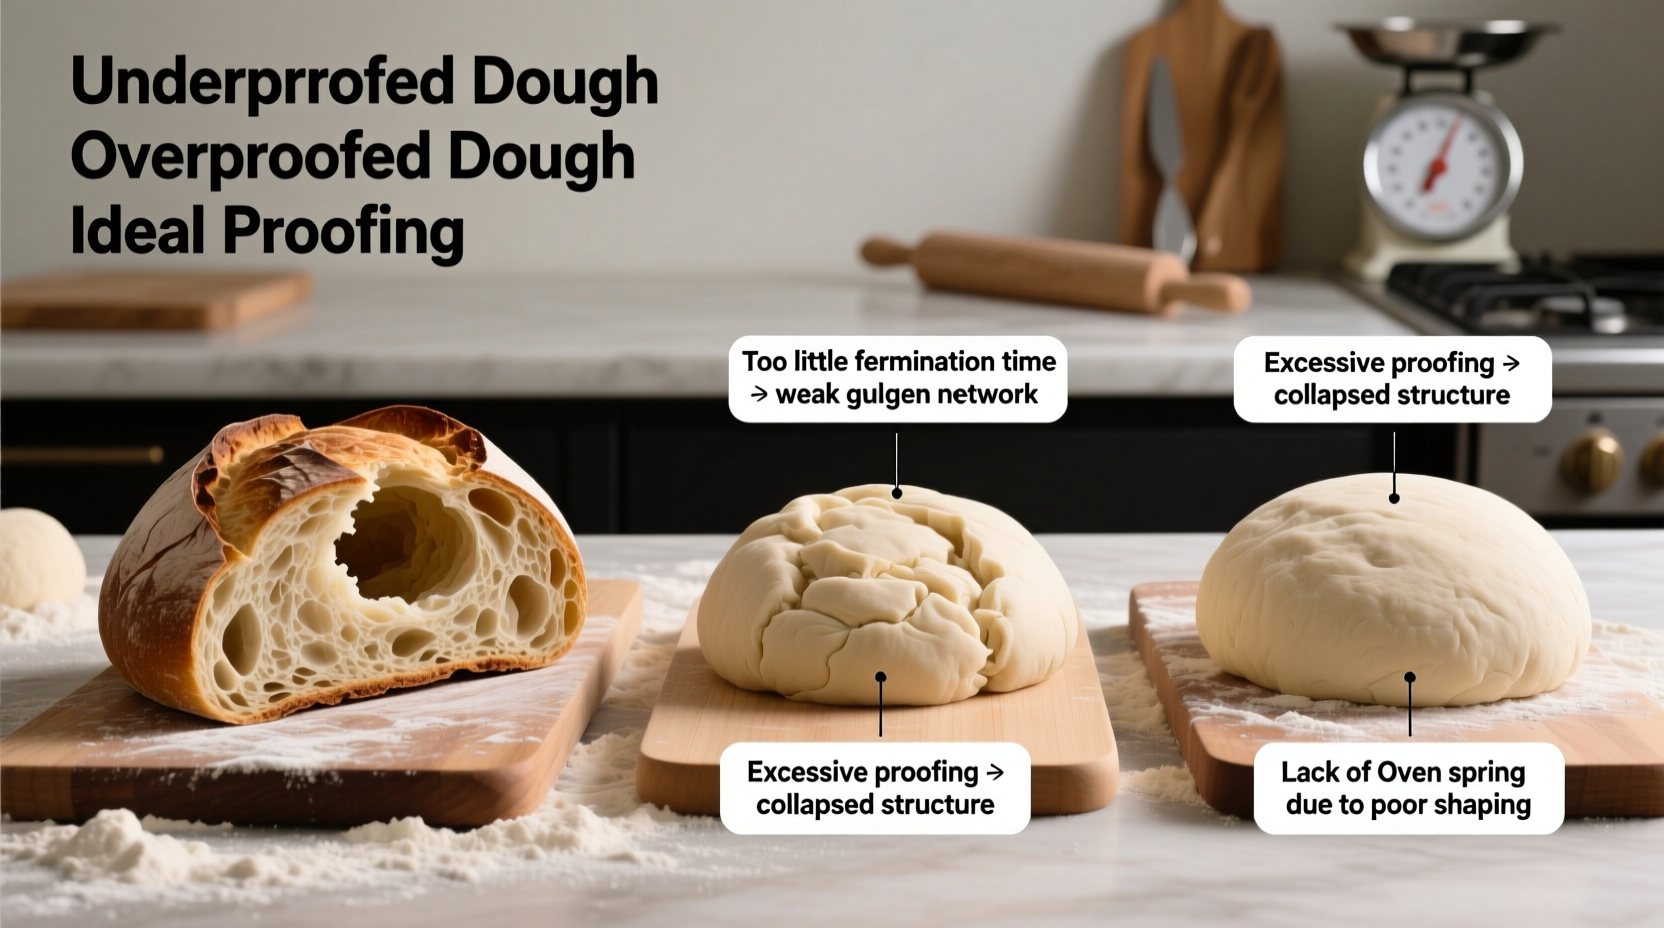
1. Overfermentation (Proofing Too Long)
One of the leading causes of bread collapsing in the middle is overproofing. When dough ferments too long, the yeast exhausts available sugars and begins breaking down the gluten structure. The weakened network can no longer hold expanding gas, leading to deflation during or after baking.
Signs of overproofed dough include:
- Dough that doesn’t spring back when gently poked
- A strong alcoholic or sour smell
- Excessive puffiness with little resilience
- Slumping when transferred to the oven
2. Underdeveloped Gluten
Without sufficient gluten development, dough lacks the elasticity and strength to trap gas effectively. This results in poor oven spring and eventual collapse. Underdevelopment often stems from insufficient kneading, using low-protein flour for the recipe, or skipping stretch-and-fold sessions in no-knead methods.
To ensure proper gluten formation:
- Knead until the dough passes the windowpane test (stretch a small piece thin enough to see light through without tearing)
- Use bread flour instead of all-purpose if structure is consistently weak
- Incorporate 2–4 sets of stretch-and-folds during bulk fermentation for better alignment
3. Excessive Moisture (Too High Hydration)
High-hydration doughs (75%+ water-to-flour ratio) produce open crumb and crisp crusts but are harder to manage. Without expert handling, excess moisture prevents the dough from holding its shape. During baking, steam builds rapidly, but the weak structure gives way before the crust can set.
This is especially problematic in home ovens, which lack the powerful steam injection and even heat distribution of professional models.
4. Poor Shaping Technique
Shaping creates surface tension—a taut outer skin that helps contain internal pressure. If the loaf is improperly shaped, with loose seams or uneven tension, weak spots form where gas escapes or structure fails.
Common shaping errors include:
- Not degassing properly before shaping
- Rolling loosely instead of tightening with each fold
- Placing the seam side up in the pan or Dutch oven
5. Sudden Temperature Changes
Rapid cooling causes condensation inside the loaf, weakening the still-soft crumb. Taking bread out of a hot oven and placing it directly on a cold countertop or sealing it in a container too soon can trigger collapse.
Similarly, opening the oven door too early during baking releases heat and steam, halting oven spring and destabilizing the structure mid-rise.
Do’s and Don’ts: Preventing Collapse at Each Stage
| Stage | Do’s | Don’ts |
|---|---|---|
| Mixing | Use accurate measurements; hydrate gradually to assess consistency | Don’t add all water at once—adjust based on flour absorption |
| Fermentation | Monitor time and temperature; use cooler proofing for longer flavor development | Don’t walk away for hours without checking—especially in warm kitchens |
| Shaping | Create tight surface tension; seal seams firmly | Don’t rush shaping—take 1–2 minutes to do it right |
| Baking | Preheat oven thoroughly; use steam for first 15–20 minutes | Don’t open the oven door before the crust has set (usually after 20+ minutes) |
| Cooling | Cool completely on a wire rack before slicing | Don’t cover hot bread or cut into it too early |
Step-by-Step Guide to Avoiding Collapse
- Weigh ingredients accurately – Use a kitchen scale for precision. Volume measurements vary too much.
- Develop gluten properly – Either knead for 8–10 minutes by machine or perform 3–4 sets of stretch-and-folds spaced 30 minutes apart during bulk fermentation.
- Control fermentation temperature – Ideal bulk fermentation is between 72°F and 78°F (22°C–26°C). Warmer temperatures speed up yeast activity but increase risk of overproofing.
- Shape with tension – After preshaping, let the dough rest 15–20 minutes, then shape tightly, sealing the seam underneath.
- Proof until ready—not on schedule – Let final proof go until the dough puffs slightly and passes the poke test, regardless of recipe time estimates.
- Bake with steam – Add steam for the first 20 minutes (use a Dutch oven or place a pan of water in the oven) to delay crust formation and maximize oven spring.
- Avoid sudden temperature shifts – Leave the loaf in the oven with the door ajar for 5 minutes after baking, then transfer to a cooling rack.
- Cool completely – Wait at least 1.5–2 hours before slicing. Cutting too early releases steam and collapses the interior.
Real Example: Sarah’s Sourdough Struggles
Sarah, a home baker in Portland, had been making sourdough weekly for months. Her loaves smelled amazing and had great color, but nearly every one sank dramatically in the center after baking. Frustrated, she posted her process online for feedback.
Reviewers noticed her dough looked very slack during shaping and that she was proofing her boule overnight at room temperature—around 76°F. Given her active starter and high hydration (80%), the dough was clearly overfermented by morning.
She adjusted by:
- Reducing hydration to 75%
- Refrigerating the dough after 2 hours at room temperature
- Improving shaping technique with video tutorials
Within two weeks, her loaves rose evenly and held their shape. The key insight? Time isn’t the only factor—temperature and visual cues matter more.
Troubleshooting Checklist
If your bread keeps collapsing, run through this checklist before your next bake:
- ✅ Did I weigh ingredients instead of measuring by volume?
- ✅ Is my flour high enough in protein? (Bread flour preferred for structured loaves)
- ✅ Did I develop gluten sufficiently? (Windowpane test passed?)
- ✅ Was the dough overproofed? (Poke test failed or smelled boozy?)
- ✅ Did I shape the loaf tightly with sealed seams?
- ✅ Was the oven fully preheated with vessel (if using Dutch oven)?
- ✅ Did I use steam during the first phase of baking?
- ✅ Did I avoid opening the oven door too early?
- ✅ Did I cool the bread completely before slicing?
Frequently Asked Questions
Can I save a collapsed loaf?
Yes—texture and flavor are often unaffected. Slice and toast it, turn it into croutons, or use it for bread pudding. Aesthetic flaws don’t mean culinary failure.
Why did my bread rise beautifully in the oven but collapse as it cooled?
This typically indicates underbaking or premature cooling. The crumb hadn’t set fully when removed from heat. Always check internal temperature: aim for at least 198°F (92°C) for standard white bread and higher for whole grain.
Does using too much yeast cause collapse?
Indirectly, yes. Excess yeast accelerates fermentation, increasing the chance of overproofing and weakening gluten. Stick to recommended amounts—usually 1–2% of flour weight for commercial yeast, or 20–30% for active sourdough starter.
Conclusion: Build Confidence Through Consistency
Bread baking is equal parts science and craft. A collapsed center doesn’t mean you’ve failed—it means you’re observing, learning, and improving. Most structural issues stem from small, correctable choices made hours before the oven. By refining your approach to fermentation, shaping, and baking conditions, you gain control over the outcome.
Track your bakes in a simple journal: note room temperature, proofing times, flour type, and results. Over time, patterns will emerge, and consistent success will follow. Great bread isn’t about perfection on the first try—it’s about persistence, attention, and respect for the process.


 浙公网安备
33010002000092号
浙公网安备
33010002000092号 浙B2-20120091-4
Comments
No comments yet. Why don't you start the discussion?