
Baking bread is both an art and a science. When your loaf rises beautifully during proofing only to deflate in the oven, it’s not just disappointing—it can feel like a mystery. Yet, bread collapse is rarely random. It's usually the result of one or more preventable factors related to dough structure, fermentation, oven conditions, or handling. Understanding these underlying causes empowers you to diagnose and correct the issue, turning collapsed loaves into consistent successes.
The key lies in balancing moisture, gluten development, yeast activity, and heat. A collapsed loaf doesn’t mean failure—it means feedback. By examining what went wrong, you refine your technique and deepen your understanding of the baking process.
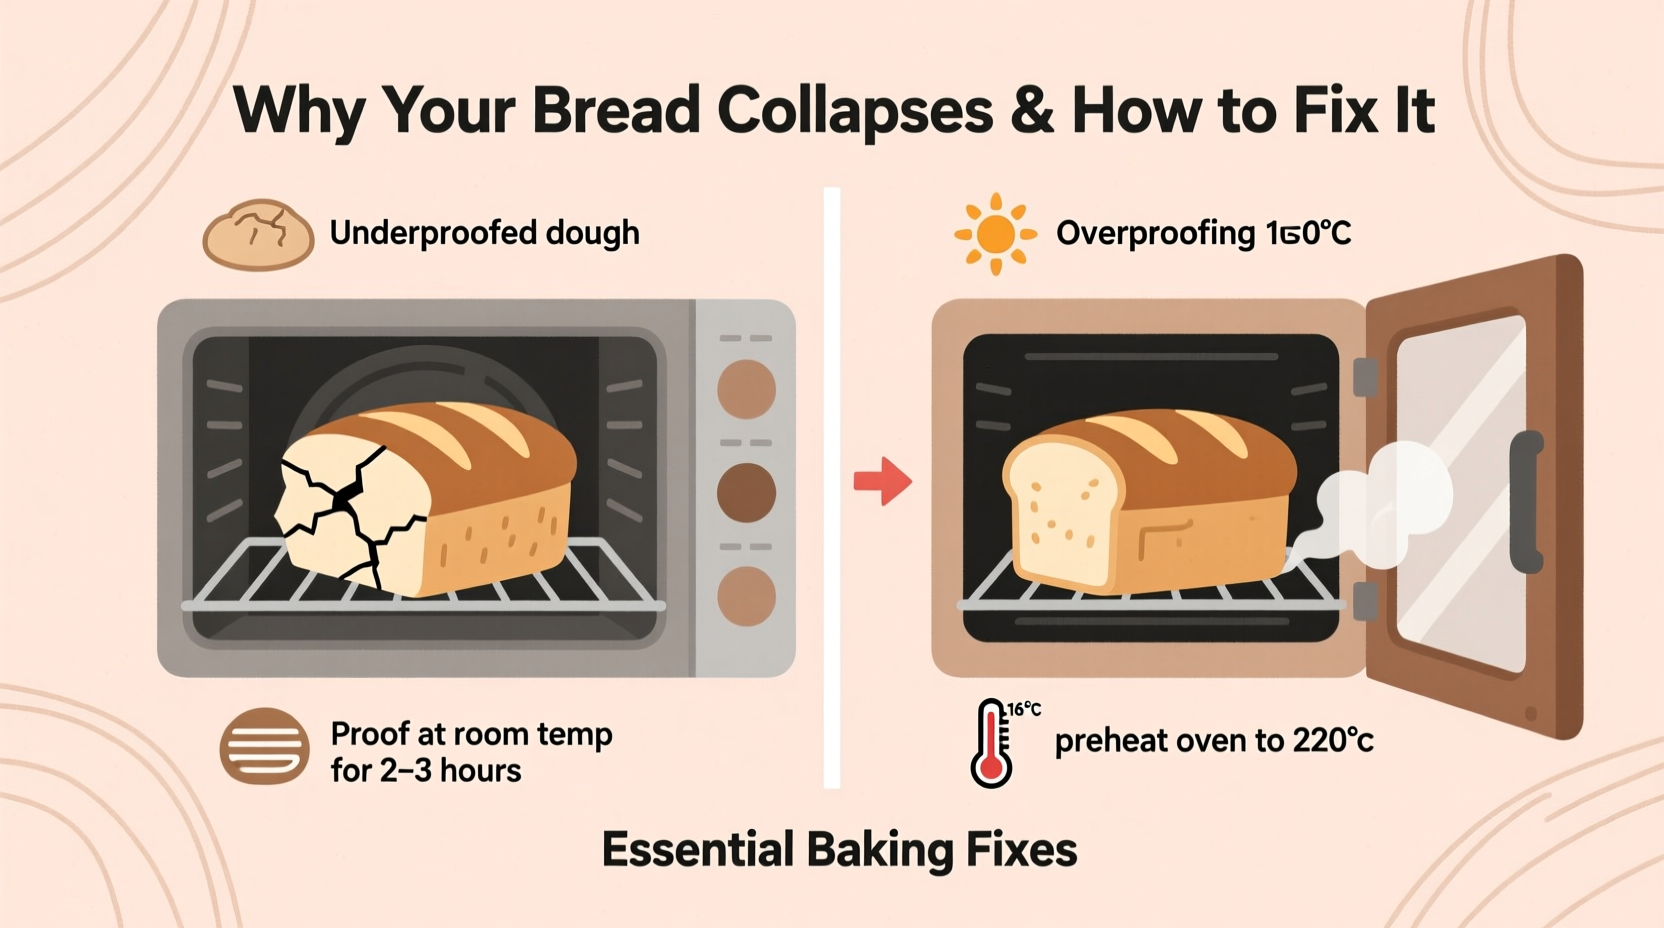
Understanding Oven Spring and Why Bread Collapses
Oven spring refers to the rapid rise that occurs in the first 10–15 minutes of baking, when trapped carbon dioxide expands and steam forms within the dough. This phase is crucial for volume and crumb structure. If the dough lacks strength or stability, however, this expansion can cause the loaf to burst unpredictably—or worse, collapse.
Collapsing typically happens when the internal structure cannot support the pressure generated by rising gases. This may occur due to:
- Over-proofing: The gluten network weakens, losing its ability to trap gas.
- Inadequate gluten development: Dough hasn’t been kneaded enough or lacks proper hydration.
- Sudden temperature changes: Opening the oven too early shocks the dough.
- Under-baking: The crust sets too late, or the interior remains gummy and unstable.
- Poor scoring: Without controlled slashes, steam escapes unevenly, causing structural failure.
Each of these issues disrupts the delicate balance needed for a successful bake. But with targeted adjustments, most collapsing problems are entirely fixable.
Essential Fixes for Preventing Bread Collapse
Preventing collapse starts long before the oven. It begins with ingredient selection, continues through mixing and fermentation, and culminates in precise baking technique. Below are the most effective corrective measures.
1. Optimize Proofing Time and Conditions
Proofing is often the root cause of collapse. Over-proofed dough has exhausted its gas-producing capacity and weakened its gluten matrix. Conversely, under-proofed dough lacks sufficient gas to expand properly, leading to dense or uneven results.
Room temperature, humidity, and starter activity all affect proofing time. Instead of relying on a fixed schedule, assess readiness using visual and tactile cues:
- Dough should look puffy and nearly doubled.
- It should hold a fingerprint briefly before slowly retracting.
- Boules should feel light and airy when lifted.
For sourdough bakers, cold retardation in the refrigerator (8–16 hours) slows fermentation, strengthens flavor, and improves dough stability—reducing the risk of over-proofing.
2. Strengthen Gluten Development
Gluten is the scaffolding that holds your bread together. Weak gluten leads to poor gas retention and structural collapse. To build a resilient network:
- Knead sufficiently: For white flour, 8–10 minutes by machine or 12–15 by hand.
- Use autolyse: Mix flour and water and let rest for 20–30 minutes before adding yeast and salt. This enhances gluten formation and extensibility.
- Incorporate stretch and folds: During bulk fermentation, perform 3–4 sets of stretch-and-folds at 30-minute intervals to align gluten strands.
Higher protein flours (like bread flour) naturally form stronger gluten than all-purpose or whole grain varieties. If using whole wheat, consider blending with white flour to improve elasticity.
3. Score Your Loaf Correctly
Scoring isn’t just decorative—it’s functional. Controlled cuts allow steam to escape predictably, guiding expansion and preventing random bursting. Poor or missing scores force pressure to find weak spots, which can lead to splitting or deflation.
Use a sharp blade (lame or razor) and make decisive cuts at a 30–45° angle, about ½ inch deep. Common patterns include:
- A single slash for baguettes
- A cross or tic-tac-toe pattern for round loaves
- Ear creation via undercut scoring for artisan appeal
Score just before baking. Scoring too early on a hot day can cause the dough to deflate before it hits the oven.
4. Bake at the Right Temperature with Steam
Oven temperature directly affects crust formation and oven spring. Too low, and the crust sets too slowly, allowing the interior to remain fragile. Too high without steam, and the surface dries out prematurely, restricting expansion.
Most rustic breads require an initial blast of heat: 450°F–475°F (230°C–245°C) with steam for the first 15–20 minutes. Steam delays crust formation, allowing maximum oven spring. After this phase, reduce heat slightly (to around 425°F) and vent steam to allow drying and browning.
To create steam at home:
- Place a metal pan on the oven floor and pour boiling water into it at loading time.
- Use a spray bottle to mist the oven walls (avoid glass doors).
- Bake inside a preheated Dutch oven, which traps natural moisture.
“Steam is the unsung hero of artisan bread. It keeps the crust flexible long enough for the dough to reach its full potential.” — Daniel Leader, author of *Local Breads*
Common Mistakes That Cause Collapse (and How to Avoid Them)
Even experienced bakers make errors. The following table outlines frequent missteps, their consequences, and practical solutions.
| Mistake | Why It Causes Collapse | How to Fix It |
|---|---|---|
| Over-proofing | Gluten breaks down; gas bubbles grow too large and pop | Use the poke test; refrigerate if delayed |
| Opening oven too soon | Sudden drop in temperature shocks rising dough | Wait at least 20 minutes before peeking |
| Under-kneading | Weak gluten can't hold gas | Autolyse + stretch and folds; use higher-protein flour |
| Incorrect hydration | Too wet = no structure; too dry = poor rise | Adjust water gradually; aim for 65–75% hydration for beginners |
| Poor shaping | Loose seams create weak points | Tighten surface tension during shaping; seal seams well |
Step-by-Step Guide to Baking Collapse-Free Bread
Follow this proven sequence to minimize risk and maximize success:
- Weigh ingredients: Use a digital scale for accuracy. Volume measurements vary significantly.
- Autolyse: Mix flour and water; rest 30 minutes.
- Add yeast and salt; knead or mix until smooth and elastic.
- Bulk ferment: 3–5 hours at room temperature with 3–4 sets of stretch and folds.
- Shape gently with tight surface tension; avoid degassing.
- Final proof: 1–2 hours at room temp or overnight in the fridge.
- Preheat oven and vessel (Dutch oven, baking stone, etc.) for at least 45 minutes.
- Score right before baking with a sharp blade.
- Bake with steam at 450°F for 20 minutes, then remove lid or vent oven and bake 20–25 more minutes until internal temp reaches 205°F–210°F (96°C–99°C).
- Cool completely (1–2 hours) before slicing to prevent gumminess.
Real Example: Recovering from Repeated Collapse
Sarah, a home baker in Portland, struggled for months with her sourdough boules collapsing after a promising rise. Her dough looked perfect during proofing but flattened dramatically in the oven. She tried adjusting hydration and flour brands with little success.
After reviewing her process, she realized two issues: she was leaving her dough in a warm kitchen for 4 hours during bulk fermentation, and she wasn’t using a brotform (proofing basket), which led to loose shaping. She also opened the oven frequently during the first 10 minutes.
She adjusted by:
- Reducing bulk fermentation to 3 hours with stretch and folds.
- Using a lined banneton for better support.
- Retarding the final proof in the refrigerator overnight.
- Resisting the urge to open the oven until the 20-minute mark.
Within two bakes, her loaves rose evenly and held their shape. The crust developed a glossy sheen, and the crumb was open yet stable. Sarah learned that small, precise changes yield the biggest improvements.
Frequently Asked Questions
Why does my bread rise and then fall in the oven?
This is typically caused by over-proofing. The dough has already expanded close to its limit before baking, so the additional heat pushes it past structural stability. The gas pockets rupture, and the loaf collapses. Always verify readiness with the poke test.
Can I save a collapsed loaf?
If the loaf collapses mid-bake, it’s likely too late to fix it in the oven. However, once cooled, you can repurpose it into croutons, breadcrumbs, or bread pudding. For future bakes, focus on improving gluten strength and proofing control.
Does altitude affect bread collapse?
Yes. At high altitudes, lower atmospheric pressure allows gases to expand faster, increasing the risk of over-expansion and collapse. Bakers above 3,000 feet often reduce yeast by 25%, shorten fermentation times, increase oven temperature slightly, and add a bit more flour to strengthen dough.
Checklist: Prevent Bread Collapse in 7 Steps
- ✅ Weigh ingredients for consistency
- ✅ Perform autolyse and stretch-and-folds
- ✅ Monitor proofing with the poke test—not the clock
- ✅ Shape with tight surface tension
- ✅ Use a preheated Dutch oven or baking stone
- ✅ Bake with steam for the first 20 minutes
- ✅ Avoid opening the oven during initial bake
Conclusion: Turn Collapse Into Confidence
Bread collapse isn’t a dead end—it’s a diagnostic signal. Each failed loaf brings you closer to mastery. By refining your approach to proofing, gluten development, scoring, and baking environment, you gain control over variables that once felt unpredictable.
The perfect loaf isn’t about perfection on the first try. It’s about learning, adjusting, and persisting. Now that you understand the science behind collapse and have actionable fixes at your fingertips, every bake becomes a step forward.


 浙公网安备
33010002000092号
浙公网安备
33010002000092号 浙B2-20120091-4
Comments
No comments yet. Why don't you start the discussion?