
Baking bread is both a science and an art. When your loaf rises beautifully during proofing only to sink dramatically in the center once it comes out of the oven—or worse, while still inside—it can be deeply frustrating. A collapsed center doesn’t just affect appearance; it often signals structural weakness, dense crumb, or improper texture. The good news? This issue is almost always preventable. Understanding the root causes behind bread collapse allows you to refine your technique, adjust ingredients, and produce consistently well-structured loaves.
This guide dives deep into the most common reasons bread collapses in the middle, offering practical solutions grounded in baking chemistry and real-world experience. Whether you're baking sourdough, sandwich loaves, or rustic boules, these insights will help you troubleshoot and improve your results—one perfect rise at a time.
Understanding Bread Structure: The Role of Gluten and Gas
Bread relies on a delicate balance between gluten development and gas retention. During fermentation, yeast consumes sugars and produces carbon dioxide. These gas bubbles are trapped within a network of gluten—a protein matrix formed when flour and water interact and are agitated through mixing or kneading. As the dough bakes, the gas expands (oven spring), steam forms, and the structure sets as proteins coagulate and starches gelatinize.
If any part of this process fails—whether due to weak gluten, over-proofing, or premature crust formation—the loaf may not support its own weight. A collapse in the center typically means the internal structure couldn’t withstand the pressure of rising gases or failed during cooling when moisture redistributes.
“Bread structure is like a balloon made of tiny interconnected chambers. If the walls are too thin or overstretched, it pops.” — Dr. Emily Tran, Food Scientist & Baking Consultant
Top 5 Causes of Bread Collapse (And How to Fix Them)
1. Over-Proofing the Dough
One of the most frequent culprits behind a sunken loaf is over-proofing. When dough proofs too long, the gluten network stretches beyond its capacity. Gas bubbles grow too large and weaken the surrounding structure. In the oven, rapid expansion causes the fragile walls to rupture, leading to collapse as the loaf can no longer hold its shape.
To avoid over-proofing:
- Monitor ambient temperature—warmer kitchens speed up fermentation.
- Use the refrigerator for slow, controlled proofing (especially for sourdough).
- Stick to recommended proofing times as guidelines, but rely more on visual cues like doubled volume and elasticity.
2. Weak Gluten Development
Without sufficient gluten strength, dough lacks the elasticity needed to trap gas effectively. This is especially common in low-protein flours (like all-purpose without added vital wheat gluten) or under-kneaded doughs. The result? A loaf that puffs up initially but collapses as soon as internal pressure exceeds structural integrity.
For better gluten formation:
- Knead adequately—either by hand (10–15 minutes) or mixer (6–8 minutes on medium).
- Consider using bread flour, which has higher protein content (12–14%) than all-purpose flour.
- Incorporate autolyse: let flour and water rest for 20–30 minutes before adding yeast and salt to enhance gluten development.
3. Excess Moisture in the Dough
High hydration doughs (common in artisan breads) are prized for their open crumb, but they require advanced handling. Too much water compromises dough strength, making it harder to retain shape during proofing and baking. While skilled bakers manage wet doughs with proper shaping and support, beginners often struggle, leading to spreading and central collapse.
| Dough Type | Typical Hydration (%) | Risk Level for Collapse | Recommended For |
|---|---|---|---|
| Sandwich Loaf | 60–65% | Low | Beginners |
| Sourdough Boule | 70–75% | Moderate | Intermediate |
| Wet Artisan Batard | 78–85% | High | Advanced |
If you're experiencing collapse, try reducing hydration by 5% and observe improvements in structure and oven spring.
4. Opening the Oven Too Early
The first 15–20 minutes of baking are critical for oven spring—the final burst of rising caused by expanding gases and steam. Prematurely opening the oven door releases heat and steam, causing the crust to set too quickly and halting expansion. This sudden shift can destabilize the internal structure, resulting in collapse.
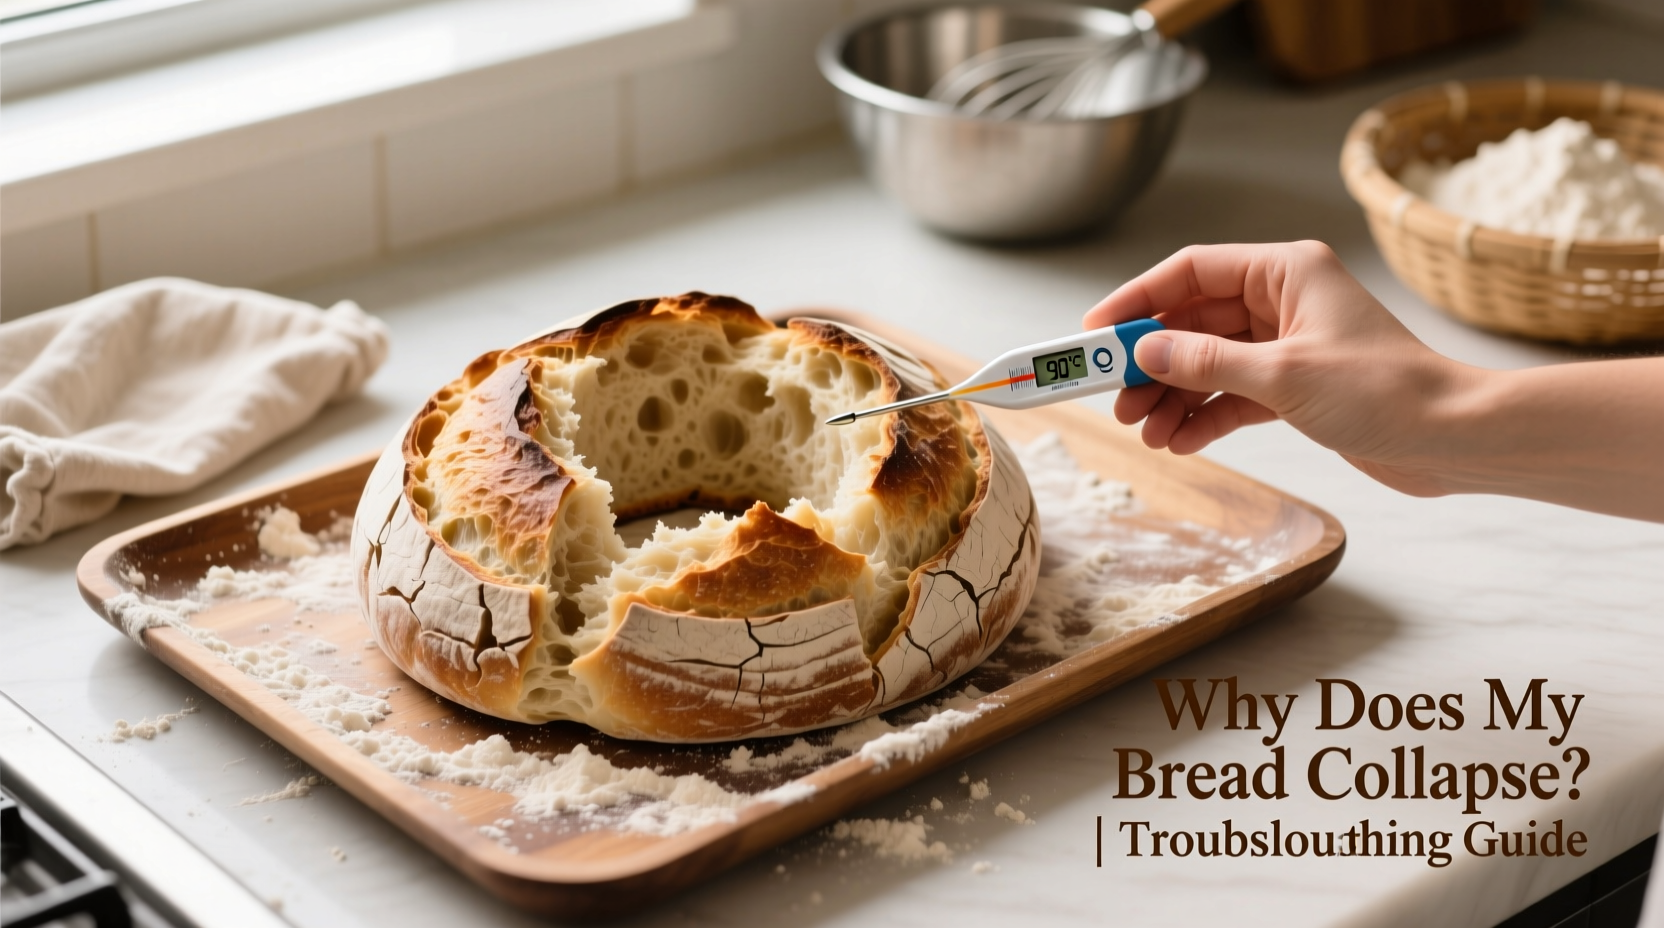
5. Inadequate Baking or Under-Baked Interior
A loaf that isn’t baked long enough may appear done on the outside but remain gummy and unstable inside. As it cools, the moist interior cannot support the structure, leading to sinking. Always verify doneness with a thermometer: most breads should reach an internal temperature of 190–210°F (88–99°C), depending on type.
- Sweet breads: 190°F (88°C)
- Enriched doughs (brioche): 195°F (90°C)
- Lean doughs (baguettes, sourdough): 205–210°F (96–99°C)
Step-by-Step Guide to Prevent Bread Collapse
Follow this systematic approach to minimize collapse risk and improve loaf stability:
- Weigh Ingredients Accurately: Use a kitchen scale for consistency. Volume measurements vary significantly.
- Mix Thoroughly: Knead until the dough passes the windowpane test—stretch a small piece thinly enough to see light through without tearing.
- Control Fermentation: Proof in a draft-free area at 75–78°F (24–26°C). Cold ferment overnight if needed for flavor and control.
- Shape Tightly: Pre-shape and final shape with tension on the surface to create a strong outer skin that supports rise.
- Use Proper Baking Vessels: Bake in a Dutch oven for even heat distribution and steam retention, or use a baking stone with a steam pan.
- Bake Until Fully Done: Don’t rely solely on color. Insert a thermometer into the center of the loaf to confirm internal temperature.
- Cool Gradually: Allow bread to cool completely on a wire rack (at least 1–2 hours) before slicing. Cutting too early releases steam and can cause collapse.
Real Example: Troubleshooting a Sinking Sourdough
Julia, an enthusiastic home baker, had been struggling with her sourdough loaves collapsing after baking. She followed a popular recipe but noticed her dough felt slack and spread during proofing. After two failed attempts, she recorded her process and reviewed each step.
She discovered that her starter was peaking too early due to a warm kitchen (82°F). By moving the starter to a cooler spot and refrigerating the bulk fermentation, she slowed fermentation. She also switched from all-purpose to bread flour and improved her shaping technique to build more surface tension.
On her next bake, the loaf held its shape beautifully in the banneton, rose evenly in the oven, and cooled without sinking. Julia learned that environmental factors and subtle technique changes could make all the difference.
Bread Collapse Checklist: What to Review Next Time
Before dismissing another loaf as a failure, go through this checklist to identify potential issues:
- ✅ Did I use the correct flour type and protein level?
- ✅ Was the dough properly kneaded or mixed for gluten development?
- ✅ Was the dough over-proofed? (Poke test failed, overly soft, or bubbly)
- ✅ Was the oven preheated sufficiently?
- ✅ Did I open the oven door during the first 20 minutes?
- ✅ Was the bread baked long enough? (Check internal temp)
- ✅ Did I cut into the bread too soon after baking?
- ✅ Was the dough too wet for my skill level or environment?
Frequently Asked Questions
Can I save a collapsed loaf?
Yes—while appearance suffers, flavor and safety aren’t compromised. Use collapsed bread for croutons, breadcrumbs, or bread pudding. If the interior is fully baked, it’s still edible and delicious.
Why does my bread rise in the oven but fall as it cools?
This usually indicates under-baking or excessive moisture. The structure appears stable when hot but collapses as steam escapes and the weak crumb settles. Ensure your bread reaches the correct internal temperature before removing it from the oven.
Does altitude affect bread collapse?
Yes. At higher elevations, lower atmospheric pressure causes gases to expand faster, increasing the risk of over-expansion and collapse. Bakers at altitude often reduce yeast by 25%, decrease sugar, increase liquid slightly, and shorten proofing times.
Expert Insight: The Importance of Process Control
“The biggest mistake home bakers make is treating every batch the same. Temperature, humidity, flour freshness—these variables change daily. Success comes from observation and adjustment, not rigid adherence to recipes.” — Chef Marcus Reed, Artisan Baker & Instructor
Professional bakers emphasize adaptability. Your kitchen isn’t a lab, so expect variation. Learning to read dough—how it feels, looks, and responds—is more valuable than memorizing timelines.
Conclusion: Build Confidence Through Consistent Practice
Bread collapse isn’t a dead end—it’s feedback. Each sunken loaf provides clues about your process, ingredients, and environment. By systematically addressing over-proofing, improving gluten strength, managing moisture, and ensuring full baking, you’ll steadily improve your results.
Don’t aim for perfection from the start. Aim for progress. Track your bakes, note changes, and celebrate small wins. With attention to detail and a willingness to learn from mistakes, you’ll develop the intuition that turns inconsistent results into reliable, beautiful loaves.


 浙公网安备
33010002000092号
浙公网安备
33010002000092号 浙B2-20120091-4
Comments
No comments yet. Why don't you start the discussion?