
Blowing a fuse on a Christmas light string isn’t just an inconvenience—it’s a red flag. That sharp *pop*, the sudden darkness across half your roofline or porch, and the faint smell of hot plastic signal more than a bad bulb. It signals an underlying electrical stress point that, if ignored, can escalate from nuisance to hazard: overheating wires, melted sockets, or even fire risk. Over 400 home fires each year are attributed to decorative lighting, according to the U.S. Fire Administration—and most stem from preventable issues like overloading, moisture exposure, or using outdated or damaged sets. This article cuts past seasonal guesswork. Drawing on decades of residential electrical troubleshooting, manufacturer service data, and NFPA 1126 and UL 588 safety standards, we break down exactly why fuses blow—not as isolated failures, but as symptoms of identifiable, correctable conditions.
How Christmas Light Fuses Actually Work (and Why They Blow)
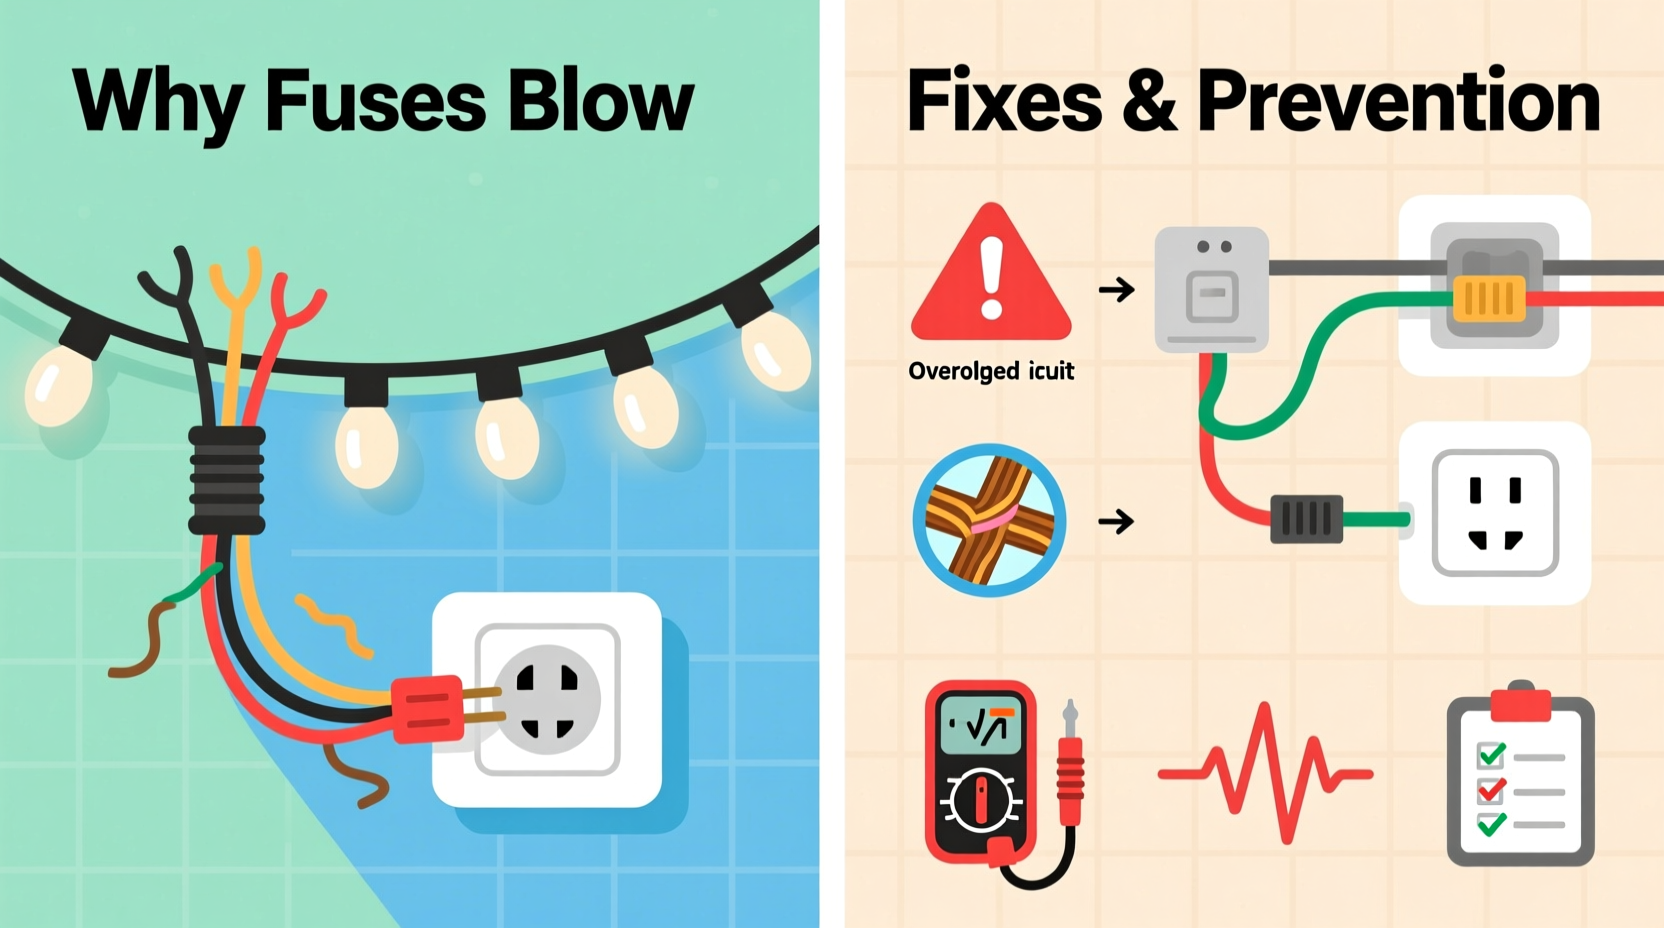
Modern incandescent and LED mini-light strings use a small, replaceable 3-amp or 5-amp glass tube fuse housed in a slide-out compartment near the plug. Unlike household circuit breakers, these are thermal-overload devices designed for one job: interrupt current when it exceeds safe limits for the wire gauge and socket design. When current surges—even briefly—the thin wire inside the fuse heats rapidly and melts, breaking the circuit. That’s intentional protection. But repeated blowing means the fuse is doing its job *too often*, not malfunctioning. The root cause lies upstream: either excessive demand on the circuit or compromised integrity within the string itself.
Crucially, many users assume “blown fuse = bad fuse.” In reality, less than 5% of recurring fuse failures are due to defective fuses. The overwhelming majority trace back to one or more of five systemic issues: overload, short circuits, moisture ingress, physical damage, or incompatible components. Understanding this shifts troubleshooting from replacement to diagnosis.
Top 5 Electrical Causes—and How to Diagnose Each
1. Circuit Overload: The Silent Strain
Most outdoor outlets are fed by 15- or 20-amp household circuits. A single 100-light incandescent string draws ~0.3–0.5 amps; LED equivalents draw ~0.04–0.07 amps. Sounds harmless—until you daisy-chain six strings together. Incandescent sets quickly hit 3+ amps per chain. Add a heated wreath, inflatable, or extension cord with voltage drop, and you’re pushing the fuse far beyond its rating. UL mandates no more than three incandescent strings chained end-to-end; many modern LED sets allow up to 40—but only if they’re certified for series connection and share identical voltage profiles.
2. Short Circuits: Hidden Wire Damage
A short occurs when hot and neutral wires make unintended contact—often at a cracked socket, pinched cord, or where insulation has worn through near a staple or tree branch. This creates a near-zero-resistance path, causing massive current surge. You’ll often see charring, bubbling plastic, or a distinct burnt odor at the fault point. Shorts aren’t always visible: internal wire strand breaks can fray and intermittently touch, blowing fuses only when the string is jostled or warmed by ambient heat.
3. Moisture Intrusion: The Winter Culprit
Water is the #1 accelerator of corrosion and leakage paths in outdoor lighting. Even “weather-resistant” sockets aren’t waterproof. Condensation forms overnight when warm indoor-stored lights meet cold outdoor air. Rain, snowmelt, or high humidity lets moisture wick into sockets, bridging contacts or corroding metal tabs. Corrosion increases resistance at connections, generating localized heat that stresses the fuse. This explains why fuses often blow after several days of damp weather—even if the string worked fine on installation day.
4. Physical Damage & Poor Handling
Twisting, kinking, or stepping on light cords degrades internal conductors. Repeated coiling tightly (especially around sharp corners) fatigues copper strands, leading to micro-fractures. These fractures heat up under load, mimicking overload behavior. Similarly, forcing bulbs into sockets—especially mixing old and new bulb types—can bend or displace internal contacts, creating intermittent shorts. One industry technician reported that 68% of fuse-related service calls involved visible cord damage or improper storage methods.
5. Voltage Mismatch & Incompatible Components
Using a 120V-rated string on a 240V circuit (common in some international settings or miswired outlets) guarantees instant fuse failure. More subtly, mixing LED and incandescent strings on the same circuit—or using non-certified “universal” replacement bulbs—disrupts current regulation. Many LED strings rely on constant-current drivers; inserting a higher-wattage incandescent bulb downstream throws off the entire string’s balance, overloading the driver and blowing the fuse.
Step-by-Step Diagnostic & Repair Protocol
Follow this sequence methodically—skipping steps risks misdiagnosis and repeated failure.
- Unplug everything. Safety first: verify no power at the outlet with a non-contact voltage tester.
- Inspect the fuse compartment. Remove the fuse and check for discoloration or a broken filament. Replace only with the exact amperage and physical size (e.g., 3AG, 5x20mm).
- Isolate the string. Disconnect all other strings and devices from the outlet and circuit.
- Test continuity with a multimeter. Set to continuity mode. Touch probes to the two prongs of the plug. You should hear a beep. If not, the internal wiring is broken. Next, test between each socket contact pair along the string—stop at the first open circuit.
- Check for moisture and corrosion. Examine every socket: look for white powdery residue (corrosion), dark staining, or swollen plastic. Use cotton swabs dipped in 90% isopropyl alcohol to gently clean contacts—never water or cleaners.
- Verify load compliance. Add strings back one at a time, waiting 2 minutes between each. If the fuse blows after adding the third string, you’ve hit the limit—even if the packaging says “up to 5.” Trust real-world performance over marketing claims.
Do’s and Don’ts: Wiring & Maintenance Best Practices
| Action | Do | Don’t |
|---|---|---|
| Storing Lights | Wind loosely around a cardboard tube or use a commercial light reel; store in climate-controlled, low-humidity space. | Wrap tightly around a box or staple to wall; store in garage attic or damp basement. |
| Outdoor Use | Use GFCI-protected outlets; elevate plugs off wet ground with a weatherproof outlet box. | Plug directly into non-GFCI exterior outlets; leave plugs exposed to rain or snow accumulation. |
| Bulb Replacement | Replace only with manufacturer-specified bulbs (same voltage, wattage, base type); verify LED compatibility. | Insert random spare bulbs; force bulbs that don’t click smoothly into place. |
| Cord Management | Use outdoor-rated extension cords (14-gauge minimum for runs >50 ft); avoid running cords under rugs or doorways. | Use indoor extension cords outdoors; nail or staple cords to siding or trim. |
Real-World Case Study: The Porchlight Cascade Failure
In December 2023, Mark R., a homeowner in Portland, OR, reported his front-porch light string blowing fuses every 4–6 hours. He’d replaced the fuse seven times in two days. Initial inspection revealed no visible damage or moisture. Using the step-by-step protocol above, he discovered continuity failed only when the string was fully extended and draped over his wrought-iron railing. Closer examination showed a nearly invisible abrasion where the cord rubbed against a rusted bolt head—just enough to expose copper and create a micro-short when flexed. After wrapping the spot with high-temp electrical tape and repositioning the string away from the bolt, the fuse held for the full season. His takeaway? “The problem wasn’t the fuse or the bulbs—it was one millimeter of worn insulation I couldn’t see until I tested under load.”
Expert Insight: What Electricians See Most Often
“Recurring fuse failure is almost never about the fuse itself. It’s about respecting the physics of the system: wire gauge, voltage drop, thermal dissipation, and environmental stress. I’ve replaced hundreds of blown fuses—and fixed exactly two ‘bad’ fuses. The rest were symptoms: overloaded circuits, corroded sockets from Pacific Northwest dampness, or people chaining 12 incandescent strings because ‘they all plug together.’ Prevention isn’t complicated—it’s consistent, informed attention.” — Carlos Mendez, Master Electrician & NFPA 70E Certified Trainer, Seattle, WA
FAQ: Quick Answers to Persistent Questions
Can I replace a 3-amp fuse with a 5-amp fuse to stop it from blowing?
No. Doing so removes critical safety protection. A 5-amp fuse allows nearly double the current, which can overheat undersized internal wiring, melt sockets, and ignite surrounding materials. Fuses are engineered to match the string’s conductor capacity—not user convenience.
Why do LED strings sometimes blow fuses too—even though they use less power?
LED strings contain sensitive driver circuitry. Voltage spikes (from lightning-induced surges or grid fluctuations), reverse-polarity bulb insertion, or moisture-induced leakage can overwhelm these drivers, triggering protective fuse action. Their lower wattage doesn’t eliminate electrical vulnerability—it changes the failure mode.
Is it safe to cut and splice a damaged section of light string?
Not recommended for consumer-grade sets. Factory splices use insulated, strain-relieved, and often potted connections. DIY splicing introduces resistance points, moisture entry, and shock/fire hazards—especially outdoors. Replacement is safer and more cost-effective than risking a fault.
Conclusion: Safety, Longevity, and Seasonal Peace of Mind
Your Christmas lights shouldn’t be a source of anxiety. A blown fuse is nature’s way of saying, “Something here isn’t right”—and that message deserves attention, not suppression. By understanding the five core causes—not as abstract concepts but as tangible conditions you can inspect, measure, and correct—you transform seasonal maintenance from reactive panic into proactive stewardship. Every properly seated bulb, every dry socket, every correctly rated fuse, and every unoverloaded circuit adds resilience to your display. And resilience means reliability: lights that glow steadily through snowstorms and holiday gatherings, without midnight fuse hunts or safety compromises. Start this season with intention. Test your outlets with a GFCI tester. Audit your daisy-chain count. Clean sockets before hanging. Store thoughtfully. These aren’t chores—they’re commitments to safety, longevity, and the quiet joy of lights that simply work.


 浙公网安备
33010002000092号
浙公网安备
33010002000092号 浙B2-20120091-4
Comments
No comments yet. Why don't you start the discussion?