
Floor squeaks are one of the most common household nuisances—annoying, distracting, and often mistaken for a sign of structural damage. The truth is, while they rarely indicate danger, persistent creaks underfoot can erode comfort and even affect resale value. Squeaky floors usually stem from natural movement in wood components due to settling, humidity changes, or loose connections. The good news? Most can be fixed without replacing flooring or calling in a full renovation crew. Understanding the root cause is half the battle; the other half lies in choosing the right repair method based on your floor type, access level, and skill.
The Science Behind Floor Squeaks
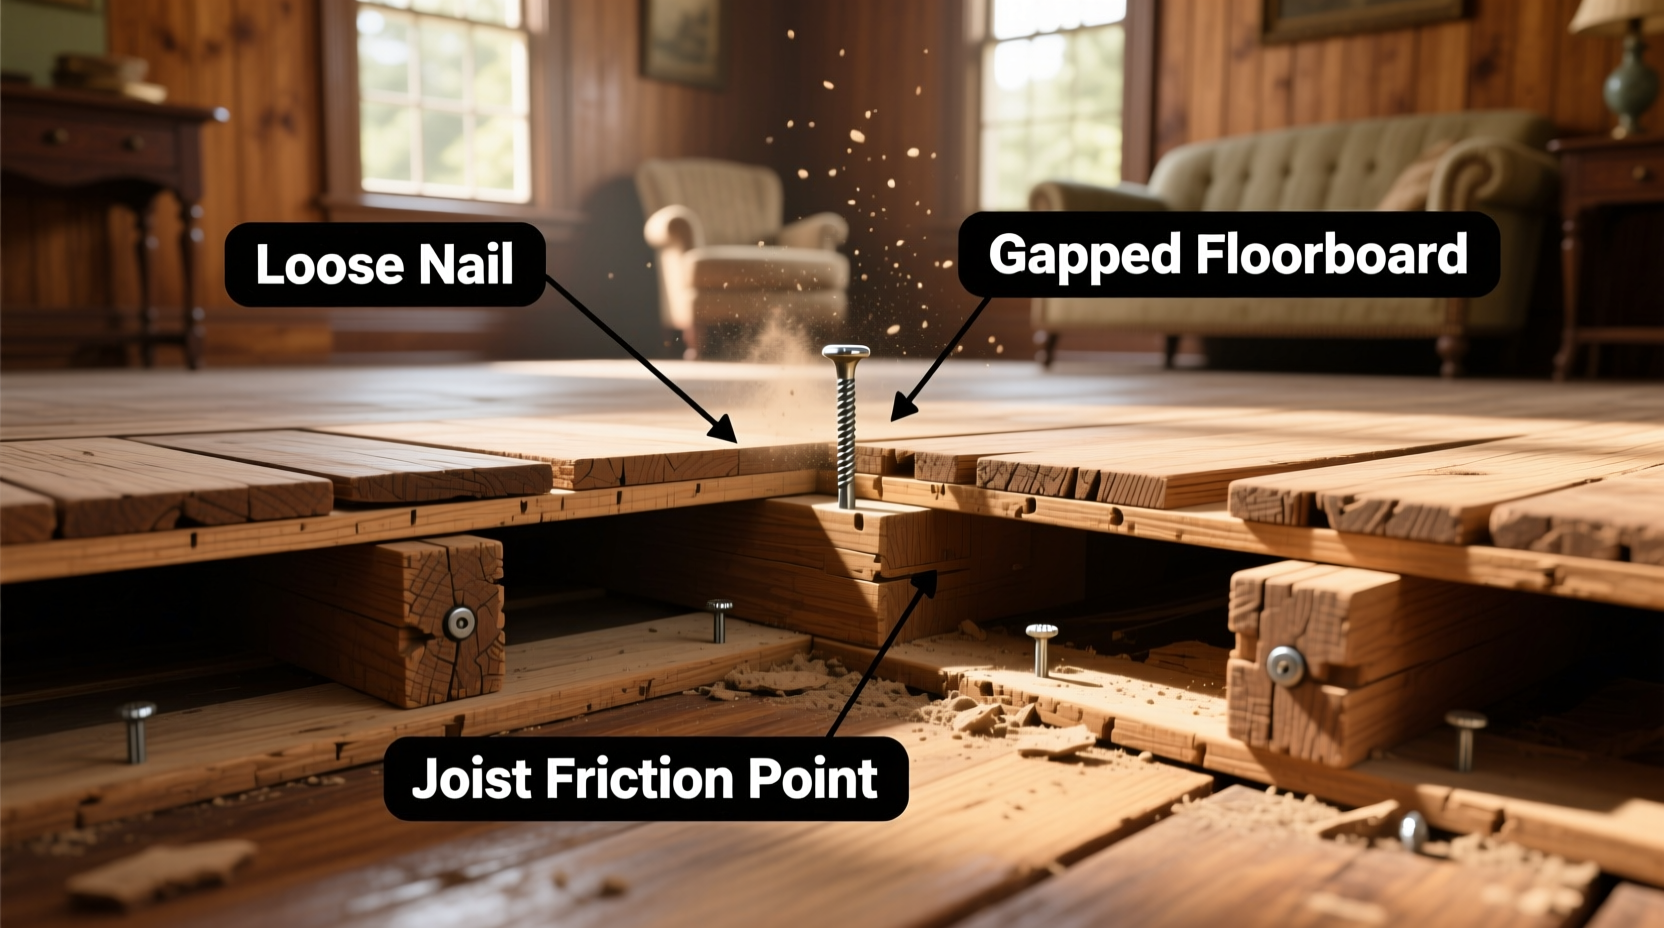
Floors aren’t static. They expand, contract, shift, and settle over time. When wooden subfloors, joists, or finish flooring materials rub against each other due to gaps or loose fasteners, friction creates that familiar high-pitched squeak. This typically happens at the interface between the subfloor and floor joists, where nails have loosened or boards have dried and pulled away slightly.
Temperature and humidity play a significant role. In winter, dry indoor air causes wood to shrink, increasing gaps. In summer, moisture absorption leads to expansion, which may temporarily silence a squeak—only for it to return with seasonal change. This cyclical behavior explains why some squeaks appear and disappear throughout the year.
According to building engineer Dr. Laura Nguyen, “Squeaks are almost always mechanical noise from movement, not structural failure. A 20-year-old home with well-maintained framing but loose subfloor screws will squeak more than a newer house with tighter tolerances.”
“Squeaks are rarely dangerous—but ignoring them can lead to larger issues like damaged subfloors or compromised finishes.” — Dr. Laura Nguyen, Building Systems Engineer
Common Causes of Squeaky Floors
Identifying the source is essential before attempting repairs. Here are the most frequent culprits:
- Loose subfloor-to-joist connections: Over time, nails can work loose, especially if ring-shank or screw alternatives weren’t used during construction.
- Gaps between subfloor panels: Wood shrinks, leaving tiny spaces where edges rub when stepped on.
- Weak or undersized joists: In older homes, joists may flex excessively under load, causing repeated motion and noise.
- Improper fastening during installation: Nails driven at an angle or too close to panel edges can pull out over time.
- Changes in humidity: Seasonal swelling and shrinking stress joints and fasteners.
- Carpet padding or underlayment shifting: Can create false squeaks felt through soft flooring.
Step-by-Step Guide to Silencing Squeaky Floors
Fixing a squeaky floor doesn’t require a contractor in most cases. With the right tools and approach, homeowners can eliminate noise permanently. Below is a comprehensive sequence of actions tailored to different access levels and flooring types.
- Map the squeak locations: Walk across the floor wearing socks to pinpoint exact spots. Mark them with tape or chalk.
- Determine access: Check if you can access the underside (basement, crawlspace, or ceiling below). If yes, repairs are easier and cleaner.
- Choose your repair method: Based on access and flooring, select from options like sistering joists, re-securing subfloor, or using specialized clips.
- Gather tools and materials: Common items include drill, screw gun, 2–3 inch structural screws, shims, construction adhesive, and possibly a floor repair kit.
- Secure loose subfloor sections: From below, drive screws through the subfloor into the joist. Use washers to prevent pull-through.
- Fill gaps with adhesive and shims: Inject construction adhesive into the joint between joist and subfloor, then tap in cedar shims until snug.
- Reinforce weak joists: If deflection is visible, install a “sister” joist alongside the original using adhesive and screws.
- Test and refine: Walk over repaired areas. Repeat steps if needed.
If no access from below, work from above. Use a countersinking bit to drive screws through the finished floor into the joist beneath. Fill holes with matching wood putty and touch up finish. For hardwood, pre-drill to avoid splitting.
Do’s and Don’ts: Best Practices Table
| Do’s | Don’ts |
|---|---|
| Use corrosion-resistant structural screws instead of nails | Use finishing nails—they lack holding power for subfloors |
| Apply construction adhesive between joist and subfloor | Over-tighten screws and crack hardwood or tile |
| Work during moderate humidity (not extreme dry/wet) | Ignore multiple squeaks—they may signal systemic issues |
| Label joist locations from below before drilling from above | Use drywall screws—they are brittle and not load-rated |
| Check for plumbing or wiring before drilling | Assume carpet means no subfloor issue—noise still transfers |
Real-World Example: Fixing a Hallway Squeak in a 1950s Home
Jennifer, a homeowner in Portland, noticed a loud squeak every time she walked down her second-floor hallway. The sound was worst in winter mornings. She had hardwood flooring with no visible damage. Access from below was limited—only partial crawl space under part of the hall.
She started by marking the squeak zone. From the crawl space, she located the corresponding joist and found a 1/8-inch gap between the subfloor and the joist. Using a caulking gun, she injected polyurethane construction adhesive into the gap, then gently tapped a cedar shim coated with adhesive into place. She secured the subfloor with two 3-inch structural screws driven upward into the subfloor.
After sealing the access hatch, she tested the floor. The squeak was gone. Six months later, during a humid spell, there was no recurrence. Her total cost: $22 in materials and two hours of effort.
Alternative Repair Methods and Tools
Not every homeowner has basement access or wants to drill through finished floors. Fortunately, several specialized products offer minimally invasive solutions:
- SqueakNoMore Kit: A guided tool that allows you to drive a screw from above directly into a joist, even without prior knowledge of joist location. It uses a bit that breaks off flush once the screw seats.
- Breakaway screws: Designed to snap at the surface of hardwood, eliminating need for countersinking.
- Joist clips (like Strong-Drive SDWS): Metal connectors installed from below that secure subfloor to joist without direct screwing through flooring.
- Injection adhesives: Low-viscosity formulas designed to wick into tight gaps when injected with a needle nozzle.
For engineered or laminate floors, avoid permanent screwing. Instead, focus on stabilizing from below or using approved underlayment tapes and edge adhesives recommended by manufacturers.
Preventive Maintenance Checklist
To minimize future squeaks, follow this proactive checklist annually:
- Monitor indoor humidity—keep between 35% and 55% using a hygrometer.
- Inspect crawl spaces for signs of moisture, sagging joists, or pest activity.
- Tighten any loose trim or baseboards that might vibrate sympathetically.
- Walk through main traffic areas monthly to catch new squeaks early.
- Ensure HVAC vents aren’t blowing directly onto exposed floor edges, accelerating drying.
- Recheck subfloor fasteners in older homes every 5–7 years, especially after major renovations.
Frequently Asked Questions
Can squeaky floors be a sign of serious structural damage?
Almost never. Squeaks are typically caused by friction from loose fasteners or movement in wood layers. However, if accompanied by sagging, cracking drywall, or uneven floors, consult a structural engineer.
Is it safe to fix a squeaky floor myself?
Yes, for most repairs. Just ensure you’re not drilling into electrical wires or plumbing lines. Use a stud finder with AC detection and shut off power if working near outlets.
Will carpet hide the squeak permanently?
No. Carpet and padding may dampen the sound temporarily, but the underlying movement remains. Over time, the wear can damage carpet backing or padding. Fix the source, not the symptom.
Conclusion: Silence Starts Today
A quiet floor is more than just peaceful—it reflects care, attention to detail, and a well-maintained home. Squeaks don’t fix themselves, and patching over them with rugs won’t solve the mechanical issue beneath. Whether you choose to reinforce from below, use precision tools from above, or call in a specialist for complex cases, the solution lies in understanding movement and securing what’s loose.
You don’t need decades of carpentry experience to make a difference. With basic tools, a little patience, and the right technique, most squeaks can be silenced in an afternoon. Take action now—walk across your floor in silence tomorrow.


 浙公网安备
33010002000092号
浙公网安备
33010002000092号 浙B2-20120091-4
Comments
No comments yet. Why don't you start the discussion?