
The iodine-starch test is one of the most recognizable chemical tests taught in school laboratories and applied in real-world settings—from food analysis to forensic science. Its striking visual change from a pale yellow-brown to deep blue-black makes it both simple and effective. But why exactly does iodine act as an indicator for starch? The answer lies in the unique chemistry between iodine molecules and the helical structure of starch. This article breaks down the science behind this classic reaction, explores its practical uses, and explains what makes iodine uniquely suited for detecting starch.
The Chemistry Behind the Color Change
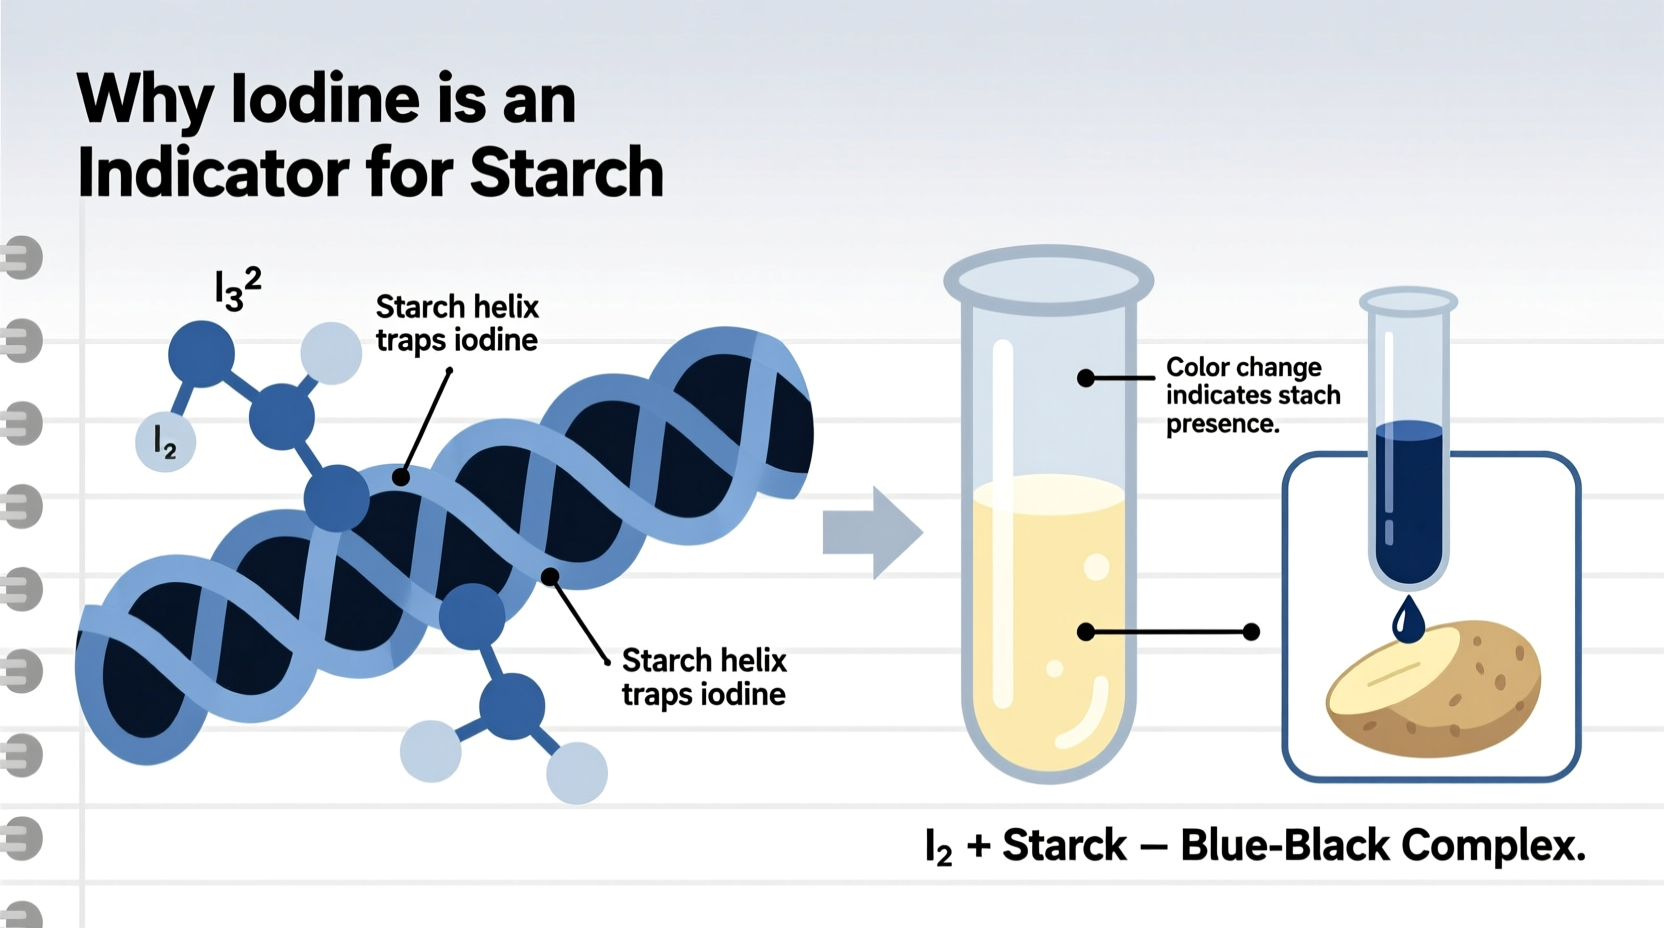
At the heart of the iodine-starch test is a physical interaction rather than a chemical reaction. When iodine (I₂) is dissolved in water—often with potassium iodide (KI) to improve solubility—it forms a triiodide ion (I₃⁻), which is responsible for the characteristic yellow to brown color of the solution. When this solution comes into contact with starch, a dramatic color shift occurs: it turns deep blue or black.
This transformation happens because of the molecular architecture of starch. Starch consists mainly of two polysaccharides: amylose and amylopectin. Amylose, which makes up about 20–30% of most starches, has a linear, helical structure. The interior of this helix is hydrophobic and just wide enough to accommodate iodine molecules. As triiodide ions enter the helical coil, they form a charge-transfer complex with the glucose units lining the interior. This complex alters the energy levels of the electrons involved, causing the molecule to absorb light differently—specifically in the visible spectrum—which results in the intense blue-black color.
Amylopectin, on the other hand, is highly branched and lacks the long, continuous helices needed to stabilize the iodine complex. Therefore, it contributes less to the color intensity. The more amylose a starch contains, the darker the blue observed in the test.
“Starch acts like a molecular cage for iodine. It’s not a bond in the traditional sense, but a snug fit that changes how light interacts with the system.” — Dr. Helen Ramirez, Biochemistry Researcher, University of Edinburgh
Why Iodine Is the Ideal Indicator
Not all elements or compounds can serve as indicators for starch. Iodine is uniquely effective due to several key properties:
- Molecular size and shape compatibility: Iodine molecules are small enough to slip into the amylose helix but large enough to interact significantly with the glucose chains.
- Reversible binding: The interaction is non-covalent and reversible. Heating the solution disrupts the helix, causing the color to fade; cooling restores it, demonstrating the physical nature of the complex.
- High sensitivity: Even trace amounts of starch can produce a visible color change, making the test useful for qualitative detection.
- Low interference: Few other biological molecules react with iodine in the same way, reducing false positives.
Step-by-Step Guide: Performing the Iodine-Starch Test
Conducting the iodine-starch test is straightforward and requires minimal equipment. Follow this procedure for accurate results:
- Prepare the iodine solution: Use Lugol’s iodine (2–5% iodine with potassium iodide in water) or make a dilute solution by dissolving a few crystals of iodine in potassium iodide solution.
- Obtain the sample: This could be a liquid food extract, plant tissue, or a solution suspected of containing starch.
- Apply the reagent: Add 1–2 drops of iodine solution directly to the sample. For solids, place the drop on a cut surface or mix with water first.
- Observe the color change: Wait 30 seconds. A blue-black color indicates the presence of starch. Yellow, brown, or red hues suggest no starch or modified starch forms.
- Record and interpret: Note the intensity of the color, which correlates roughly with starch concentration.
Applications Across Industries
The iodine-starch test extends beyond classroom demonstrations. It plays a functional role in multiple fields:
| Industry | Application | Example |
|---|---|---|
| Food Science | Detecting starch in processed foods | Verifying if a “starch-free” sauce contains hidden thickeners |
| Botany | Photosynthesis experiments | Testing leaves for starch after light/dark exposure to prove glucose production |
| Forensics | Identifying unknown powders | Distinguishing flour from illicit substances at crime scenes |
| Education | Teaching biomolecules | Students testing fruits, vegetables, and cereals for carbohydrate content |
Mini Case Study: Testing Banana Ripeness
In a high school biology lab, students investigated how starch content changes as bananas ripen. Green bananas were found to turn deep blue when exposed to iodine, confirming high starch levels. In contrast, fully yellow or spotted bananas showed little to no color change, indicating that enzymes had converted starch into sugars during ripening. This real-world application demonstrates how the iodine test provides insight into biochemical processes in everyday foods.
Common Misconceptions and Limitations
While powerful, the iodine-starch test has limitations that are often overlooked:
- Does not detect all carbohydrates: Sugars like glucose, fructose, and sucrose do not react with iodine. Only polysaccharides with helical structures (like amylose) give a positive result.
- Temperature sensitivity: Heating disrupts the helix, so a negative test on a heated sample doesn’t mean starch was absent initially.
- Modified starches may not react: Industrial processing (e.g., oxidation, etherification) can alter starch structure, reducing or eliminating the blue response.
- False negatives in acidic environments: Low pH can break down starch or inhibit complex formation.
“The iodine test is elegant in its simplicity, but it’s not foolproof. Always consider context—sample preparation, pH, and temperature—when interpreting results.” — Prof. Alan Zhou, Analytical Chemistry, MIT
Checklist: Best Practices for Accurate Testing
To ensure reliable outcomes when using the iodine-starch test, follow this checklist:
- ✔ Use fresh iodine solution—old solutions lose potency.
- ✔ Test at room temperature unless studying thermal effects.
- ✔ Include a control sample (known starch) for comparison.
- ✔ Avoid contamination—use clean droppers and containers.
- ✔ Neutralize highly acidic samples before testing.
- ✔ Observe results within one minute—prolonged exposure may lead to evaporation or degradation.
Frequently Asked Questions
Can the iodine-starch test quantify starch?
No, the test is primarily qualitative. While darker shades suggest higher starch content, precise measurement requires techniques like spectrophotometry or enzymatic assays.
Is the iodine-starch reaction permanent?
No. The complex is stable at room temperature but breaks down upon heating. Cooling may restore the color if the starch structure remains intact. This reversibility confirms the physical, not chemical, nature of the interaction.
Are there alternatives to iodine for starch detection?
Iodine remains the gold standard due to its specificity and visual clarity. Some fluorescent dyes and enzyme-based kits exist for specialized labs, but they are costlier and less accessible.
Conclusion
The reason iodine serves as the go-to indicator in the starch test lies in a perfect alignment of molecular structure and optical behavior. Its ability to nestle inside the amylose helix and create a vivid color shift makes it unmatched for quick, reliable starch detection. From educational labs to quality control in food manufacturing, this simple yet profound interaction continues to provide valuable insights. Understanding not just *how* it works, but *why*, empowers better experimentation and interpretation.


 浙公网安备
33010002000092号
浙公网安备
33010002000092号 浙B2-20120091-4
Comments
No comments yet. Why don't you start the discussion?